
Start your mornings off right with my Make-ahead Breakfast Zucchini and Cheese Scones! These easy scones pack in flavor and nutrition, making them perfect for busy days. With just a few simple steps, you can whip up a batch that you can enjoy all week long. I’ll guide you through the ingredients, instructions, and tips to make these scones a hit at your breakfast table. Let’s get baking!
Why I Love This Recipe
- Fresh Flavor Burst: The combination of zesty lemon juice and fresh zucchini brings a vibrant flavor that elevates these scones to a whole new level.
- Cheesy Goodness: Sharp cheddar cheese adds a delightful richness, making every bite a cheesy treat that pairs perfectly with the tender scone texture.
- Easy to Make: This recipe is straightforward and perfect for bakers of all levels, allowing you to whip up a batch of scones in no time.
- Versatile Snack: These scones can be enjoyed warm as a snack or light meal, and they also make a great addition to brunch spreads!
Ingredients
Essential Ingredients for Zucchini and Cheese Scones
To make the best zucchini and cheese scones, you need these key ingredients:
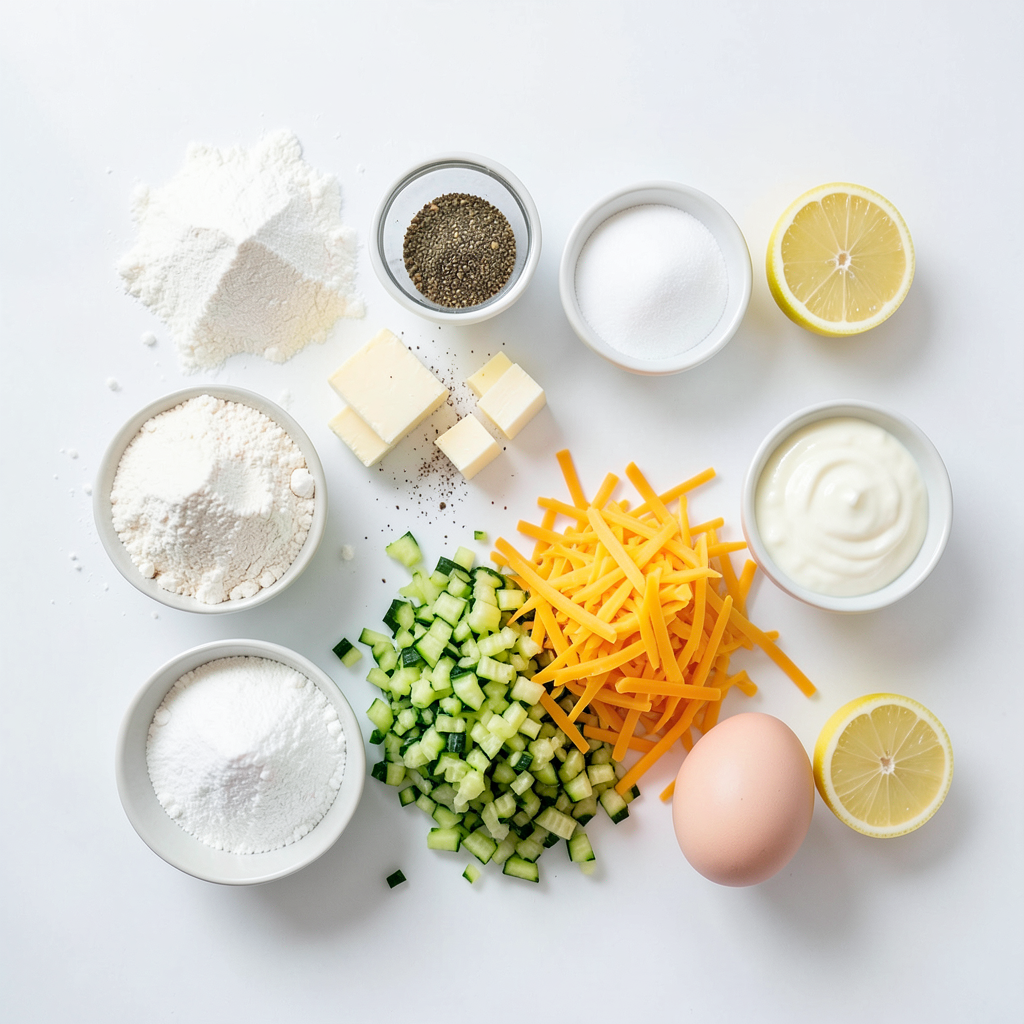
- 2 cups all-purpose flour
- 1 tablespoon baking powder
- 1/2 teaspoon baking soda
- 1 teaspoon salt
- 1/2 teaspoon freshly ground black pepper
- 1 teaspoon dried oregano
- 1/2 cup unsalted butter, chilled and cut into small cubes
- 1 cup grated zucchini, thoroughly squeezed to remove excess moisture
- 1 cup shredded sharp cheddar cheese
- 1/3 cup plain Greek yogurt
- 2 large eggs
- 1 tablespoon fresh lemon juice
These ingredients come together to create a soft and savory scone. The sharp cheddar adds richness while the zucchini keeps things moist.
Optional Ingredients for Additional Flavor
You can add some optional ingredients for extra flavor:
- Fresh herbs like chives or parsley
- Crushed red pepper flakes for a kick
- Different cheeses like feta or mozzarella
These extras can make your scones unique. Feel free to experiment and find what you like best!
Ingredient Substitutions
Don't have something on hand? Here are some easy swaps:
- Use whole wheat flour for a nuttier flavor.
- Swap Greek yogurt with sour cream for a tangy taste.
- Replace cheddar cheese with your favorite type, like gouda or Monterey Jack.
These substitutions keep the spirit of the scone while allowing for personal tastes. You can still enjoy delicious, fluffy scones even if you don’t have every ingredient!
Step-by-Step Instructions
Preparation Steps for Making Scones
To start, preheat your oven to 400°F (200°C). This temperature helps the scones rise nicely. Line a baking sheet with parchment paper. This step stops the scones from sticking.
In a large bowl, mix 2 cups of all-purpose flour, 1 tablespoon of baking powder, 1/2 teaspoon of baking soda, 1 teaspoon of salt, 1/2 teaspoon of black pepper, and 1 teaspoon of dried oregano. Whisk these well.
Next, take 1/2 cup of chilled unsalted butter, cut into small cubes. Add it to the flour mix. With a pastry cutter or your fingers, blend until it looks like coarse crumbs. This gives the scones a nice, flaky texture.
Now, add 1 cup of grated zucchini and 1 cup of shredded sharp cheddar cheese. Fold them into the dry mix to spread the flavors evenly.
In another bowl, whisk together 1/3 cup of plain Greek yogurt, 2 large eggs, and 1 tablespoon of fresh lemon juice. This adds moisture and a bright taste to the scones.
Pour the wet mix into the dry mix. Fold gently with a spatula. Don’t overmix; stop when just combined. Lightly flour a clean surface and turn out the dough. Knead it a couple of times so it sticks together.
Pat the dough into a round disc, about 1 inch thick. Use a sharp knife to cut it into 8 wedges. Place each on the baking sheet, leaving space between them.
Baking Instructions for Perfect Texture
Put the baking sheet in the preheated oven. Bake for 20-25 minutes. Look for a golden brown color. This means the scones are ready.
Keep an eye on them towards the end. Ovens can vary, and you want to catch them at their best.
Tips for Cooling and Serving
After baking, let the scones cool on the sheet for a few minutes. Then, move them to a wire rack to cool completely.
Serve the scones warm. They taste great with herb-infused butter or your favorite spread.
You can make them ahead of time. Store in an airtight container. Before serving, reheat in the oven for a few minutes. This brings back that fresh-baked feel.
Tips & Tricks
How to Achieve the Best Texture
To get the best texture for your scones, focus on your butter. Use cold butter and cut it into small cubes. This helps create flaky layers. When mixing the butter into the flour, stop when it looks like coarse crumbs. Overmixing makes scones tough, so mix gently. Also, make sure to squeeze the zucchini well. Removing excess moisture helps keep your scones from becoming soggy.
Common Mistakes to Avoid
One common mistake is not measuring your flour correctly. Use the spoon-and-level method to avoid adding too much. Another mistake is overmixing the dough. Remember, mix just until combined. Lastly, don't skip preheating your oven. Baking in a hot oven helps the scones rise well.
Serving Suggestions for Breakfast Pairings
These scones are great on their own but can be even better with some extras. Serve them warm with herb-infused butter for added flavor. You can also pair them with eggs or a fresh salad. A dollop of yogurt or a spread of cream cheese adds a nice touch. Enjoy with a cup of tea or coffee for a perfect breakfast!
Pro Tips
- Use Fresh Zucchini: Opt for fresh, firm zucchini to ensure maximum flavor and moisture. Avoid using oversized zucchini, as they tend to be more watery.
- Chill Your Butter: Ensure your butter is properly chilled before incorporating it into the flour mixture. This helps create flaky layers in your scones.
- Don’t Overmix: When combining wet and dry ingredients, mix just until moistened. Overmixing can lead to tough scones.
- Reheat for Freshness: To revive leftover scones, reheat them in a preheated oven for a few minutes before serving. This restores their warmth and texture.
Variations
Adding Different Cheeses for Custom Flavor
You can switch up the cheese to fit your taste. Instead of sharp cheddar, try mozzarella for a milder taste. Feta adds a tangy kick, while Gruyère brings a nutty flavor. Mixing cheeses can create a fun taste experience. Just remember to keep the total amount the same for the best results.
Alternative Herbs and Spices
Herbs and spices can change the flavor of your scones. You can use fresh herbs like chives or parsley for a bright taste. Dried thyme or basil also works well. If you like heat, try adding a pinch of red pepper flakes. Just be careful not to overpower the zucchini and cheese.
Gluten-Free and Dairy-Free Options
To make gluten-free scones, replace all-purpose flour with a gluten-free blend. Look for one that has xanthan gum for structure. For dairy-free options, use vegan butter and dairy-free yogurt. Nutritional yeast can replace cheese for added flavor without dairy. These swaps let everyone enjoy the scones, no matter their diet.
Storage Info
How to Properly Store Scones
To keep your zucchini and cheese scones fresh, store them in an airtight container. Line the container with parchment paper to absorb moisture. This helps maintain their texture and keeps them tasty. Place the lid tightly on the container. Store at room temperature if you plan to eat them within two days. For longer storage, the fridge is a better option. Just remember to wrap them tightly in plastic wrap before placing them in the fridge.
Freezing Instructions for Long-Term Storage
Freezing is a great way to keep scones for later. First, cool the scones completely after baking. Once cool, wrap each scone in plastic wrap. Place the wrapped scones in a freezer-safe bag or container. Label the bag with the date and type of scone. You can freeze them for up to three months. When you’re ready to enjoy, simply take out as many scones as you need.
Reheating Tips for Best Results
To reheat your scones, preheat your oven to 350°F (175°C). Unwrap the scones and place them on a baking sheet. Heat them for about 10-15 minutes. This will help them regain their crispiness. If you are in a hurry, you can microwave them for about 20-30 seconds. However, the oven method gives the best taste and texture. Enjoy them warm, just like fresh out of the oven!
FAQs
How do I make scones fluffier?
To make scones fluffier, focus on your ingredients and mixing method. Use cold butter to create a light texture. Cut it into the flour until it looks like coarse crumbs. Do not overmix the batter; just combine until moistened. This keeps the air in, which helps the scones rise. Baking powder and baking soda also help. They create air pockets when heated, making your scones light and fluffy.
Can I make the dough in advance?
Yes, you can make the dough in advance. After mixing the dough, wrap it tightly in plastic wrap. Store it in the fridge for up to 24 hours. When ready to bake, take it out and let it warm for a few minutes. Then shape it into wedges and bake as directed. This saves time in the morning and gives you fresh scones.
What can I pair with zucchini and cheese scones?
Zucchini and cheese scones pair well with many things. Serve them warm with herb-infused butter for a tasty treat. You can also add cream cheese or your favorite spread. A side of fresh fruit, like berries or melon, adds a nice touch. For drinks, try coffee or tea. These pairings enhance your breakfast experience and make it more enjoyable.
In this article, we explored the ingredients, steps, tips, and variations for making zucchini and cheese scones. We covered essential and optional ingredients, along with substitutions for your needs. You learned step-by-step instructions for preparation and baking, plus some helpful cooling tips. Remember to avoid common mistakes to achieve the best texture.
Try different cheeses or herbs to make these scones your own. With proper storage and reheating, you can always enjoy them fresh. Now, you have all you need to bake delicious scones any time you want!