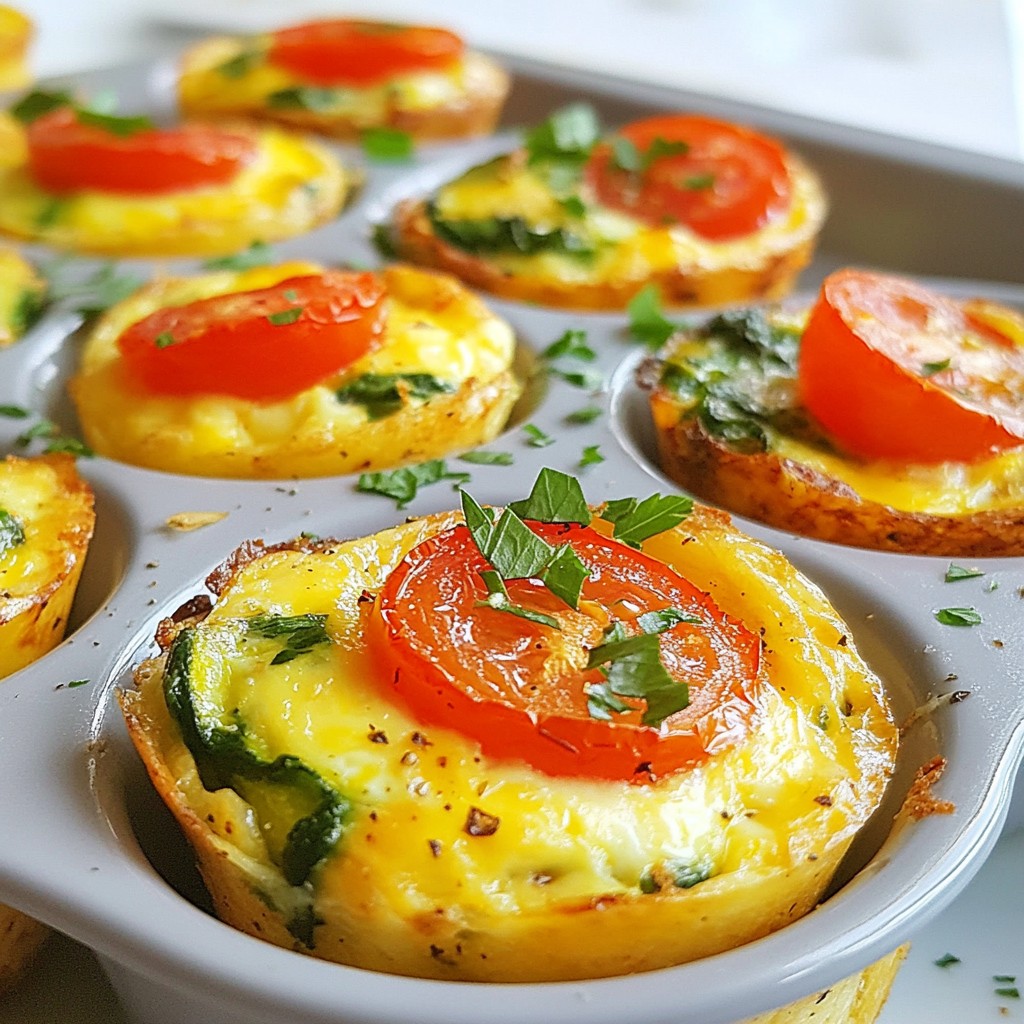
Start your day right with my easy recipe for make-ahead breakfast veggie quiche cups! These delightful mini quiches are not only quick to prepare but also packed with flavor and nutrients. Whether you’re a busy parent or just love a good breakfast, you'll appreciate the convenience of making these ahead of time. Join me as I guide you through the simple steps and share tips for customizing your perfect quiche cups. Let’s dive in!
Why I Love This Recipe
- Make-Ahead Convenience: These quiche cups are perfect for meal prep, allowing you to enjoy a nutritious breakfast or snack throughout the week.
- Versatile Ingredients: You can customize the vegetables and cheese based on what you have on hand or your personal preferences, making this recipe endlessly adaptable.
- Deliciously Savory: Each bite is packed with flavor from the fresh ingredients, making these quiche cups a tasty treat for any meal of the day.
- Easy to Serve: These individual portions are perfect for gatherings or brunches, allowing guests to grab and enjoy without any fuss.
Ingredients
List of Essential Ingredients
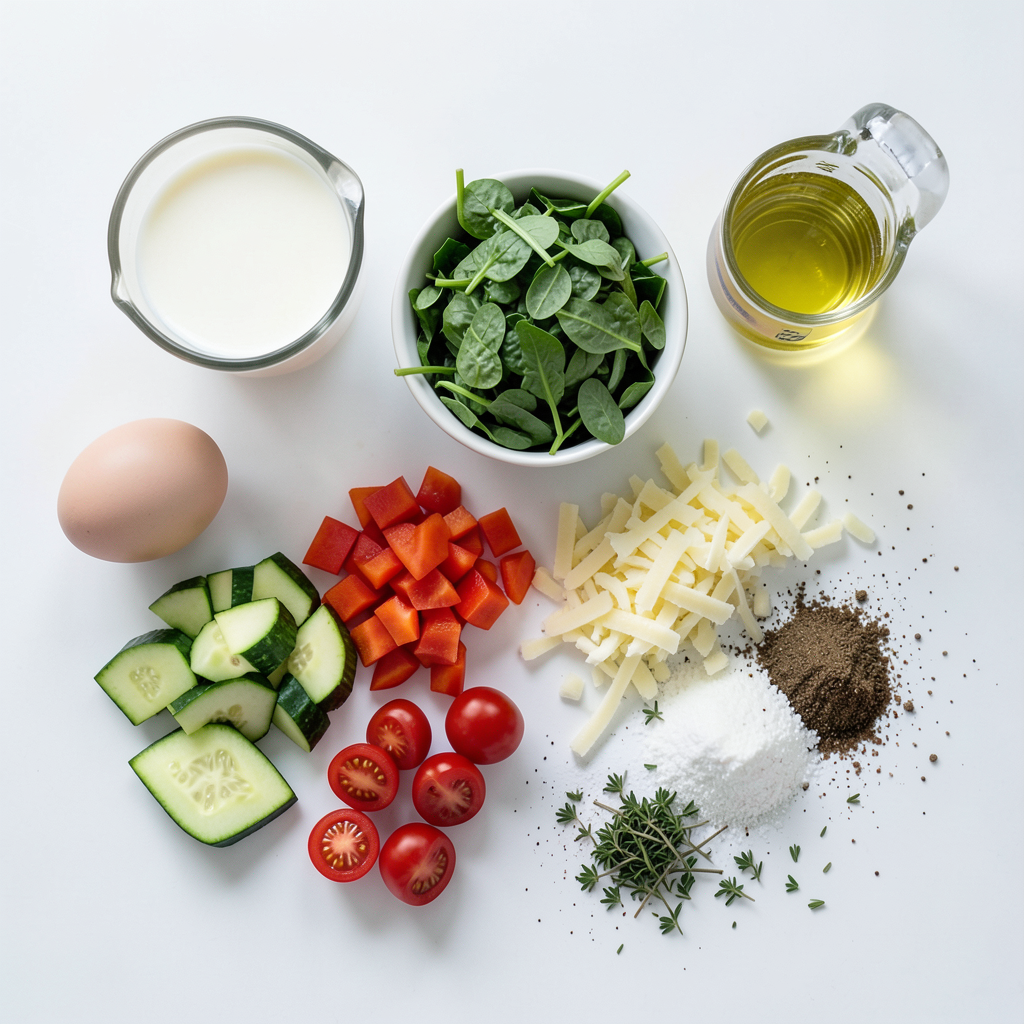
To make tasty veggie quiche cups, gather these key items:
- 6 large eggs
- 1 cup milk (dairy or non-dairy)
- 1 cup fresh spinach, chopped
- 1 red bell pepper, diced
- 1 small zucchini, grated
- 1/2 cup cherry tomatoes, halved
- 1/2 cup shredded cheese (like cheddar or feta)
- 1 teaspoon garlic powder
- 1/2 teaspoon salt
- 1/4 teaspoon black pepper
- 1 teaspoon olive oil (for greasing)
Cheese Options for Quiche Cups
You can choose from many types of cheese for your quiche cups. Cheddar adds a rich flavor. Feta gives a nice tang. Mozzarella brings a creamy touch. Use your favorite cheese or mix a few for fun. Each cheese brings a unique taste to your dish.
Vegetables Suggested for Variety
Feel free to mix up the veggies in your quiche cups. Some great choices include:
- Broccoli florets for a crunchy bite
- Mushrooms for an earthy flavor
- Carrots for a touch of sweetness
- Kale for added nutrients
You can get creative and use what you have on hand. This keeps your breakfast exciting!
Step-by-Step Instructions
Preparation Steps Overview
First, gather all your ingredients. You need six large eggs, milk, spinach, red pepper, zucchini, cherry tomatoes, cheese, garlic powder, salt, and pepper. Preheat your oven to 375°F (190°C). This step is key for a good rise. In a big bowl, whisk the eggs with milk, garlic powder, salt, and black pepper. Make sure it is smooth. Next, fold in the chopped spinach, diced red pepper, grated zucchini, halved tomatoes, and shredded cheese. Stir gently until everything is mixed well.
Tips for Whisking Eggs Properly
Whisking eggs takes a bit of practice. Start with large eggs at room temperature. This helps them mix better. Use a whisk or a fork. Mix until the yolks and whites blend fully. Aim for a smooth texture. This step adds air, making the quiche light. If you want fluffier cups, whisk a bit longer.
Baking Time and Temperature Guidelines
Once your mixture is ready, lightly grease a muffin tin with olive oil. Pour the egg mix into each cup, filling them about 3/4 full. This gives them space to rise. Place the muffin tin in the preheated oven. Bake for 20 to 25 minutes. The quiche cups should feel firm and look golden. After baking, let them cool for a few minutes. Use a knife to loosen the edges. Flip them out onto a cooling rack. If you plan to store them, cool completely before placing them in an airtight container.
Tips & Tricks
Storing Make-Ahead Quiche Cups
To keep your quiche cups fresh, let them cool completely. Place them in an airtight container. You can store them in the fridge for up to five days. If you want to keep them longer, freeze them. Just make sure to wrap each cup tightly in plastic wrap.
Reheating Instructions for Best Results
When you're ready to eat, simply reheat the quiche cups. Use the oven for the best texture. Preheat your oven to 350°F (175°C). Place the quiche cups on a baking sheet and heat for about 10-15 minutes. You can also use a microwave for quick reheating. Heat them for 30 seconds, then check if they're warm. Repeat if needed.
How to Customize Your Quiche Cups
You can make these quiche cups your own! Try adding different veggies like mushrooms or kale. Want some spice? Add chopped jalapeños or red pepper flakes. You can also swap the cheese for something new, like goat cheese or mozzarella. Let your taste guide you!
Pro Tips
- Use Fresh Ingredients: Opt for fresh vegetables and herbs to enhance the flavor and nutritional value of your quiche cups. Fresh produce offers a vibrant taste and texture that frozen alternatives can't match.
- Experiment with Cheese: Don't hesitate to mix different types of cheese! Combining cheeses like cheddar, feta, and mozzarella can create a unique flavor profile that elevates your quiche cups.
- Customize Your Fillings: Feel free to swap in your favorite vegetables or leftovers. Ingredients like mushrooms, broccoli, or even cooked meats can add variety and make the recipe your own.
- Perfect Storage: For optimal freshness, store your quiche cups in an airtight container in the refrigerator. They can also be frozen for longer storage; just reheat before serving.
Variations
Meat Add-Ins for Protein Boost
You can add meat for extra protein. Cooked bacon, ham, or sausage work great. Simply chop your choice into small pieces. Fold the meat into the egg mixture before pouring it into the muffin tin. This will give your quiche cups a savory kick and keep you full longer.
Dairy-Free Options for Quiche Cups
To make these cups dairy-free, swap the milk and cheese. Use almond, soy, or oat milk instead. For cheese, try dairy-free options made from nuts or soy. These swaps keep the flavor rich while meeting dietary needs. You won’t lose taste; the veggies still shine through.
Spice and Herb Variations
Herbs and spices add fun twists to your quiche cups. Try adding dried oregano or thyme to the egg mix. Fresh herbs like basil or cilantro can brighten the flavor. If you like a kick, add a pinch of red pepper flakes. Experiment with flavors to find your favorite blend.
Storage Info
Best Storage Practices for Freshness
To keep your veggie quiche cups fresh, let them cool completely. This step stops moisture build-up. Once cool, place them in an airtight container. Store the container in the fridge. They stay fresh for up to four days. Make sure to label the container with the date. This helps you track their freshness.
Freezing Quiche Cups for Longer Storage
You can freeze quiche cups for longer storage. To do this, first, cool them to room temperature. Then, wrap each cup in plastic wrap. After wrapping, place them in a freezer-safe bag. Remove as much air as possible. They can last up to three months in the freezer. When you are ready to eat, thaw them in the fridge overnight before reheating.
Ideal Containers for Storing Quiche Cups
Choose airtight containers or freezer bags for storage. Glass containers work well and help keep the cups fresh. If using plastic, make sure it's BPA-free. Muffin trays are great for freezing, but remember to wrap them after. Be sure to use containers that fit in your fridge or freezer. A good fit saves space and keeps your kitchen tidy.
FAQs
Can I make these quiche cups gluten-free?
Yes, you can easily make these quiche cups gluten-free. The main ingredients, like eggs and veggies, are gluten-free. Just be sure to use gluten-free cheese or any other gluten-free products you choose. This way, everyone can enjoy these tasty bites!
What vegetables work best in quiche cups?
Many veggies can shine in your quiche cups. I suggest using fresh spinach, bell peppers, zucchini, and cherry tomatoes. You can also add mushrooms, broccoli, or onions for more flavor. The key is to chop them finely so they mix well with the eggs. Feel free to get creative with your favorites!
How long can I store quiche cups in the fridge?
You can store quiche cups in the fridge for up to five days. Make sure to keep them in an airtight container to stay fresh. This makes them great for meal prep! Just reheat them in the microwave or oven for a quick breakfast. Enjoy them warm for the best taste!
You now have all the knowledge to create delicious quiche cups. We covered key ingredients, cheese choices, and great veggies. I shared easy steps for preparing and baking, plus tips for storage. You can customize your cups with meats, dairy-free options, or herbs. Remember to freeze leftover quiche cups for later. Whether it’s a brunch or a snack, these little dishes are a hit. Make your own quiche cups and enjoy the flavors you love!