Welcome to your guide for making the perfect Vanilla Bean Crème Brûlée! This classic dessert is a sweet treat you’ll love. In this post, I’ll share the ingredients you need, step-by-step instructions, and handy tips to avoid mistakes. You'll learn how to achieve that perfect crunchy top and explore fun variations. So grab your kitchen tools and let’s create a delightful dessert that will impress everyone!
Why I Love This Recipe
- Decadent Flavor: This crème brûlée is a classic dessert that combines the richness of cream with the aromatic essence of vanilla, creating an indulgent treat that delights the senses.
- Elegant Presentation: The beautiful caramelized sugar crust adds a stunning visual appeal, making it perfect for special occasions or dinner parties.
- Customizable: While vanilla bean is a favorite, you can easily experiment with different flavors like chocolate, coffee, or citrus to make it your own.
- Impressive Yet Simple: With a bit of patience, you can master this dessert that looks and tastes gourmet, impressing your guests without excessive effort.
Ingredients
Complete List of Ingredients
To make a rich Vanilla Bean Crème Brûlée, gather these simple items:
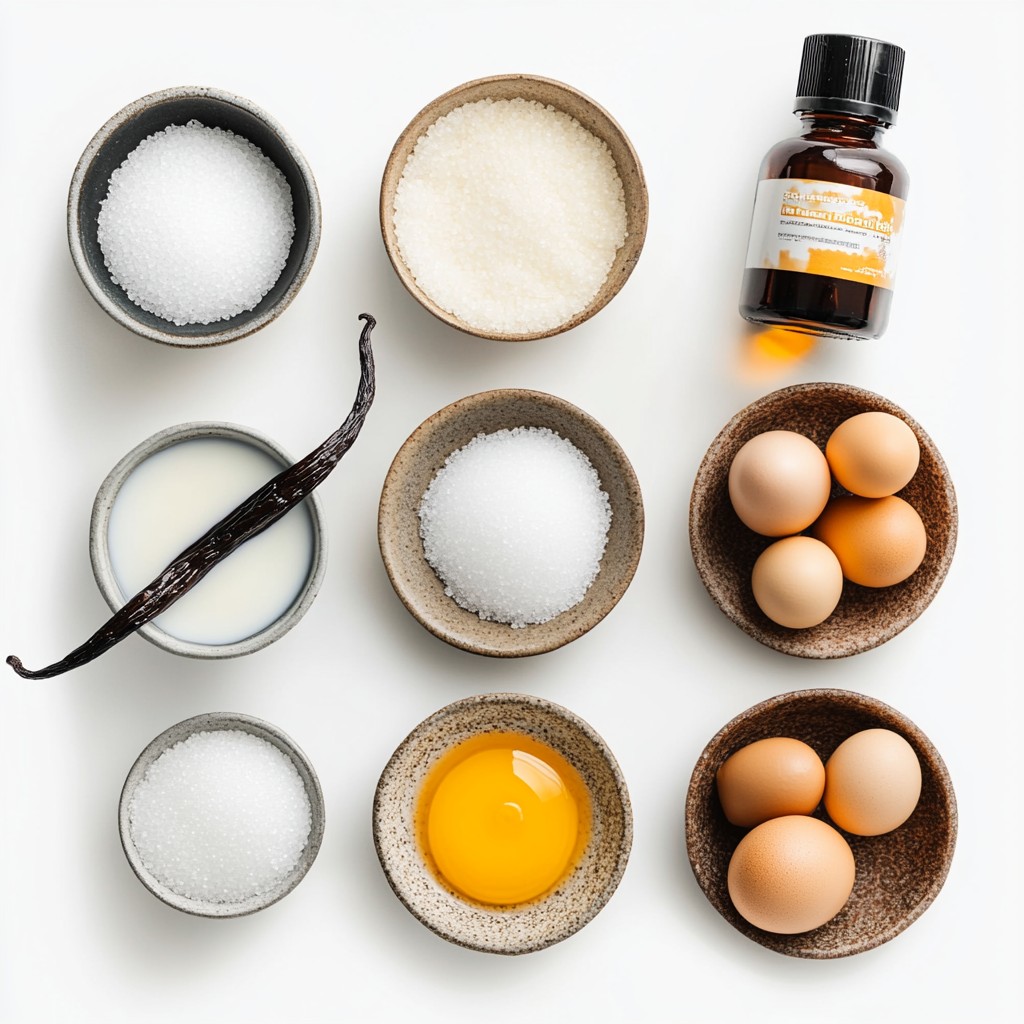
- 2 cups heavy cream
- 1 cup whole milk
- 1 vanilla bean, split with seeds scraped
- 1/2 cup granulated sugar, divided
- 5 large egg yolks
- 1/4 teaspoon salt
- 1/2 teaspoon pure vanilla extract (optional, for enhanced flavor)
- 4 tablespoons turbinado sugar (for the caramelized crust)
Ingredient Substitutions
You can make some easy swaps if you need to.
- Use half-and-half instead of heavy cream for a lighter option.
- Almond milk can replace whole milk for a dairy-free version.
- If you lack vanilla beans, use 2 teaspoons of pure vanilla extract for flavor.
- If turbinado sugar is not available, regular granulated sugar works fine for the crust.
Tips for Selecting Quality Vanilla
Choosing good vanilla makes a big difference. Here are some tips:
- Look for plump, moist vanilla beans. They should feel soft and flexible.
- Check for a strong vanilla aroma; it should smell sweet and rich.
- Always buy from trusted brands or specialty stores for the best quality.
- Remember, pure extracts are better than imitation ones for great flavor.
These details will help you create a delicious and memorable dessert!
Step-by-Step Instructions
Preparation Steps Overview
To make this vanilla bean crème brûlée, gather all your ingredients first. You will need heavy cream, whole milk, a vanilla bean, granulated sugar, egg yolks, salt, and turbinado sugar. Preparing the custard takes about 20 minutes. After that, it will cool and chill for at least four hours.
Detailed Cooking Instructions
1. Preheat the Oven: Set your oven to 325°F (160°C).
2. Infuse the Cream: In a medium saucepan, mix together the heavy cream, whole milk, and the split vanilla bean. Heat this mix over medium heat until it is just shy of simmering. Take it off the heat and let it sit for 15 minutes.
3. Prepare the Egg Mixture: In a bowl, whisk the egg yolks, 1/4 cup of sugar, and salt until it turns pale and thickens a bit.
4. Blend the Mixtures: Remove the vanilla bean pod from the cream. Slowly pour the warm cream into the egg mixture while whisking. This helps keep the eggs from scrambling.
5. Enhance with Extract: Stir in the vanilla extract if you want to deepen the flavor.
6. Strain for Smoothness: Pour the mixture through a fine-mesh sieve into another bowl. This step makes your custard smooth.
7. Distribute into Ramekins: Pour the custard into 6 to 8 ramekins. Place them in a baking dish. Fill the dish with boiling water halfway up the sides of the ramekins.
8. Bake the Custards: Bake in the preheated oven for 30 to 35 minutes. The edges should set, but the centers can jiggle.
9. Cool and Chill: After baking, let the ramekins cool on a wire rack for about 30 minutes. Cover and refrigerate for at least four hours, but overnight is best for flavor.
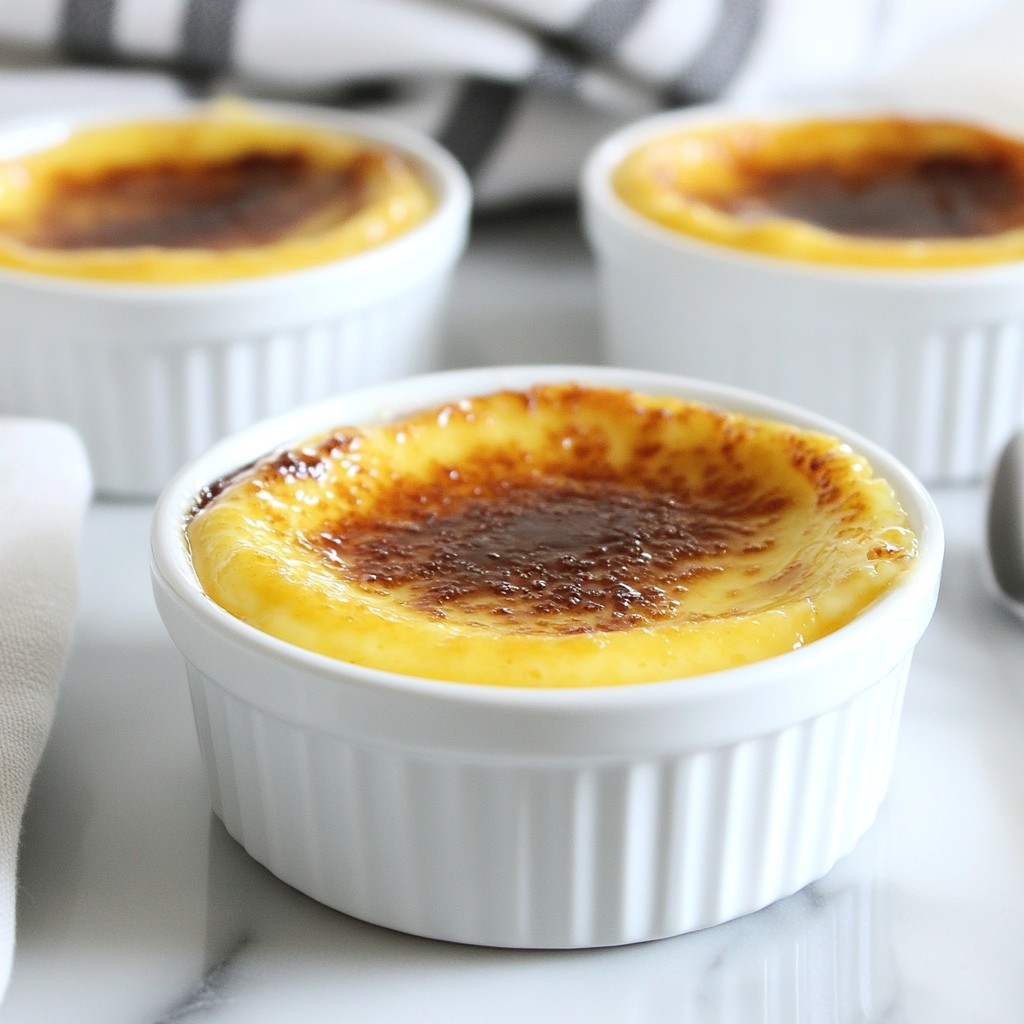
10. Create the Sugar Crust: Before serving, sprinkle turbinado sugar over each custard. Use a culinary torch to caramelize the sugar until it turns golden. You can also broil them for 2 to 4 minutes, but watch closely.
11. Serve and Enjoy: Let the brûlée rest for 2 minutes. This lets the sugar crust harden. Then, serve and enjoy the delightful crack as you dig in!
Tips for Avoiding Common Mistakes
- Always whisk while pouring the warm cream to prevent the eggs from cooking too fast.
- Make sure the water bath does not touch the custard to avoid excess moisture.
- Watch the sugar closely when caramelizing to avoid burning.
- Let it chill overnight if you can. This enhances the flavor and texture.
Tips & Tricks
Achieving the Perfect Brulee Crust
To get that nice, crisp crust, use turbinado sugar. It is great for caramelizing. After you pour it on the custard, use a torch to melt it evenly. If you don’t have a torch, broil it in the oven. Watch it closely so it doesn’t burn. Aim for a golden-brown color. This crust adds a sweet crunch that contrasts well with the creamy custard.
Recommendations for Serving
When serving your crème brûlée, let it sit for about two minutes after caramelizing. This time lets the sugar crust harden. For a lovely touch, add fresh berries or mint on the side. These not only look pretty but also add a fresh taste. You can serve it in individual ramekins, making it easy for guests to enjoy.
Enhancing Flavor Profiles
To boost the vanilla flavor, consider adding pure vanilla extract. It enriches the taste of the custard. You can also try infusing other flavors. A pinch of espresso powder or a drop of almond extract can give a unique twist. Experiment with these options to find your favorite flavor mix.
Pro Tips
- Use Fresh Vanilla Beans: For the best flavor, always opt for fresh vanilla beans instead of extracts. The seeds from the bean provide a rich, aromatic essence that enhances the custard.
- Temperature Matters: Ensure your ingredients are at room temperature before mixing. This helps the custard bake evenly and achieve a smooth texture.
- Don't Overbake: Keep an eye on the custards while they bake. They should be set around the edges but still slightly jiggly in the center to ensure a creamy consistency.
- Caramelization Technique: When caramelizing the sugar crust, move the torch in a circular motion to achieve an even melt. This prevents burning and results in a beautifully golden crust.
Variations
Flavor Additions and Substitutions
You can add fun flavors to your crème brûlée! Here are some ideas:
- Chocolate: Melt 4 ounces of dark chocolate and stir it in with the cream.
- Coffee: Add 1 tablespoon of instant coffee to the cream while heating.
- Citrus: Add the zest of one orange or lemon for a fresh twist.
- Spices: Consider adding a pinch of cinnamon or nutmeg to enhance the taste.
These additions can bring a new twist to this classic dessert. Feel free to mix and match based on your taste.
Dietary-Specific Modifications
You can easily adapt this recipe for various diets:
- Dairy-Free: Swap heavy cream and milk for coconut cream and almond milk.
- Sugar-Free: Use a sugar substitute like erythritol in place of granulated sugar.
- Gluten-Free: Luckily, this recipe is naturally gluten-free as it uses no flour.
These adjustments allow everyone to enjoy this lovely dessert, regardless of dietary needs.
Creative Serving Suggestions
Serving can be just as fun as making! Here are some ideas:
- Berries: Top with fresh strawberries or raspberries for a pop of color.
- Mint: Add a sprig of mint to give a refreshing look.
- Chocolate Shavings: Garnish with dark chocolate shavings for an extra treat.
These touches can make your crème brûlée even more appealing. Enjoy the process of making it your own!
Storage Info
Best Practices for Storing Crème Brûlée
To keep your crème brûlée fresh, store it in the fridge. Cover each ramekin with plastic wrap. This helps prevent a skin from forming on the custard. Make sure they stay upright to avoid spills. If you have extra custard, store it in a sealed container. Always chill it right after it cools.
How to Reheat and Serve Leftovers
When you want to enjoy leftover crème brûlée, do not reheat it in the microwave. Instead, let it sit at room temperature for about 30 minutes. This helps restore its creamy texture. For the sugar crust, sprinkle a bit more turbinado sugar on top. Use a kitchen torch to caramelize it again before serving. If you don’t have a torch, broil it briefly in the oven.
Shelf Life and Freezing Tips
Crème brûlée lasts up to four days in the fridge. After that, the taste and texture may change. You should not freeze crème brûlée. Freezing alters the creamy texture and can ruin the dessert. Always enjoy your delicious treat fresh for the best experience.
FAQs
What is the difference between Crème Brûlée and other custards?
Crème Brûlée has a unique texture. It is smooth and creamy, with a crunchy sugar crust on top. Other custards, like flan or pastry cream, lack this hard topping. Flan is often denser and has a caramel layer beneath. Crème Brûlée uses heavy cream and egg yolks for richness. Other custards may use milk or whole eggs, changing their texture and flavor.
Can I make Crème Brûlée ahead of time?
Yes, you can make Crème Brûlée in advance. After baking, let it cool down, then chill in the fridge. It’s best to chill for at least 4 hours, but overnight works great too. Just add the sugar crust before serving. This way, you can enjoy a fresh dessert without the last-minute fuss.
What kind of torch should I use for caramelizing sugar?
A culinary torch is your best tool for caramelizing sugar. Look for one that has a steady flame and is easy to control. A butane torch works well and is common in kitchens. If you don’t have a torch, you can use your oven's broiler. Just watch it closely to prevent burning, as it can cook the sugar quickly.
You now have all the tools to make a great crème brûlée. We covered ingredients, tips, and step-by-step instructions. Remember to pick quality vanilla, avoid common mistakes, and tune flavors to your taste. You can even try new variations or store extras for later. With these insights, you can impress everyone with your skills. Enjoy your delicious creation!