Indulge in the creamy goodness of Vanilla Bean Crème Brûlée — a dessert that dazzles! With just a few simple ingredients, you can create a rich custard topped with a perfectly crispy caramel layer. In this post, I will guide you step by step to ensure your crème brûlée turns out flawless every time. Let’s dive into the world of this sweet delight and impress your friends and family with your culinary skills!
Why I Love This Recipe
- Decadent Flavor: This crème brûlée is rich and creamy, with the perfect balance of vanilla sweetness that melts in your mouth.
- Simple Technique: The process of making this dessert is straightforward, allowing even novice bakers to achieve impressive results.
- Impressive Presentation: The beautiful caramelized sugar crust adds an elegant touch, making it perfect for special occasions or dinner parties.
- Customizable: This recipe serves as a great base; feel free to experiment with flavored extracts or toppings to suit your taste.
Ingredients
Key Ingredients Overview
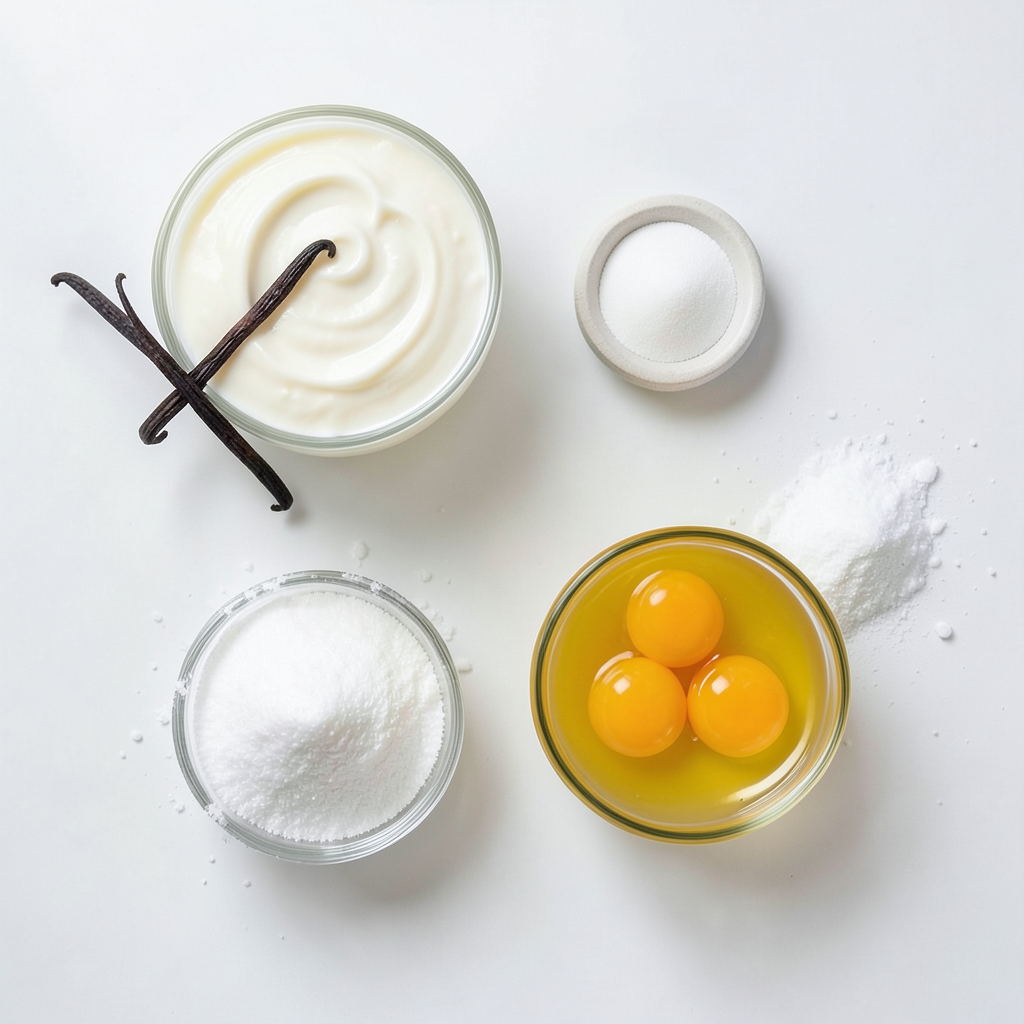
- Heavy cream: This rich cream makes the base of the custard. It adds that silky texture we love. Use fresh cream for the best flavor.
- Vanilla bean vs. vanilla extract: Vanilla bean offers a deep flavor and beautiful specks in the custard. If you use extract, opt for pure. It’s a good backup.
- Egg yolks and sugar: Egg yolks give the custard its creamy richness. Sugar sweetens and helps form the crispy top.
Additional Ingredients
- Salt: A pinch of salt enhances all the flavors. It’s a small but key player in this recipe.
- Sugar for caramelizing: Use granulated sugar for the topping. This sugar forms the crunchy crust that contrasts perfectly with the creamy custard.
Step-by-Step Instructions
Preparation Steps
- Preheat the oven: Start by setting your oven to 325°F (160°C). This heat will help cook the custard evenly.
- Infuse the cream: In a saucepan, heat 2 cups of heavy cream over medium heat. If you have a vanilla bean, slice it open and scrape the seeds into the cream. Add the whole pod too. Allow this mixture to simmer gently for about 15 minutes. Then, remove the vanilla pod.
Mixing & Baking Steps
- Whisk the egg yolks: In a bowl, whisk together 5 large egg yolks, 1/2 cup of granulated sugar, and a pinch of salt. Aim for a light and creamy mix.
- Temper the eggs with cream: Slowly add the warm cream to the egg yolk mixture, whisking all the time. This step is key to avoiding scrambled eggs. If you’re using vanilla extract, add it now.
- Strain and pour into ramekins: Use a fine-mesh sieve to strain the mixture into a bowl. This will catch any lumps. Then, pour it into ramekins, filling each about three-quarters full.
- Set up the water bath: Place the ramekins in a baking dish. Pour hot water into the dish until it reaches halfway up the sides of the ramekins. This helps cook the custards gently.
- Bake the custards: Put the baking dish in the preheated oven. Bake for 30-35 minutes. The edges should be set, but the center should still jiggle slightly.
Cooling & Caramelizing
- Cool completely: After baking, carefully take the ramekins out of the water bath. Let them cool on a wire rack until they reach room temperature.
- Chill in the refrigerator: Cover the ramekins and place them in the fridge. Chill for at least 2 hours, or overnight for the best flavor.
- Caramelize the tops: When ready to serve, sprinkle a thin layer of granulated sugar on top of each custard. Use a kitchen torch to melt the sugar until it forms a golden crust. Let it cool for a minute to harden.
Tips & Tricks
Perfecting Crème Brûlée
To make a rich and creamy crème brûlée, getting the right texture is key. You want it smooth and velvety. Start with heavy cream. This gives you that luxurious mouthfeel. Heat it gently to infuse the vanilla flavor. Avoid boiling, as it can make the cream too thick.
To prevent curdling, temper your egg yolks. Slowly pour the warm cream into the whisked yolks. Whisk continuously while you pour. This keeps the eggs from cooking too fast. Always strain the mixture before pouring it into ramekins. This helps remove clumps and ensures a silky custard.
Caramelization Techniques
For caramelizing sugar, the right tools matter. A kitchen torch works best for even caramelization. If you don’t have one, a broiler can work too, but watch it closely. You don’t want burnt sugar.
To achieve a perfect crust, sprinkle sugar evenly on the custard. Use just enough to cover the surface. After caramelizing, let it cool for a minute. This helps the sugar harden into a crispy layer.
Serving Suggestions
Garnishing your crème brûlée adds flair. Fresh berries, like raspberries or strawberries, bring color and flavor. A sprig of mint on top adds a lovely touch.
For presentation, serve the crème brûlée directly in the ramekins. This keeps it simple and elegant. Set them on a nice plate or tray to impress your guests.
Pro Tips
- Choose Quality Ingredients: Using high-quality heavy cream and real vanilla bean will elevate the flavor of your crème brûlée, resulting in a richer and more aromatic dessert.
- Don’t Overbake: Keep a close eye on your custards while baking. They should be set around the edges but still have a slight jiggle in the center for a perfectly creamy texture.
- Cool Thoroughly: Allow the custards to cool completely at room temperature before refrigerating. This helps them set properly and develop a better flavor.
- Caramelizing Sugar: When caramelizing the sugar, move the torch in small circles to ensure even melting and avoid burning. A perfect caramelized top should be crisp and golden.
Variations
Flavor Alternatives
You can switch up the flavor of your crème brûlée. Here are some fun ideas:
- Chocolate crème brûlée: Add melted dark chocolate to your cream. This gives a rich, decadent twist.
- Coffee or espresso-infused options: Stir in brewed coffee or espresso into the cream. This will wake up your taste buds and add a nice kick.
Dietary Adjustments
Want to tweak the recipe for your diet? Here are some options:
- Vegan crème brûlée substitutes: Use coconut cream instead of heavy cream and replace egg yolks with silken tofu. This keeps it creamy and delicious.
- Sugar-free variations: Opt for a sugar substitute like stevia or erythritol. This way, you can enjoy the dessert without the extra sugar.
Portion Size Variations
You can change how you serve your crème brûlée:
- Mini versions in smaller ramekins: Use tiny ramekins for individual servings. They are cute and perfect for parties.
- Family-sized adaptations: Pour the mixture into a larger baking dish. This is great for sharing and saves time on serving.
Storage Info
Refrigeration Guidelines
To store crème brûlée, let it cool completely first. Cover each ramekin with plastic wrap. Keep your crème brûlée in the fridge. It can stay fresh for 2 to 3 days. The longer it sits, the more the texture may change. The custard might soften, but the flavor will still be great.
Freezing Options
Can you freeze crème brûlée? Yes, you can freeze it! But, it’s best to freeze it before caramelizing. Use an airtight container or wrap each ramekin tightly in plastic wrap. This helps avoid freezer burn. When you're ready to eat, thaw it in the fridge overnight.
Best practices for reheating include warming it in the oven at a low temperature. Let it sit for a few minutes before adding sugar to caramelize. This way, you keep that rich and creamy texture. Enjoy!
FAQs
Common Questions
What is crème brûlée? Crème brûlée is a rich dessert made of cream, eggs, and sugar. It has a smooth custard base topped with a hard, caramelized sugar crust. This dessert is known for its creamy texture and the satisfying crack of caramel when you dig in.
Can I make crème brûlée in advance? Yes, you can prepare crème brûlée a day ahead. After baking and cooling, store it in the fridge. Just remember to add the caramelized sugar on top just before serving for the best texture.
Troubleshooting
Why did my crème brûlée turn out grainy? Grainy texture comes from overcooking the eggs. If the custard gets too hot, the eggs can curdle. Always temper the eggs slowly, adding warm cream to avoid this issue.
How to fix a runny custard? If your custard is too runny, it may need more baking time. Check for a slight jiggle in the center. If it’s still runny, return it to the oven for a few more minutes until it sets.
Serving & Enjoying
How long does crème brûlée last after caramelization? Once you caramelize the sugar, serve it right away. The sugar crust can become soft over time, losing its delightful crunch. If you have leftovers, you can refrigerate them, but the crust will not stay crisp.
Can I use a broiler instead of a kitchen torch? Yes, you can use a broiler to caramelize the sugar. Place the ramekins under the broiler for a few minutes. Watch closely to avoid burning the sugar. Turn the ramekins to ensure even caramelization.
In this post, I covered how to make crème brûlée, starting with key ingredients like heavy cream, sugar, and egg yolks. I provided step-by-step instructions, from preparation to cooling and caramelizing. You learned tips to perfect the texture and avoid issues. I also shared variations, storage info, and answered common questions.
Embrace your creativity and enjoy making this classic dessert. With practice, you’ll impress everyone with your skills!