Get ready for a sweet treat with our Strawberry Cream Cheese Danish recipe! This delightful snack blends flaky puff pastry, creamy cheese filling, and juicy strawberries. I’ll show you how to make this easy dessert step by step. Whether you need a quick breakfast or a charming brunch item, these Danishes will impress everyone. Let's dive into the details and get baking your new favorite treat!
Why I Love This Recipe
- Deliciously Creamy Filling: The cream cheese mixture provides a rich and velvety texture that perfectly complements the flaky pastry.
- Fresh Strawberry Twist: The addition of fresh strawberries adds a burst of flavor and a touch of sweetness, making each bite refreshing.
- Quick and Easy: This recipe is simple to follow and can be prepared in just 35 minutes, perfect for a delightful breakfast or snack.
- Beautiful Presentation: The danishes look stunning on a platter, making them an attractive choice for gatherings or brunches.
Ingredients
Main Ingredients
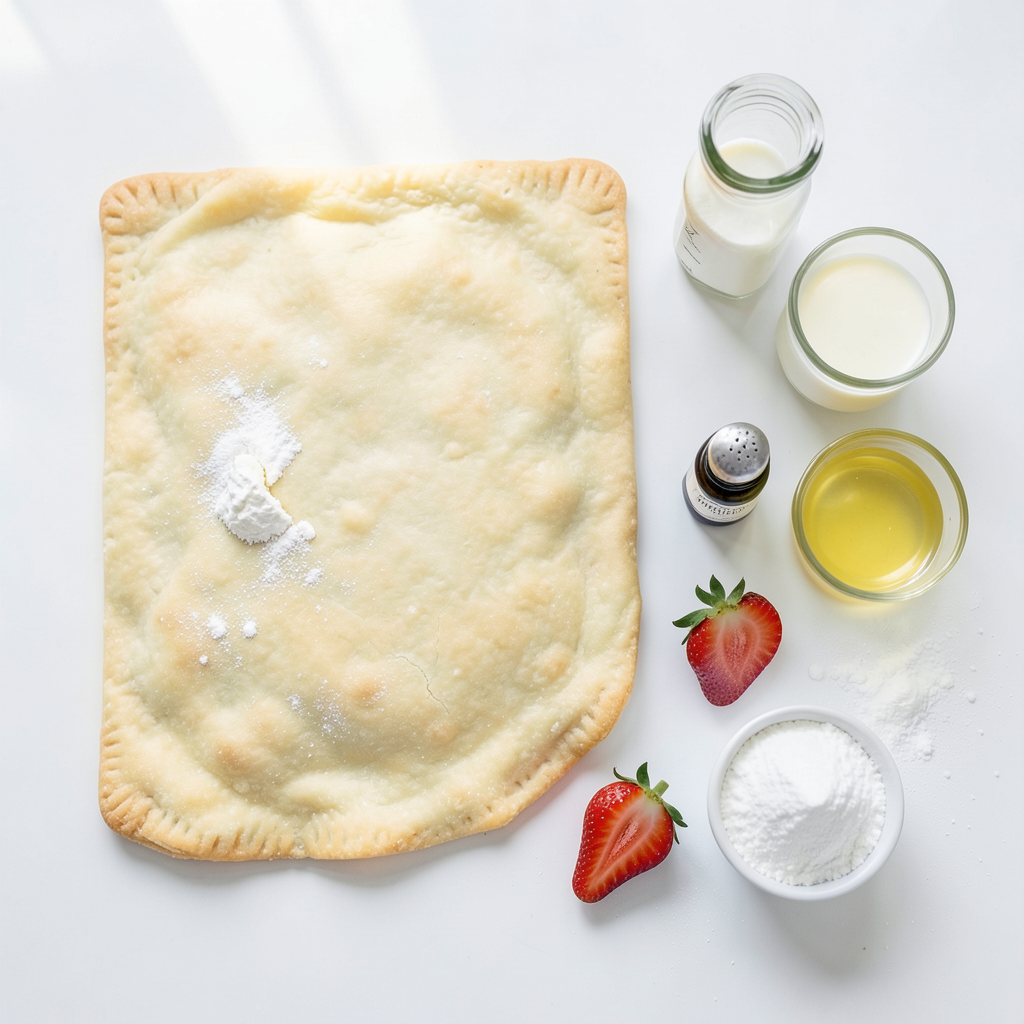
- 1 sheet of puff pastry (thawed)
- 8 oz cream cheese, softened to room temperature
- 1/4 cup powdered sugar, plus extra for dusting
- 1/2 teaspoon pure vanilla extract
- 1 cup fresh strawberries, hulled and thinly sliced
- 1 tablespoon fresh lemon juice
- 1 egg (for egg wash)
- 1 tablespoon milk (for egg wash)
For this recipe, I love using puff pastry as the base. It puffs up beautifully in the oven, creating a flaky and tender crust. The cream cheese filling adds a rich and creamy layer that pairs perfectly with the fresh strawberries.
Optional Ingredients
- You can add a splash of almond extract for extra flavor.
- Consider sprinkling some lemon zest into the cream cheese mixture for a fresh twist.
- For garnishes, I suggest fresh mint leaves and whole strawberries. They brighten up the plate and make it look more inviting.
Tools Needed
- Mixing bowls for preparing the filling and strawberries
- A baking sheet lined with parchment paper to prevent sticking
- A pastry brush for applying the egg wash to the danishes
These tools help create a smooth and easy cooking process. You will find that having everything ready makes the assembly fun and quick!
Step-by-Step Instructions
Preparing the Oven and Baking Sheet
1. Preheat your oven to 400°F (200°C). This step is key for a great bake.
2. Line a baking sheet with parchment paper. This helps prevent sticking and makes cleanup easy.
Preparing the Puff Pastry
1. On a lightly floured surface, roll out the thawed puff pastry. This smooths out any creases.
2. Cut the pastry into four equal rectangles. Set these aside for later.
Making the Cream Cheese Filling
1. In a mixing bowl, combine the softened cream cheese, powdered sugar, and vanilla extract.
2. Use a hand mixer or whisk to mix until it's smooth and creamy. Make sure there are no lumps.
Preparing the Strawberries
1. In a separate bowl, toss the sliced strawberries with lemon juice.
2. This step brightens their flavor and keeps them fresh.
Assembling the Danishes
1. Take each pastry rectangle and add a dollop of the cream cheese filling in the center.
2. Leave about an inch of space around the edges to fold later.
3. Layer a few slices of strawberries on top of the cream cheese. This adds a sweet, fruity touch.
Baking Process
1. Fold the edges of the pastry rectangles towards the center. This creates a nice border around the filling.
2. Pinch the corners and edges to seal them.
3. In a small bowl, whisk the egg and milk to make an egg wash.
4. Use a pastry brush to apply the egg wash over the edges. This gives a golden finish.
5. Place the danishes on the lined baking sheet and bake for 15-18 minutes. Look for puffiness and a golden brown color. Enjoy the wonderful smell while they bake!
Tips & Tricks
Achieving Flakiness
To get perfect puff pastry, always start with cold dough. Keep your pastry chilled until you roll it out. Roll gently to avoid flattening the layers. A light touch helps maintain the air pockets. This gives your danish that sought-after flakiness.
Cream Cheese Tips
For a smooth filling, ensure your cream cheese is at room temperature. This helps it blend well. Mix the cream cheese, powdered sugar, and vanilla until smooth. A hand mixer works great here. Make sure there are no lumps for a creamy texture.
Storing Leftovers
If you have any danishes left, let them cool first. Store them in an airtight container in the fridge. They stay fresh for up to three days. To enjoy them warm, reheat in the oven for a few minutes. This keeps them crispy and delightful.
Pro Tips
- Use Cold Puff Pastry: For the flakiest texture, ensure your puff pastry is cold before rolling it out. This helps create those beautiful layers when baked.
- Don't Overmix the Cream Cheese: Mix your cream cheese just until smooth. Overmixing can introduce too much air, leading to cracks during baking.
- Experiment with Fruit: While strawberries are delightful, feel free to experiment with other fruits like blueberries or raspberries for a different flavor profile.
- Serve Warm: These danishes are best enjoyed warm out of the oven. Consider reheating any leftovers in the oven to restore their crispiness.
Variations
Different Fillings
You can swap strawberries for other fruits. Try blueberries, raspberries, or peaches. Each fruit brings its own flavor. If you use apples, cook them a bit first. This makes them soft and sweet. Mix in some cinnamon for extra taste.
Shapes and Presentation
Folding shapes can change how your danishes look. You can make circles, triangles, or even hearts. For circles, fold the edges in toward the center. For triangles, cut the pastry into triangles and fold one corner over the other. This makes a nice design.
Dietary Modifications
You can make this recipe gluten-free. Use gluten-free puff pastry. For a dairy-free option, choose a cream cheese substitute made from nuts or soy. These swaps keep the taste fun and fresh. Enjoy the danishes without worry!
Storage Info
Refrigeration Guidelines
To store your strawberry cream cheese danish in the fridge, first, let them cool completely. Place them in an airtight container. They will stay fresh for up to three days. If you want to keep them longer, consider freezing instead.
Freezing the Danishes
Freezing danishes is easy. Wrap each cooled danish tightly in plastic wrap. Then, place them in a freezer bag or an airtight container. This keeps them fresh for up to two months. When you are ready to enjoy, simply thaw them in the fridge overnight.
Reheating Instructions
To reheat leftovers, preheat your oven to 350°F (175°C). Place the danishes on a baking sheet. Heat for about 10 to 15 minutes, or until warm. This method helps keep the pastry flaky and delicious. Enjoy your treat warm for the best taste!
FAQs
How do you make strawberry filling?
To make strawberry filling, you need fresh strawberries. Start by hulling and slicing them. Toss the slices in a bowl with one tablespoon of fresh lemon juice. This step adds flavor and keeps the strawberries fresh. If you want alternatives, you can use other fruits like blueberries or raspberries. You can even mix them for a fun twist!
Can you use store-bought cream cheese?
Yes, you can use store-bought cream cheese. It is a great time saver. Just make sure to soften it to room temperature before mixing. This helps create a smooth and creamy filling. If you want to try something new, you can use flavored cream cheese, like strawberry or chive, for a fun twist.
What beverages pair well with danishes?
When enjoying strawberry cream cheese danishes, you have many drink options. A hot cup of coffee or tea works well. If you prefer something cold, try a glass of fresh lemonade or iced tea. For a sweeter touch, a light sparkling wine can also enhance your treat. Enjoy experimenting with different flavors!
In this blog post, we explored making delicious danishes using puff pastry, cream cheese, and fresh strawberries. You learned about optional ingredients, essential tools, and step-by-step instructions. We also shared tips for achieving flakiness and storing leftovers. Don't forget the variations to customize your danishes and the storage info to keep them fresh. Enjoy your baking journey, and create tasty treats for yourself and your loved ones. Remember, the right techniques make all the difference in your final dish.