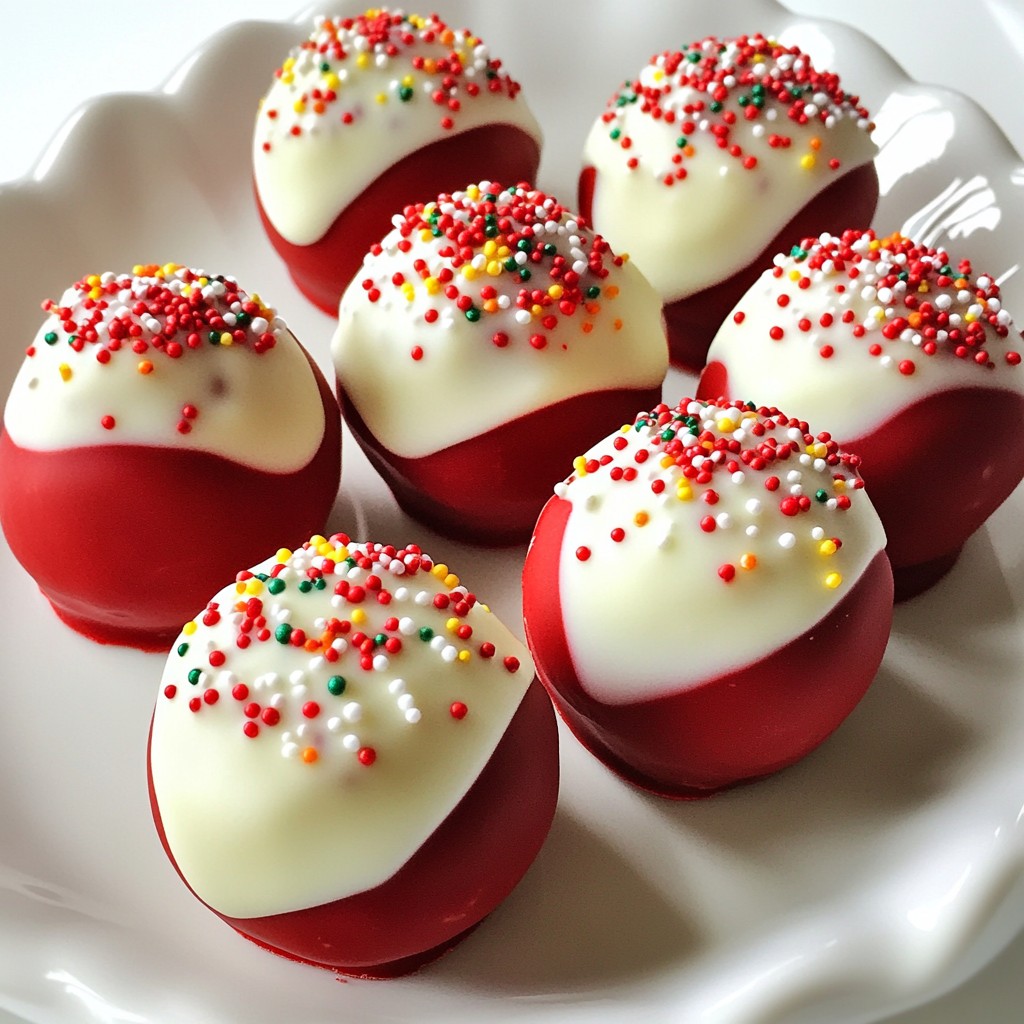
Get ready to indulge in a sweet treat that will light up your dessert table! These Red Velvet Oreo Truffles blend soft red velvet cake and creamy Oreo goodness, creating a melt-in-your-mouth delight. In this post, I’ll walk you through simple steps, essential tips, and fun variations to elevate this treat. Whether it's a festive party or just a cozy night in, these truffles are perfect for any occasion. Let’s dive into the deliciousness!
Why I Love This Recipe
- Delicious Flavor Combination: The rich red velvet cake paired with the classic Oreo cookie creates a delightful and indulgent treat that everyone loves.
- Easy to Make: With just a few simple steps and minimal ingredients, these truffles are quick to prepare, making them perfect for any occasion.
- Perfect for Gifting: These truffles not only taste amazing but also look beautiful, making them an excellent gift for friends and family.
- Customizable: You can easily adapt this recipe by using different flavors of cake mix or chocolate coatings to suit your taste preferences.
Ingredients
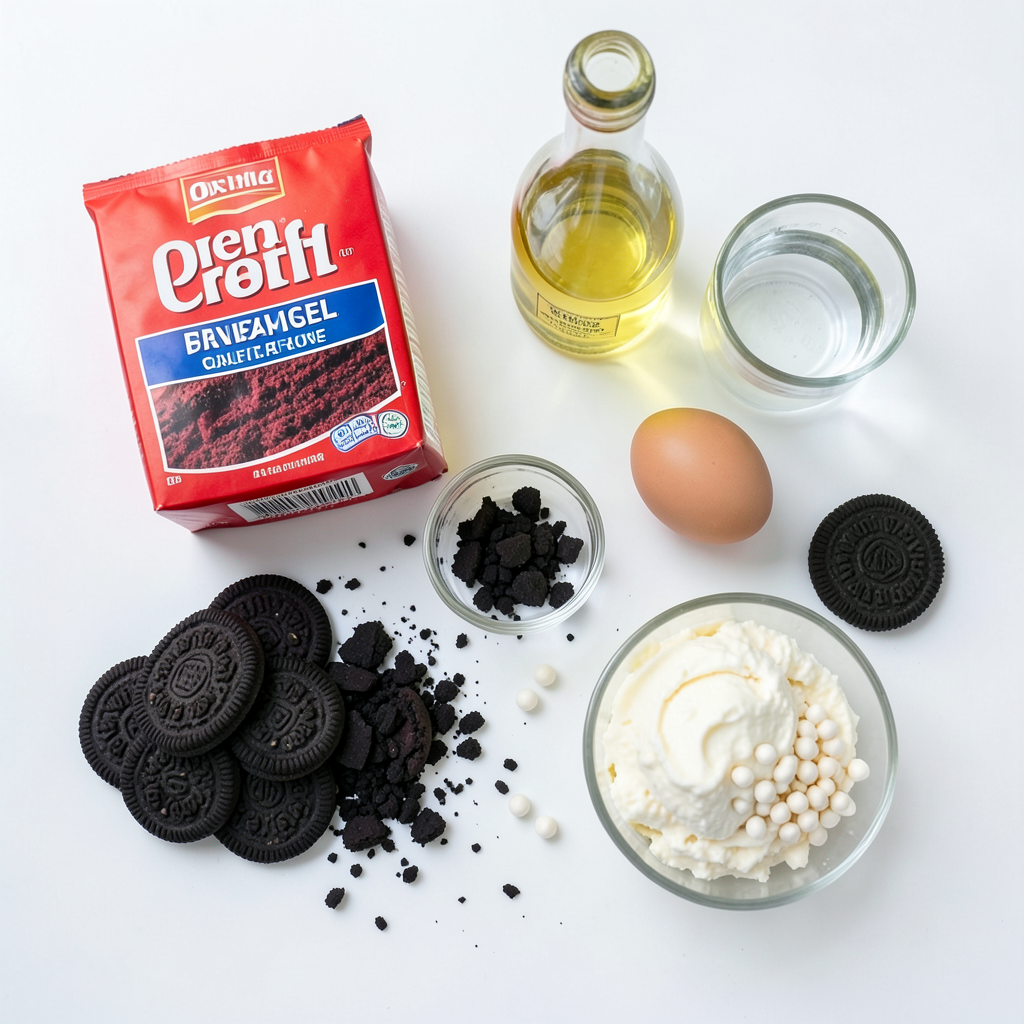
Here is the full list of ingredients you need for Red Velvet Oreo Truffles:
- 1 package (15.25 oz) red velvet cake mix
- 1/2 cup vegetable oil
- 3 large eggs
- 1/2 cup water
- 1 package (14.3 oz) Oreo cookies, crushed
- 8 oz cream cheese, softened to room temperature
- 2 cups white chocolate chips
- 1 tablespoon colorful sprinkles
Each ingredient plays a key role in making these truffles special. The red velvet cake mix gives a rich flavor and vibrant color. The vegetable oil keeps the cake moist. Eggs bind everything together, while water helps with the batter's consistency.
Crushed Oreo cookies add crunch and a sweet taste. Cream cheese gives a nice creaminess to the mix. White chocolate chips melt into a smooth coating that enhances the truffles. Finally, colorful sprinkles make the truffles look fun and festive.
Gather these ingredients, and you will be ready to create a delightful treat that everyone will love!
Step-by-Step Instructions
Preparing the Red Velvet Cake
First, gather your ingredients. You will need red velvet cake mix, vegetable oil, eggs, and water. In a large mixing bowl, combine the cake mix, oil, eggs, and water. Use a whisk or an electric mixer to blend until smooth. This step is key to a soft cake.
Mixing and Baking the Cake
Next, preheat your oven to 350°F (175°C). Grease a 9x13 inch baking pan with non-stick spray or butter. Pour the smooth batter into the pan, spreading it evenly. Bake for 25-30 minutes. Check with a toothpick; it should come out clean. Let the cake cool completely on a wire rack.
Creating the Truffle Mixture
While the cake cools, crush the Oreo cookies in a food processor. Pulse until you get fine crumbs. In a large mixing bowl, crumble the cooled cake using your hands. Add softened cream cheese to the crumbled cake. Mix well until you have a moist mixture. Then, add the crushed Oreos and stir until combined.
Now, take about a tablespoon of the mixture and roll it into a ball. Place each ball on a parchment-lined baking sheet. Chill these truffles for at least 30 minutes. This helps them firm up nicely for coating.
Tips & Tricks
Perfecting the Texture
To get the best texture, focus on the cake mix. Blend the red velvet cake mix, oil, eggs, and water well. Use a whisk or mixer for a smooth batter. After baking, let the cake cool completely. This step ensures the truffles do not crumble. When mixing the cooled cake with cream cheese, aim for a moist and sticky texture. This helps your truffles hold their shape when you roll them.
Melting White Chocolate Efficiently
Melting white chocolate can be tricky. Use a microwave-safe bowl for melting. Heat the white chocolate chips in short bursts of 30 seconds. Stir after each burst to avoid overheating. If the chocolate seizes, add a tiny bit of vegetable oil. This will help smooth it out. A smooth coating makes your truffles look great and taste even better.
Chilling Recommendations
Chilling is essential for the perfect truffle. After shaping the truffles, chill them for at least 30 minutes. This helps them firm up nicely. If you want them extra firm, chill for an hour. If you’re in a hurry, place them in the freezer for 10 to 15 minutes. Just don’t forget to keep an eye on them!
Pro Tips
- Use Room Temperature Ingredients: Make sure your cream cheese is at room temperature for easier mixing, resulting in a smoother truffle mixture.
- Chill the Dough: Don't skip the chilling step; it helps the truffles hold their shape when dipped in chocolate.
- Customize the Coating: Feel free to use colored chocolate melts instead of white chocolate for a more vibrant truffle presentation.
- Experiment with Add-Ins: Try adding chopped nuts or flavored extracts to the mixture for a unique twist on the classic truffle.
Variations
Different Coating Options
You can switch up the coating for your truffles. Instead of white chocolate, try milk or dark chocolate. You can even use colored candy melts for a fun twist. Just melt them like you would the white chocolate. Dip the truffles in and let the excess drip off. This adds a unique touch to each bite.
Flavor Additions
Add more flavor to your truffles for a special kick. Consider mixing in a teaspoon of vanilla extract or almond extract. You can also fold in a bit of cocoa powder to enhance the chocolate taste. For a fruity twist, try adding a splash of raspberry or cherry juice to the mixture. These small changes can make a big difference.
Gluten-Free Alternatives
If you want a gluten-free option, choose gluten-free Oreo cookies. You can also find gluten-free cake mixes at most stores. Just be sure to check the labels. This way, everyone can enjoy these tasty treats without worry. Make your truffles just as delicious while keeping them gluten-free!
Storage Info
Best Storage Practices
I recommend storing your Red Velvet Oreo Truffles in an airtight container. This keeps them fresh and prevents them from drying out. Layer parchment paper between truffles if you stack them. This avoids sticking and helps keep their shape.
How Long They Last
When stored properly, these truffles can last up to one week in the fridge. Their flavor stays delicious, and the texture remains nice. I suggest eating them within three days for the best taste and freshness.
Freezing Instructions
You can freeze Red Velvet Oreo Truffles for longer storage. Place them on a baking sheet and freeze until firm. Then, transfer them to an airtight container or freezer bag. They can last up to three months in the freezer. Just thaw them in the fridge before serving for a tasty treat.
FAQs
Can I use a different cake mix?
Yes, you can use other cake mixes. A chocolate or vanilla cake mix works well. You can even try a funfetti mix for a colorful twist. Just follow the same steps in the recipe. The key is to keep the same amount of liquid so the texture stays nice.
How do I prevent the chocolate from hardening too quickly?
To keep the chocolate from hardening too fast, melt it in small batches. Use a microwave and heat for 30 seconds, stirring in between. If it starts to harden, add a little vegetable oil. This will help keep it smooth and easy to coat the truffles.
What are some serving suggestions for Red Velvet Oreo Truffles?
You can serve these truffles in many fun ways! Place them on a nice plate for parties. Or, put them in a gift box for friends. They also look great in a dessert buffet. You can even pair them with a scoop of ice cream for a special treat.
This blog post covered how to make Red Velvet Oreo Truffles with ease. You learned the ingredients, from red velvet cake mix to colorful sprinkles. I shared tips for perfecting texture and storage. You also discovered fun variations and FAQs to enhance your truffles.
These treats are simple to make and full of flavor. Try them at your next gathering. Enjoy the sweet experience of creating these fun desserts!