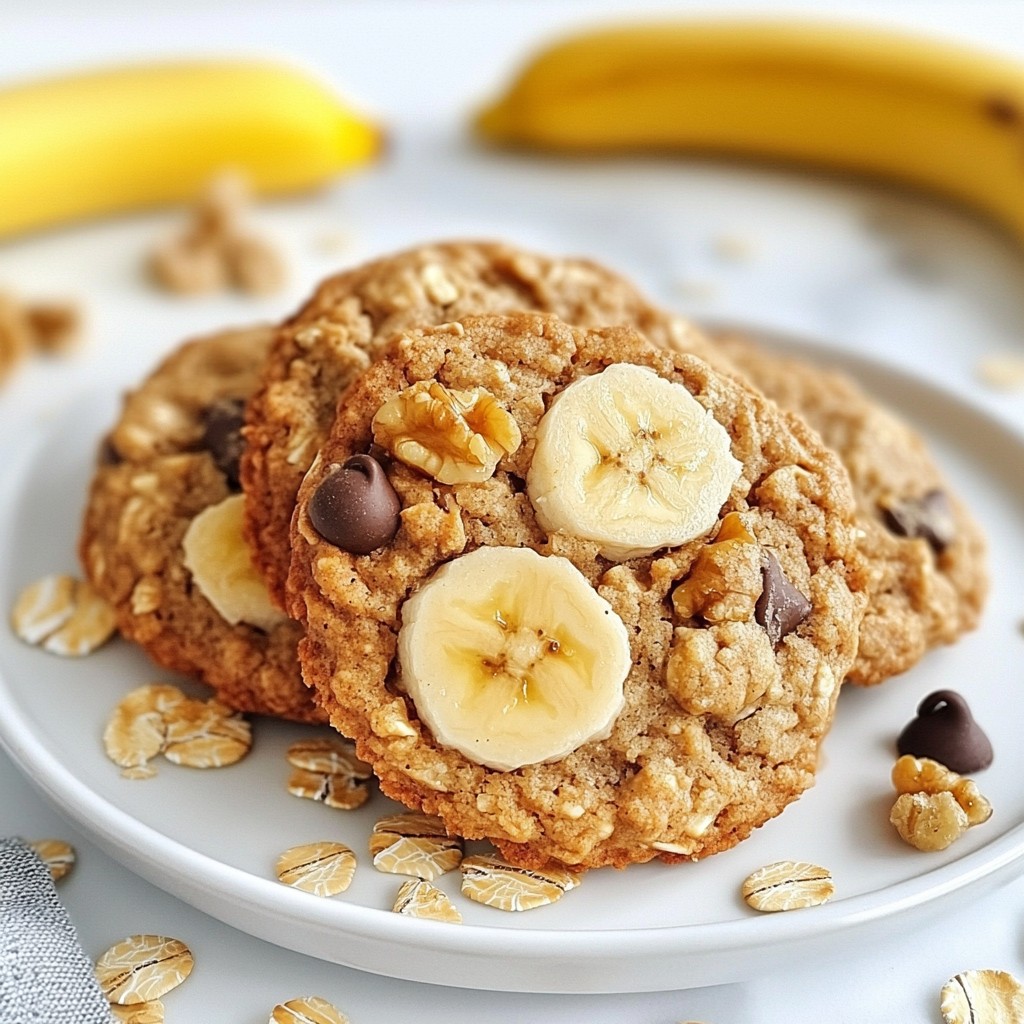
Are you craving a simple, delicious treat? Look no further! Peanut Butter Banana Oat Cookies are easy to make and packed with flavor. With just a few wholesome ingredients, these cookies will satisfy your sweet tooth without the guilt. I’ll walk you through each step, share tips, and even suggest tasty variations. Let’s dive into the world of baking these delightful cookies together!
Why I Love This Recipe
- Healthy Ingredients: This recipe uses wholesome ingredients like bananas, oats, and natural peanut butter, making it a nutritious snack option.
- Quick and Easy: With just a 10-minute prep time, these cookies are perfect for a last-minute treat or a quick satisfying snack.
- Customizable: You can easily modify this recipe by adding your favorite mix-ins like chocolate chips or nuts, allowing for endless variations.
- Deliciously Satisfying: The combination of flavors from the peanut butter and bananas creates a delightful taste that will keep you coming back for more!
Ingredients
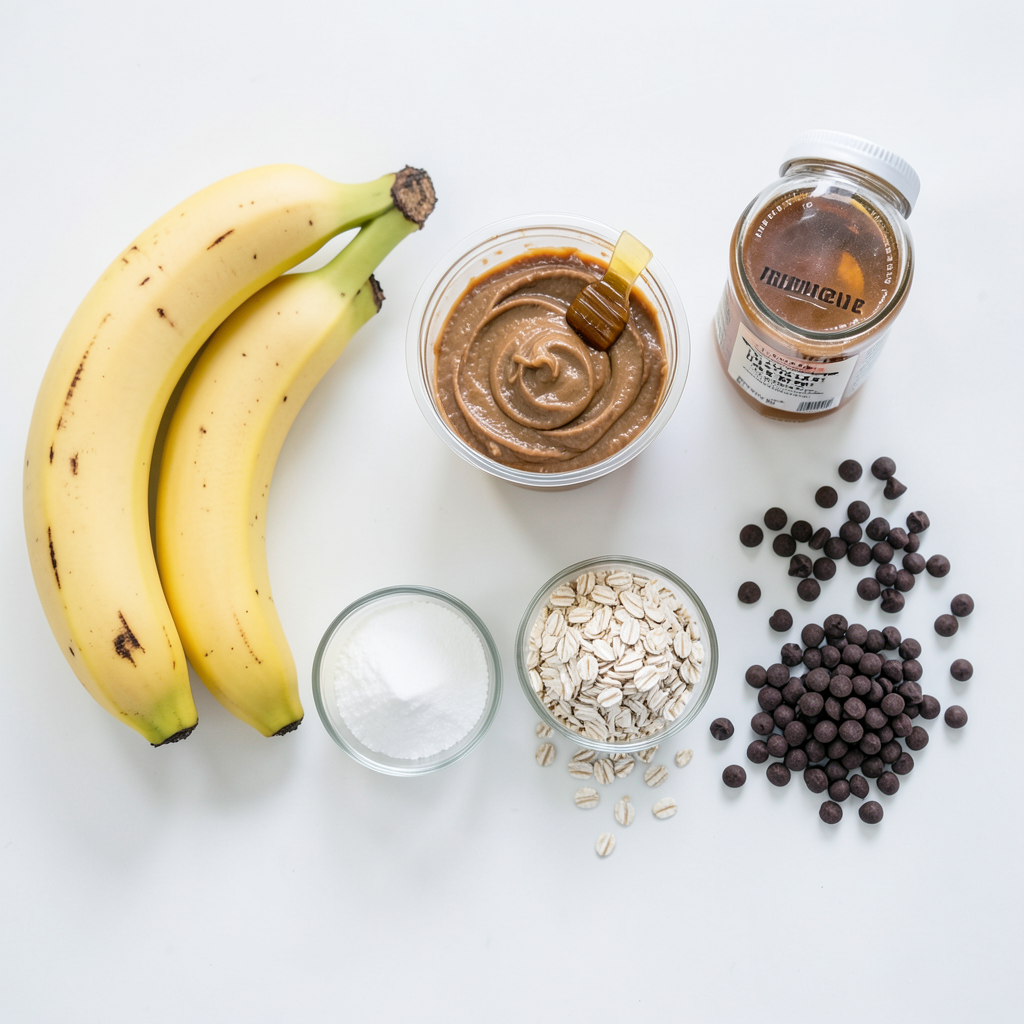
To make Peanut Butter Banana Oat Cookies, you need simple, wholesome ingredients. Here’s the list:
- 2 ripe bananas, thoroughly mashed
- 1 cup natural peanut butter (smooth or crunchy)
- 1 ½ cups rolled oats
- 1/4 cup honey or maple syrup (vegan option)
- 1/2 teaspoon vanilla extract
- 1/2 teaspoon baking soda
- 1/4 teaspoon salt
- Optional mix-ins such as dark chocolate chips, walnuts, or shredded coconut
These ingredients work together to create a soft, chewy cookie. Ripe bananas add natural sweetness and moisture. Peanut butter gives a rich, nutty flavor. Oats add texture and make these cookies hearty. Honey or maple syrup serves as a natural sweetener. The baking soda helps the cookies rise, while salt enhances the flavors. You can also customize your cookies with mix-ins for extra taste. Enjoy the process of gathering these ingredients; each one plays an important role in your final treat!
Step-by-Step Instructions
Preheat the Oven
Start by preheating your oven to 350°F (175°C). Line a baking sheet with parchment paper for easy cleanup. This step makes baking easier and keeps your cookies from sticking.
Prepare the Banana Mixture
In a large bowl, take two ripe bananas. Mash them well with a fork or potato masher. You want them smooth and creamy. This banana mix adds great flavor and moisture to your cookies.
Combine Dry Ingredients
In a separate bowl, whisk together 1 ½ cups of rolled oats, ½ teaspoon of baking soda, and ¼ teaspoon of salt. Mixing these dry ingredients ensures they blend well in your cookies. It also helps with the texture.
Mix Wet and Dry Ingredients
Now, add the banana mixture to the dry ingredients. Use a spatula to fold them together. Mix gently, but make sure everything combines well. If you want, add ¼ cup of honey or maple syrup and ½ teaspoon of vanilla extract at this stage for extra sweetness and flavor.
Form the Cookies
Using a tablespoon or a cookie scoop, drop dollops of dough onto your prepared baking sheet. Space them about 2 inches apart. This gives them room to spread while baking. For a neat look, flatten each dollop slightly with a fork or your hand.
Bake and Cool
Place the baking sheet in your preheated oven. Bake for about 10-12 minutes until the edges turn a light golden color. Once done, take them out and let them cool on the sheet for 5 minutes. After that, move them to a wire rack to cool completely. Enjoy your tasty treats!
Tips & Tricks
Choosing the Right Bananas
Use ripe bananas for the best flavor. Look for bananas with brown spots. These bananas are sweeter and softer, making them easy to mash. If your bananas are too green, they will taste less sweet. Overripe bananas work well, too. Just ensure they are not too mushy.
Making Texture Adjustments
If you want a chewier cookie, add more oats. You can also mix in chopped nuts or coconut for crunch. For a softer cookie, use more ripe bananas or peanut butter. Experiment with the mix-ins to find your favorite balance.
Baking Times and Indicators
Bake the cookies for about 10-12 minutes. Look for light golden edges. If you see the cookies puff up, they need a bit more time. The center should look set but not dry. Let them cool on the baking sheet for a few minutes before moving them.
Presentation Tips
For a lovely presentation, arrange the cookies on a wooden board. Add fresh banana slices for color. Sprinkle some oats or crushed nuts on top for extra flair. This makes your cookies look tempting and ready to enjoy!
Pro Tips
- Use Very Ripe Bananas: The riper the bananas, the sweeter and more flavorful your cookies will be. Look for bananas that are heavily speckled or even fully brown for the best results.
- Experiment with Nut Butters: While peanut butter is delicious, try swapping it for almond or cashew butter for a different flavor profile. Just ensure the consistency is similar.
- Chill the Dough: If you have time, chilling the dough for 30 minutes before baking can help the cookies maintain their shape and prevent them from spreading too much.
- Store Properly: To keep your cookies fresh, store them in an airtight container at room temperature for up to a week, or freeze them for longer storage.
Variations
Vegan Modifications
You can easily make these cookies vegan. Use maple syrup instead of honey. Choose a natural peanut butter that contains only peanuts. Ensure your chocolate chips are dairy-free if you add them. This way, everyone can enjoy these tasty treats!
Gluten-Free Options
To make the cookies gluten-free, choose certified gluten-free oats. Most rolled oats are not gluten-free due to cross-contamination. Check labels carefully. This small change keeps the cookies safe for those with gluten sensitivities.
Flavor Variations
You can switch up the flavors in these cookies. Try almond butter or cashew butter instead of peanut butter. For spice, add cinnamon or nutmeg to the dry mix. These small tweaks can lead to exciting new tastes. You can also toss in some dried fruit like cranberries or raisins for extra sweetness.
Storage Info
Storing Leftover Cookies
After baking, let the cookies cool completely. Store them in an airtight container. They stay fresh for about 3 days at room temperature. If you want to keep them longer, consider the fridge. The cool air helps them last up to a week.
Freezing for Long-term Storage
To freeze cookies, first, cool them fully. Then, place cookies in a single layer on a baking sheet. Freeze them for about 1 hour. Once frozen, transfer them to a freezer bag. They stay good for up to 3 months. When you’re ready to eat, just thaw them at room temperature.
Reheating Instructions
Reheat cookies in the oven for the best texture. Preheat your oven to 350°F (175°C). Place the cookies on a baking sheet. Heat them for about 5 minutes. This makes them warm and soft again. You can also use a microwave, but be careful not to overheat. Just 10 to 15 seconds should do the trick!
FAQs
How do I make Peanut Butter Banana Oat Cookies without added sugar?
You can skip added sugars by using ripe bananas and natural peanut butter. The ripe bananas give enough sweetness. You can also add spices like cinnamon for extra flavor. This way, you keep it healthy and tasty without added sugar.
Can I substitute other nut butters?
Yes, you can! Feel free to use almond butter or cashew butter. Each nut butter adds its own flavor. Just make sure they are smooth and natural. This keeps your cookies soft and delicious.
What can I use instead of eggs in this recipe?
You can use a flaxseed meal or chia seeds as an egg substitute. Mix one tablespoon of flaxseed meal or chia seeds with three tablespoons of water. Let it sit for a few minutes until it thickens. This works great in binding your cookie dough.
How long do these cookies last?
These cookies last about one week at room temperature. Keep them in an airtight container to stay fresh. If you want to keep them longer, freeze them for up to three months. Just thaw them at room temperature when you're ready to enjoy!
In this post, we explored the simple steps to make Peanut Butter Banana Oat Cookies. You learned about the essential ingredients and the easy method to prepare and bake them. We also shared tips for perfecting texture and options for various dietary needs. You now have the knowledge to store and reheat these treats for later. Enjoy sharing these cookies with family and friends. Happy baking!