No-Bake Oreo Cheesecake Cups Easy and Tasty Treat

WANT TO SAVE THIS RECIPE?

Craving a sweet treat but short on time? Say hello to No-Bake Oreo Cheesecake Cups! This easy recipe requires just a few simple ingredients like Oreo cookies, cream cheese, and heavy whipping cream. In no time, you can enjoy a creamy, delicious dessert without turning on the oven. Whether it’s a special occasion or just because, these cups will wow your taste buds. Ready to indulge? Let’s dive in!

- 20 Oreo cookies, finely crushed (plus extra for garnish) - 4 tablespoons unsalted butter, melted - 8 oz cream cheese, softened to room temperature - 1/2 cup granulated sugar - 1 teaspoon pure vanilla extract - 1 cup heavy whipping cream, chilled - 1/2 teaspoon powdered sugar (optional, for additional sweetness) - 1/4 cup chocolate chips or extra Oreo crumbs, for topping To make these No-Bake Oreo Cheesecake Cups, you need simple ingredients. The main star is the Oreo cookies. They create a rich, chocolatey crust. You will also use cream cheese for a smooth filling. Adding sugar and vanilla gives it a sweet touch. We whip heavy cream to make it fluffy. Butter helps bind the crust together. If you want more sweetness, add powdered sugar to the whipped cream. For toppings, you can use chocolate chips or more Oreo crumbs. These extra touches make the dessert even more delightful. {{ingredient_image_2}} - Start by mixing 20 crushed Oreo cookies with 4 tablespoons of melted butter in a bowl. - Stir until the cookie crumbs look like wet sand. - Next, take about 2 tablespoons of this mixture and spoon it into each serving cup. - Press the mixture down firmly using the back of a spoon or your fingers. This will form a solid base. - In a large bowl, beat 8 oz of softened cream cheese with 1/2 cup of granulated sugar and 1 teaspoon of vanilla extract. - Use a hand mixer until the mixture is smooth and creamy. - In a separate bowl, pour in 1 cup of chilled heavy whipping cream. - Whip the cream until soft peaks form. If you like it sweeter, add 1/2 teaspoon of powdered sugar while whipping. - Carefully fold the whipped cream into the cream cheese mixture. - Use a spatula to combine both without losing the airiness of the whipped cream. - Evenly fill each cup with the cheesecake mixture, leaving some space at the top. - Now, sprinkle the remaining crushed Oreos or chocolate chips on top for a tasty finish. - Cover the cups with plastic wrap and put them in the fridge for at least 4 hours. - This chill time helps the cheesecake filling set up nicely. - Once set, serve the cheesecake cups cold. Enjoy the rich taste of Oreo in every bite! To whip cream well, start with chilled cream. Cold cream whips faster and holds its shape. Use a clean bowl and beaters to prevent any grease. Beat on medium speed until soft peaks form. If you want it sweeter, add powdered sugar slowly. For a smooth cream cheese mixture, make sure the cream cheese is at room temperature. Blend it with sugar and vanilla until it’s creamy and lump-free. If lumps form, continue mixing until they disappear. Garnish your cheesecake cups for a lovely look. A dollop of whipped cream on top adds flair. Place a mini Oreo on each cup for a fun touch. You can also sprinkle extra crushed Oreos or chocolate chips for color. For serving, arrange the cups on a pretty platter. This makes for a nice dessert display. You can even add fresh mint leaves for a pop of green. One mistake is overmixing the cream. Once you reach soft peaks, stop mixing. Overmixing can lead to a grainy texture. Another error is not chilling the cups long enough. They need at least four hours in the fridge. This helps the cheesecake filling set properly. If you skip this step, the cups may not hold their shape. Pro Tips Chill Your Mixing Bowls: For an even fluffier whipped cream, chill your mixing bowl and beaters in the refrigerator for about 15 minutes before whipping. Use Room Temperature Ingredients: Ensure your cream cheese is at room temperature for a smoother filling. Cold cream cheese can lead to lumps in your cheesecake mixture. Don’t Overmix the Cream: When folding the whipped cream into the cream cheese mixture, be gentle. Overmixing can deflate the whipped cream and result in a denser texture. Customize the Toppings: Feel free to get creative with toppings! Try adding crushed nuts, chocolate shavings, or fresh berries for an extra flavor twist. {{image_4}} You can spice up your Oreo cheesecake cups with flavor twists. Adding mint extract gives a refreshing kick. Just add half a teaspoon to the cream cheese mix. If you love peanut butter, swap in a quarter cup of creamy peanut butter. Mix it in with the cream cheese for a nutty flavor. You can also fold in fruits like mashed strawberries or blueberries into the filling. This adds a sweet and fruity taste that balances the rich cream cheese. If you want a change from Oreos, try other crusts. Graham crackers make a nice base. Crush them and mix with butter just like the Oreos. Digestive biscuits work well too for a slightly different flavor. For gluten-free options, use gluten-free cookies or almond flour mixed with butter. Both keep the crust tasty and firm. Toppings can take your cheesecake cups to the next level. Fresh berries like strawberries, raspberries, or blueberries add color and freshness. Drizzle some chocolate or caramel sauce on top for extra sweetness. You can even sprinkle chopped nuts for a nice crunch. These toppings not only enhance taste but also make your dessert look beautiful. To keep your No-Bake Oreo Cheesecake Cups fresh, store them in the fridge. Use a tight-sealing container. This will help avoid any mixing of flavors or odors. You can also cover the cups with plastic wrap. Make sure the wrap touches the filling to prevent drying out. These cheesecake cups stay fresh for about 3 to 5 days. To ensure they last, avoid leaving them out at room temperature. If you notice any changes in texture or smell, throw them away. Signs of spoilage include a sour smell or a watery texture on top. Always check before serving. Yes, you can use low-fat cream cheese. However, it may change the texture. Low-fat cream cheese can make the cheesecake less creamy. It might also taste less rich than the regular version. You can keep these cheesecake cups in the fridge for up to five days. Make sure to cover them well with plastic wrap. This will help keep them fresh and tasty. Yes, you can freeze these cheesecake cups. Just make sure to cover each cup tightly. They can last in the freezer for about two months. When you want to eat them, thaw them in the fridge overnight. You can use coconut cream or whipped topping as a substitute. These options will still give you a nice, creamy texture. If you choose coconut cream, make sure it's cold for the best results. This blog post shows how to make No-Bake Oreo Cheesecake Cups. We covered key ingredients like Oreo cookies and cream cheese. I shared steps on preparing the crust, mixing the filling, and assembling your cups. Tips helped ensure a perfect texture and presentation. You can try fun variations or use alternative crusts. Remember to store them well for freshness. Now you have all you need for a creamy treat that impresses. Enjoy the joy of sharing this easy dessert with friends and family. Happy making!

Why I Love This Recipe

  1. Decadent Flavor: This cheesecake cups are rich and creamy, with the perfect balance of chocolate and vanilla, making each bite a true delight.
  2. No-Bake Convenience: With no baking required, this recipe is quick and easy, allowing you to whip up a delicious dessert without the hassle of an oven.
  3. Customizable Toppings: You can easily personalize these cups with your favorite toppings, whether it’s extra Oreos, chocolate chips, or whipped cream.
  4. Perfect for Any Occasion: These cheesecake cups are ideal for parties, gatherings, or a simple family treat, impressing guests with their delightful presentation.
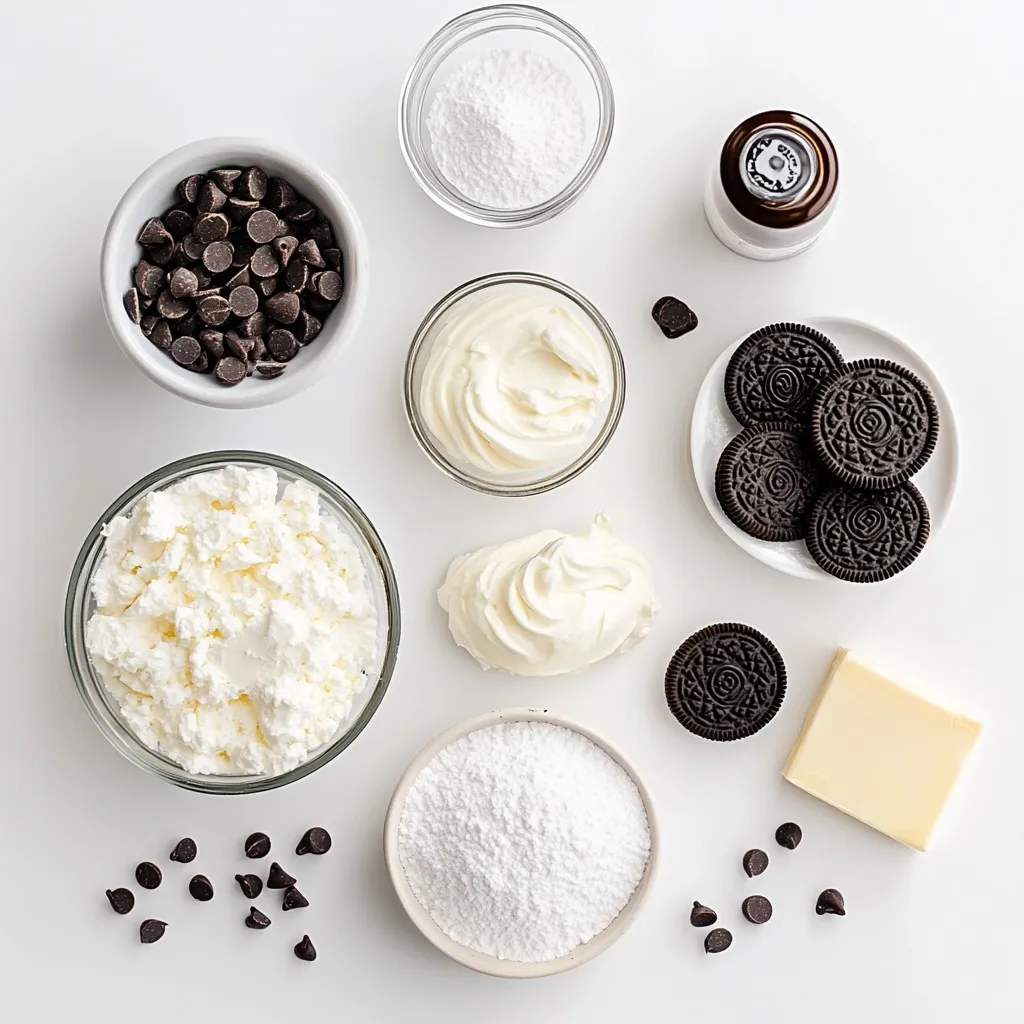
Ingredients

Main Ingredients

– 20 Oreo cookies, finely crushed (plus extra for garnish)

– 4 tablespoons unsalted butter, melted

– 8 oz cream cheese, softened to room temperature

– 1/2 cup granulated sugar

– 1 teaspoon pure vanilla extract

– 1 cup heavy whipping cream, chilled

Optional Ingredients

– 1/2 teaspoon powdered sugar (optional, for additional sweetness)

– 1/4 cup chocolate chips or extra Oreo crumbs, for topping

To make these No-Bake Oreo Cheesecake Cups, you need simple ingredients. The main star is the Oreo cookies. They create a rich, chocolatey crust. You will also use cream cheese for a smooth filling. Adding sugar and vanilla gives it a sweet touch. We whip heavy cream to make it fluffy. Butter helps bind the crust together.

If you want more sweetness, add powdered sugar to the whipped cream. For toppings, you can use chocolate chips or more Oreo crumbs. These extra touches make the dessert even more delightful.

Step-by-Step Instructions

Preparing the Oreo Crust

– Start by mixing 20 crushed Oreo cookies with 4 tablespoons of melted butter in a bowl.

– Stir until the cookie crumbs look like wet sand.

– Next, take about 2 tablespoons of this mixture and spoon it into each serving cup.

– Press the mixture down firmly using the back of a spoon or your fingers. This will form a solid base.

Creating the Creamy Filling

– In a large bowl, beat 8 oz of softened cream cheese with 1/2 cup of granulated sugar and 1 teaspoon of vanilla extract.

– Use a hand mixer until the mixture is smooth and creamy.

– In a separate bowl, pour in 1 cup of chilled heavy whipping cream.

– Whip the cream until soft peaks form. If you like it sweeter, add 1/2 teaspoon of powdered sugar while whipping.

Assembling the Cheesecake Cups

– Carefully fold the whipped cream into the cream cheese mixture.

– Use a spatula to combine both without losing the airiness of the whipped cream.

– Evenly fill each cup with the cheesecake mixture, leaving some space at the top.

– Now, sprinkle the remaining crushed Oreos or chocolate chips on top for a tasty finish.

Chilling and Serving

– Cover the cups with plastic wrap and put them in the fridge for at least 4 hours.

– This chill time helps the cheesecake filling set up nicely.

– Once set, serve the cheesecake cups cold. Enjoy the rich taste of Oreo in every bite!

Tips & Tricks

Achieving the Perfect Texture

To whip cream well, start with chilled cream. Cold cream whips faster and holds its shape. Use a clean bowl and beaters to prevent any grease. Beat on medium speed until soft peaks form. If you want it sweeter, add powdered sugar slowly.

For a smooth cream cheese mixture, make sure the cream cheese is at room temperature. Blend it with sugar and vanilla until it’s creamy and lump-free. If lumps form, continue mixing until they disappear.

Presentation Tips

Garnish your cheesecake cups for a lovely look. A dollop of whipped cream on top adds flair. Place a mini Oreo on each cup for a fun touch. You can also sprinkle extra crushed Oreos or chocolate chips for color.

For serving, arrange the cups on a pretty platter. This makes for a nice dessert display. You can even add fresh mint leaves for a pop of green.

Common Mistakes to Avoid

One mistake is overmixing the cream. Once you reach soft peaks, stop mixing. Overmixing can lead to a grainy texture.

Another error is not chilling the cups long enough. They need at least four hours in the fridge. This helps the cheesecake filling set properly. If you skip this step, the cups may not hold their shape.

Pro Tips

  1. Chill Your Mixing Bowls: For an even fluffier whipped cream, chill your mixing bowl and beaters in the refrigerator for about 15 minutes before whipping.
  2. Use Room Temperature Ingredients: Ensure your cream cheese is at room temperature for a smoother filling. Cold cream cheese can lead to lumps in your cheesecake mixture.
  3. Don’t Overmix the Cream: When folding the whipped cream into the cream cheese mixture, be gentle. Overmixing can deflate the whipped cream and result in a denser texture.
  4. Customize the Toppings: Feel free to get creative with toppings! Try adding crushed nuts, chocolate shavings, or fresh berries for an extra flavor twist.

Variations

Flavor Variations

You can spice up your Oreo cheesecake cups with flavor twists. Adding mint extract gives a refreshing kick. Just add half a teaspoon to the cream cheese mix. If you love peanut butter, swap in a quarter cup of creamy peanut butter. Mix it in with the cream cheese for a nutty flavor. You can also fold in fruits like mashed strawberries or blueberries into the filling. This adds a sweet and fruity taste that balances the rich cream cheese.

Alternative Crust Options

If you want a change from Oreos, try other crusts. Graham crackers make a nice base. Crush them and mix with butter just like the Oreos. Digestive biscuits work well too for a slightly different flavor. For gluten-free options, use gluten-free cookies or almond flour mixed with butter. Both keep the crust tasty and firm.

Different Topping Ideas

Toppings can take your cheesecake cups to the next level. Fresh berries like strawberries, raspberries, or blueberries add color and freshness. Drizzle some chocolate or caramel sauce on top for extra sweetness. You can even sprinkle chopped nuts for a nice crunch. These toppings not only enhance taste but also make your dessert look beautiful.

Storage Info

How to Store

To keep your No-Bake Oreo Cheesecake Cups fresh, store them in the fridge. Use a tight-sealing container. This will help avoid any mixing of flavors or odors. You can also cover the cups with plastic wrap. Make sure the wrap touches the filling to prevent drying out.

Shelf Life

These cheesecake cups stay fresh for about 3 to 5 days. To ensure they last, avoid leaving them out at room temperature. If you notice any changes in texture or smell, throw them away. Signs of spoilage include a sour smell or a watery texture on top. Always check before serving.

FAQs

Can I use low-fat cream cheese?

Yes, you can use low-fat cream cheese. However, it may change the texture. Low-fat cream cheese can make the cheesecake less creamy. It might also taste less rich than the regular version.

How long can I keep these cheesecake cups in the fridge?

You can keep these cheesecake cups in the fridge for up to five days. Make sure to cover them well with plastic wrap. This will help keep them fresh and tasty.

Can I freeze No-Bake Oreo Cheesecake Cups?

Yes, you can freeze these cheesecake cups. Just make sure to cover each cup tightly. They can last in the freezer for about two months. When you want to eat them, thaw them in the fridge overnight.

What can I substitute for heavy whipping cream?

You can use coconut cream or whipped topping as a substitute. These options will still give you a nice, creamy texture. If you choose coconut cream, make sure it’s cold for the best results.

This blog post shows how to make No-Bake Oreo Cheesecake Cups. We covered key ingredients like Oreo cookies and cream cheese. I shared steps on preparing the crust, mixing the filling, and assembling your cups. Tips helped ensure a perfect texture and presentation. You can try fun variations or use alternative crusts. Remember to store them well for freshness. Now you have all you need for a creamy treat that impresses. Enjoy the joy of sharing this easy dessert with friends and family. Happy makin

- 20 Oreo cookies, finely crushed (plus extra for garnish) - 4 tablespoons unsalted butter, melted - 8 oz cream cheese, softened to room temperature - 1/2 cup granulated sugar - 1 teaspoon pure vanilla extract - 1 cup heavy whipping cream, chilled - 1/2 teaspoon powdered sugar (optional, for additional sweetness) - 1/4 cup chocolate chips or extra Oreo crumbs, for topping To make these No-Bake Oreo Cheesecake Cups, you need simple ingredients. The main star is the Oreo cookies. They create a rich, chocolatey crust. You will also use cream cheese for a smooth filling. Adding sugar and vanilla gives it a sweet touch. We whip heavy cream to make it fluffy. Butter helps bind the crust together. If you want more sweetness, add powdered sugar to the whipped cream. For toppings, you can use chocolate chips or more Oreo crumbs. These extra touches make the dessert even more delightful. {{ingredient_image_2}} - Start by mixing 20 crushed Oreo cookies with 4 tablespoons of melted butter in a bowl. - Stir until the cookie crumbs look like wet sand. - Next, take about 2 tablespoons of this mixture and spoon it into each serving cup. - Press the mixture down firmly using the back of a spoon or your fingers. This will form a solid base. - In a large bowl, beat 8 oz of softened cream cheese with 1/2 cup of granulated sugar and 1 teaspoon of vanilla extract. - Use a hand mixer until the mixture is smooth and creamy. - In a separate bowl, pour in 1 cup of chilled heavy whipping cream. - Whip the cream until soft peaks form. If you like it sweeter, add 1/2 teaspoon of powdered sugar while whipping. - Carefully fold the whipped cream into the cream cheese mixture. - Use a spatula to combine both without losing the airiness of the whipped cream. - Evenly fill each cup with the cheesecake mixture, leaving some space at the top. - Now, sprinkle the remaining crushed Oreos or chocolate chips on top for a tasty finish. - Cover the cups with plastic wrap and put them in the fridge for at least 4 hours. - This chill time helps the cheesecake filling set up nicely. - Once set, serve the cheesecake cups cold. Enjoy the rich taste of Oreo in every bite! To whip cream well, start with chilled cream. Cold cream whips faster and holds its shape. Use a clean bowl and beaters to prevent any grease. Beat on medium speed until soft peaks form. If you want it sweeter, add powdered sugar slowly. For a smooth cream cheese mixture, make sure the cream cheese is at room temperature. Blend it with sugar and vanilla until it’s creamy and lump-free. If lumps form, continue mixing until they disappear. Garnish your cheesecake cups for a lovely look. A dollop of whipped cream on top adds flair. Place a mini Oreo on each cup for a fun touch. You can also sprinkle extra crushed Oreos or chocolate chips for color. For serving, arrange the cups on a pretty platter. This makes for a nice dessert display. You can even add fresh mint leaves for a pop of green. One mistake is overmixing the cream. Once you reach soft peaks, stop mixing. Overmixing can lead to a grainy texture. Another error is not chilling the cups long enough. They need at least four hours in the fridge. This helps the cheesecake filling set properly. If you skip this step, the cups may not hold their shape. Pro Tips Chill Your Mixing Bowls: For an even fluffier whipped cream, chill your mixing bowl and beaters in the refrigerator for about 15 minutes before whipping. Use Room Temperature Ingredients: Ensure your cream cheese is at room temperature for a smoother filling. Cold cream cheese can lead to lumps in your cheesecake mixture. Don’t Overmix the Cream: When folding the whipped cream into the cream cheese mixture, be gentle. Overmixing can deflate the whipped cream and result in a denser texture. Customize the Toppings: Feel free to get creative with toppings! Try adding crushed nuts, chocolate shavings, or fresh berries for an extra flavor twist. {{image_4}} You can spice up your Oreo cheesecake cups with flavor twists. Adding mint extract gives a refreshing kick. Just add half a teaspoon to the cream cheese mix. If you love peanut butter, swap in a quarter cup of creamy peanut butter. Mix it in with the cream cheese for a nutty flavor. You can also fold in fruits like mashed strawberries or blueberries into the filling. This adds a sweet and fruity taste that balances the rich cream cheese. If you want a change from Oreos, try other crusts. Graham crackers make a nice base. Crush them and mix with butter just like the Oreos. Digestive biscuits work well too for a slightly different flavor. For gluten-free options, use gluten-free cookies or almond flour mixed with butter. Both keep the crust tasty and firm. Toppings can take your cheesecake cups to the next level. Fresh berries like strawberries, raspberries, or blueberries add color and freshness. Drizzle some chocolate or caramel sauce on top for extra sweetness. You can even sprinkle chopped nuts for a nice crunch. These toppings not only enhance taste but also make your dessert look beautiful. To keep your No-Bake Oreo Cheesecake Cups fresh, store them in the fridge. Use a tight-sealing container. This will help avoid any mixing of flavors or odors. You can also cover the cups with plastic wrap. Make sure the wrap touches the filling to prevent drying out. These cheesecake cups stay fresh for about 3 to 5 days. To ensure they last, avoid leaving them out at room temperature. If you notice any changes in texture or smell, throw them away. Signs of spoilage include a sour smell or a watery texture on top. Always check before serving. Yes, you can use low-fat cream cheese. However, it may change the texture. Low-fat cream cheese can make the cheesecake less creamy. It might also taste less rich than the regular version. You can keep these cheesecake cups in the fridge for up to five days. Make sure to cover them well with plastic wrap. This will help keep them fresh and tasty. Yes, you can freeze these cheesecake cups. Just make sure to cover each cup tightly. They can last in the freezer for about two months. When you want to eat them, thaw them in the fridge overnight. You can use coconut cream or whipped topping as a substitute. These options will still give you a nice, creamy texture. If you choose coconut cream, make sure it's cold for the best results. This blog post shows how to make No-Bake Oreo Cheesecake Cups. We covered key ingredients like Oreo cookies and cream cheese. I shared steps on preparing the crust, mixing the filling, and assembling your cups. Tips helped ensure a perfect texture and presentation. You can try fun variations or use alternative crusts. Remember to store them well for freshness. Now you have all you need for a creamy treat that impresses. Enjoy the joy of sharing this easy dessert with friends and family. Happy making!

Decadent No-Bake Oreo Cheesecake Cups

Delicious and creamy cheesecake cups made with Oreo cookies, perfect for a quick dessert.
Prep Time 20 minutes
Total Time 4 hours 20 minutes
Course Dessert
Cuisine American
Servings 6
Calories 350 kcal

Ingredients
  

  • 20 cookies Oreo cookies, finely crushed (plus extra for garnish)
  • 4 tablespoons unsalted butter, melted
  • 8 oz cream cheese, softened to room temperature
  • 1 cup granulated sugar
  • 1 teaspoon pure vanilla extract
  • 1 cup heavy whipping cream, chilled
  • 1 2 powdered sugar (optional, for additional sweetness)
  • 1 4 cup chocolate chips or extra Oreo crumbs, for topping

Instructions
 

  • In a medium mixing bowl, combine the finely crushed Oreo cookies and melted butter. Stir until all the cookie crumbs are evenly coated with butter and resemble wet sand.
  • Take about 2 tablespoons of the Oreo mixture and spoon it into the bottom of each serving cup. Use the back of a spoon or your fingers to press the mixture firmly down, forming a solid base.
  • In a large mixing bowl, beat the softened cream cheese with granulated sugar and vanilla extract using a hand mixer. Blend until the mixture is completely smooth and creamy, ensuring there are no lumps.
  • In a separate bowl, pour in the chilled heavy whipping cream. Using an electric mixer, whip the cream until soft peaks begin to form. If you prefer a sweeter filling, add the powdered sugar while whipping and mix until combined.
  • Carefully fold the whipped cream into the cream cheese mixture. Use a spatula to gently combine the two mixtures without deflating the whipped cream, preserving its airy texture.
  • Evenly distribute the cheesecake filling into the prepared Oreo crusts in each cup, filling them to about 3/4 full to allow space for topping.
  • Sprinkle each cheesecake cup with the remaining crushed Oreos or chocolate chips for a delightful finishing touch.
  • Cover the cups with plastic wrap and refrigerate for at least 4 hours, or until the cheesecake filling is set and firm.
  • Once set, serve the cheesecake cups chilled to enjoy the rich layers of Oreo bliss!

Notes

For an elegant finish, top each cheesecake cup with a dollop of freshly whipped cream and place a mini Oreo on top.
Keyword cheesecake, dessert, easy, no-bake, Oreo

WANT TO SAVE THIS RECIPE?