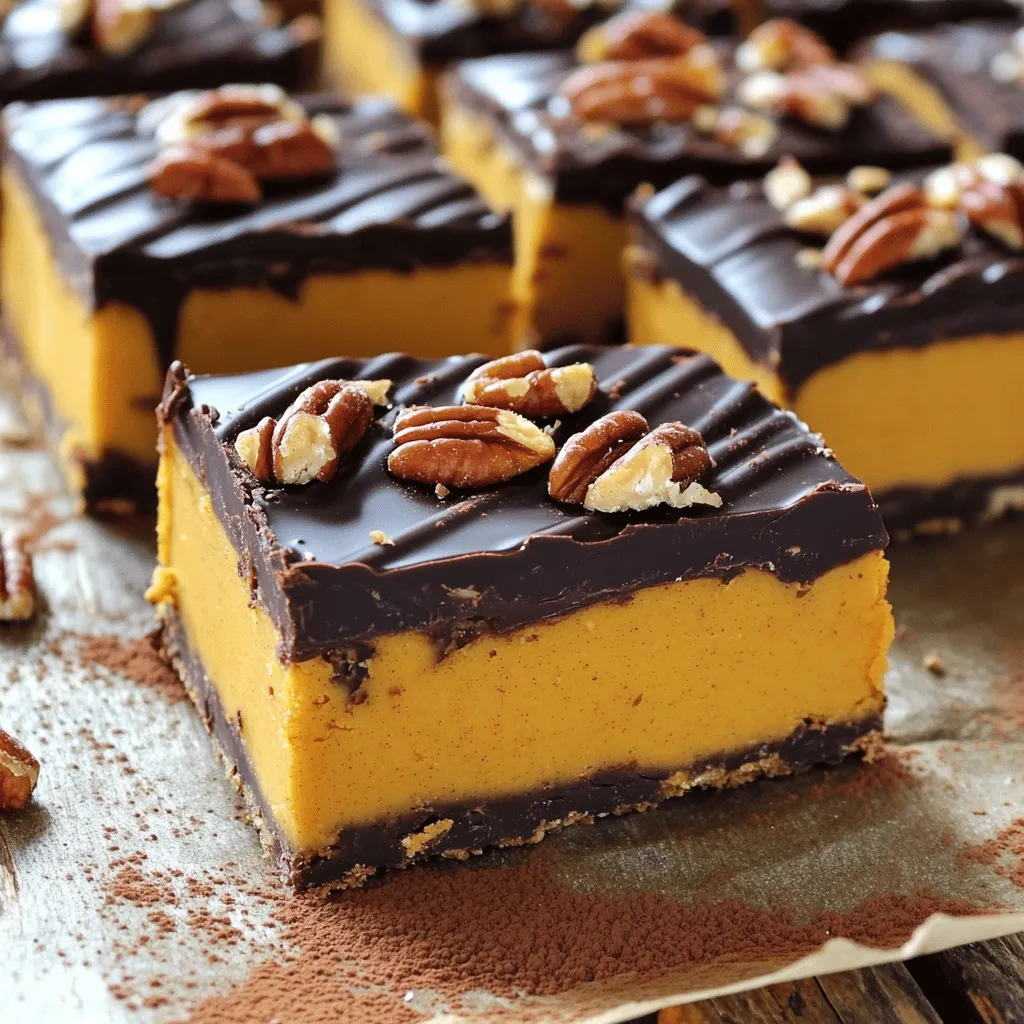
Craving something sweet that’s simple to make? You’re in for a treat! These No-Bake Chocolate Peanut Butter Pumpkin Bars mix creamy flavors with healthy ingredients. Whether you want a quick dessert or a snack, these bars will delight your taste buds. Get ready to enjoy pumpkin, chocolate, and peanut butter in every bite. They’re perfect for any occasion! Let’s dive into the easy steps to whip up this delicious recipe.
Ingredients
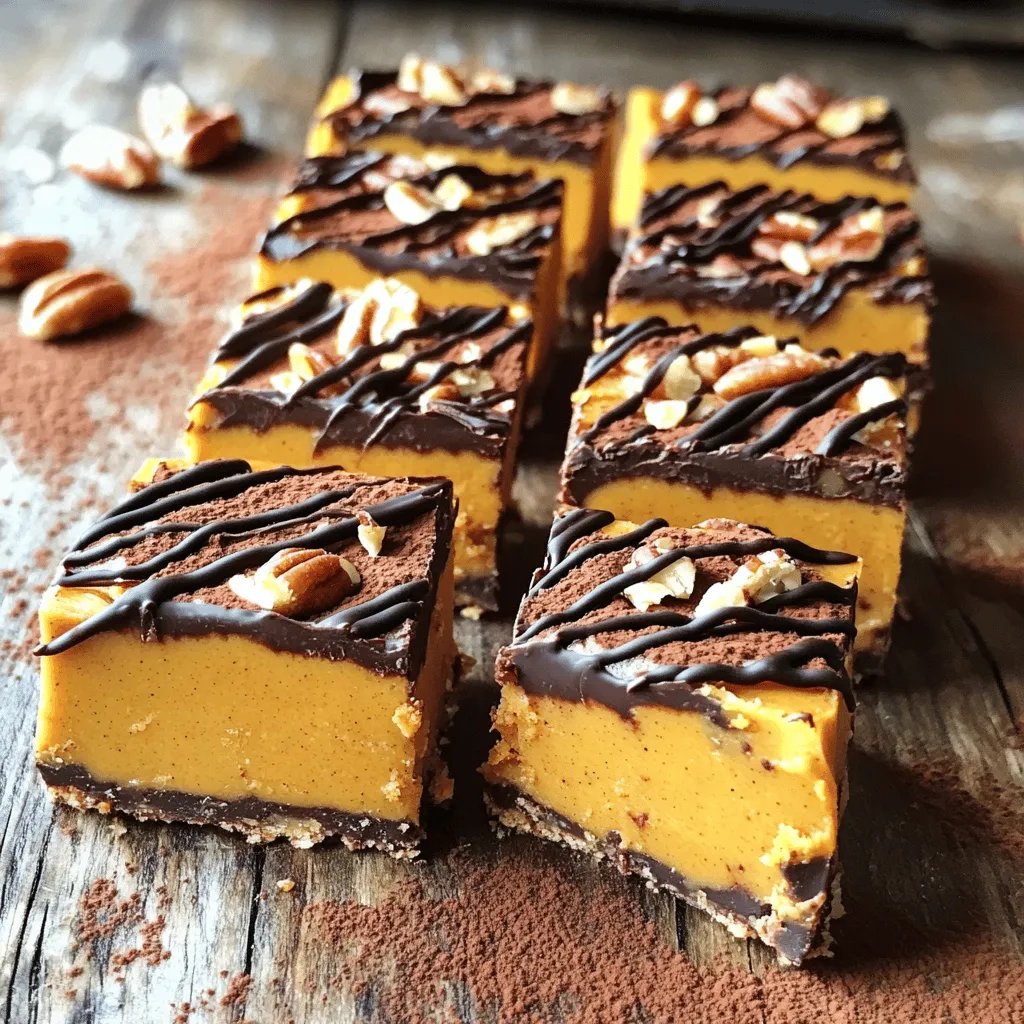
To make these no-bake chocolate peanut butter pumpkin bars, you need simple ingredients. Each one plays a key role in the flavor and texture of the bars. Here’s what you’ll need:
– 1 cup almond flour
– 1/2 cup rolled oats
– 1/4 cup coconut oil, melted
– 1/3 cup pure maple syrup
– 1/2 cup pumpkin puree (not pumpkin pie filling)
– 1/4 cup creamy peanut butter
– 1/2 teaspoon ground cinnamon
– 1/4 teaspoon ground nutmeg
– 1/4 teaspoon pure vanilla extract
– 1/2 cup dark chocolate chips (dairy-free if preferred)
– 1/2 cup chopped pecans or walnuts (optional but recommended for texture)
These ingredients blend to create a dessert that is rich and satisfying. Almond flour gives a nutty base, while rolled oats add chewiness. Coconut oil helps bind the crust and adds a light flavor. Pure maple syrup sweetens the mix naturally.
Pumpkin puree brings moisture and a lovely fall taste. Creamy peanut butter adds richness and pairs well with the chocolate. The spices, cinnamon and nutmeg, enhance the fall vibe in each bite. Finally, dark chocolate chips melt into a delicious topping. Nuts add crunch and depth, though they are optional.
Gather these ingredients to create a treat that is easy and delightful. You will love how they come together without any baking.
Step-by-Step Instructions
Preparing the Crust
– In a medium bowl, mix 1 cup of almond flour and 1/2 cup of rolled oats.
– In a small bowl, whisk 1/4 cup of melted coconut oil, 1/3 cup of maple syrup, and 1/4 teaspoon of vanilla extract.
– Pour the wet mixture into the dry ingredients. Stir until no dry bits remain.
Forming the Crust
– Press the mixture into the bottom of an 8×8 inch baking dish. Use a measuring cup to smooth it out.
Preparing the Pumpkin Filling
– In another bowl, mix 1/2 cup of pumpkin puree, 1/4 cup of peanut butter, 1/2 teaspoon of ground cinnamon, and 1/4 teaspoon of ground nutmeg.
– Stir until smooth and creamy.
Adding Chocolate and Nuts
– In a microwave-safe bowl, add 1/2 cup of dark chocolate chips. Heat in 30-second intervals, stirring until smooth.
– Drizzle the melted chocolate over the pumpkin layer. Swirl it with a toothpick for a marbled look.
– If using, sprinkle 1/2 cup of chopped pecans or walnuts on top for added crunch.
Chilling and Serving
– Refrigerate the bars for at least 2 hours until set.
– Lift the bars out using the parchment paper. Cut into squares and enjoy!
Tips & Tricks
Ensuring Proper Consistency
Mixing well is key for smooth bars. When you combine the dry and wet ingredients, make sure nothing remains dry. If you skip this step, your bars may crumble. When melting chocolate, do it slowly. Heat it in short bursts. Stir often to avoid burning. Chocolate can burn quickly, so watch it closely.
Flavor Enhancements
You can add extra spices for more depth. Consider using ginger or cloves for warmth. These spices boost the pumpkin flavor. For garnishes, try a sprinkle of sea salt. It contrasts well with the sweet chocolate. Chopped nuts can also add a nice crunch on top.
Presentation Ideas
Serve these bars on a pretty platter. For gatherings, cut them into small squares. Dust with cocoa powder for a fancy touch. A sprinkle of cinnamon adds warmth and charm. These small details make your dessert look inviting.
Variations
Dietary Substitutes
You can easily modify this recipe to fit your needs. For gluten-free bars, use certified gluten-free oats. Almond flour is already gluten-free, but check your brands to be sure. If you want vegan options, swap the honey for maple syrup. You can also use dairy-free chocolate chips to keep it plant-based.
Flavor Customizations
Feel free to get creative with nut butters. You can use almond butter, cashew butter, or even sunflower seed butter if you want a nut-free option. For toppings, try adding shredded coconut, chocolate shavings, or even crushed pretzels for a salty crunch. Swapping toppings can change the whole vibe of the bars.
Using Seasonal Ingredients
These bars are great for adding seasonal flavors. Consider adding a dash of pumpkin spice or even some ginger for a fall twist. You can also mix in some dried cranberries or chopped apples for a fruity kick. Using fresh ingredients keeps your bars exciting and tasty all year round.
Storage Info
Best Storage Practices
To keep your no-bake chocolate peanut butter pumpkin bars fresh, store them in an airtight container. This helps keep them moist and tasty. I recommend putting a piece of parchment paper between layers. It stops sticking and makes serving easier. Place the container in the fridge. Keeping them cool helps maintain their texture.
Freezing Instructions
If you want to store these bars for longer, freezing works great. First, cut the bars into squares. Wrap each square in plastic wrap. Then, place the wrapped bars in a freezer-safe bag or container. Make sure to squeeze out any air. To thaw, take out the bars and leave them in the fridge for a few hours before serving. They will taste just as good!
Shelf Life
In the fridge, these bars last about one week. If you freeze them, they can last up to three months. Always check for any signs of spoilage before eating. Enjoy them fresh for the best flavor!
FAQs
Can I substitute almond flour with another type?
Yes, you can! Here are some great alternatives for almond flour:
– Coconut flour: Use less, about 1/4 cup for every cup of almond flour.
– Oat flour: This works well; use it in equal amounts.
– All-purpose flour: Use the same amount, but it will not be gluten-free.
Each option gives a unique taste and texture. Experiment to find your favorite!
How do I make these bars vegan?
Making these bars vegan is simple! Here are a few tips for vegan substitutions:
– Use maple syrup: This is already vegan, so keep it!
– Substitute coconut oil: Use a plant-based butter or another oil like canola.
– Replace chocolate chips: Choose dairy-free chocolate chips for a vegan option.
These swaps keep your bars tasty and plant-based!
What can I use instead of pumpkin puree?
If you can’t find pumpkin puree, here are some options:
– Sweet potato puree: Cook and mash sweet potatoes for a similar texture.
– Butternut squash puree: Roast butternut squash and blend it until smooth.
– Carrot puree: Steam and blend carrots for a sweet flavor.
These alternatives add a twist while keeping the bars tasty!
How do I know when the bars are set?
You can tell your bars are set by checking these signs:
– They feel firm to the touch.
– The edges pull away from the pan slightly.
– A toothpick inserted comes out clean.
If they pass these tests, your bars are ready to enjoy!
These no-bake bars are simple and delicious. You learned about key ingredients like almond flour, pumpkin puree, and dark chocolate. I shared step-by-step instructions to help you create the perfect crust and filling. Tips ensured the best flavor and texture, while variations catered to dietary needs. You can now store these bars correctly and enjoy them fresh. Remember, these treats are fun to make and share. So grab your ingredients and get started on your tasty journey!