Dive into the world of creamy roasted garlic hummus, a dip that's bursting with flavor! This easy recipe transforms simple ingredients into a velvety delight. Whether you’re hosting a party or just want a healthy snack, I’ll guide you through every step. From roasting garlic to achieving that perfect creamy texture, you’ll impress everyone at the table. Let’s get started on making your new favorite dip!
Why I Love This Recipe
- Rich Flavor: This hummus is packed with the deep, roasted flavor of garlic, making it a standout dip that elevates any snack or meal.
- Healthy Ingredients: Made with wholesome chickpeas, tahini, and olive oil, this hummus is not just delicious but also nutritious.
- Versatile Dip: Perfect for parties, picnics, or as a healthy snack, it pairs well with a variety of dippers like veggies, pita, or even crackers.
- Easy to Make: This recipe comes together quickly, allowing you to whip up a fresh batch of hummus in no time!
Ingredients
Required Ingredients for Creamy Roasted Garlic Hummus
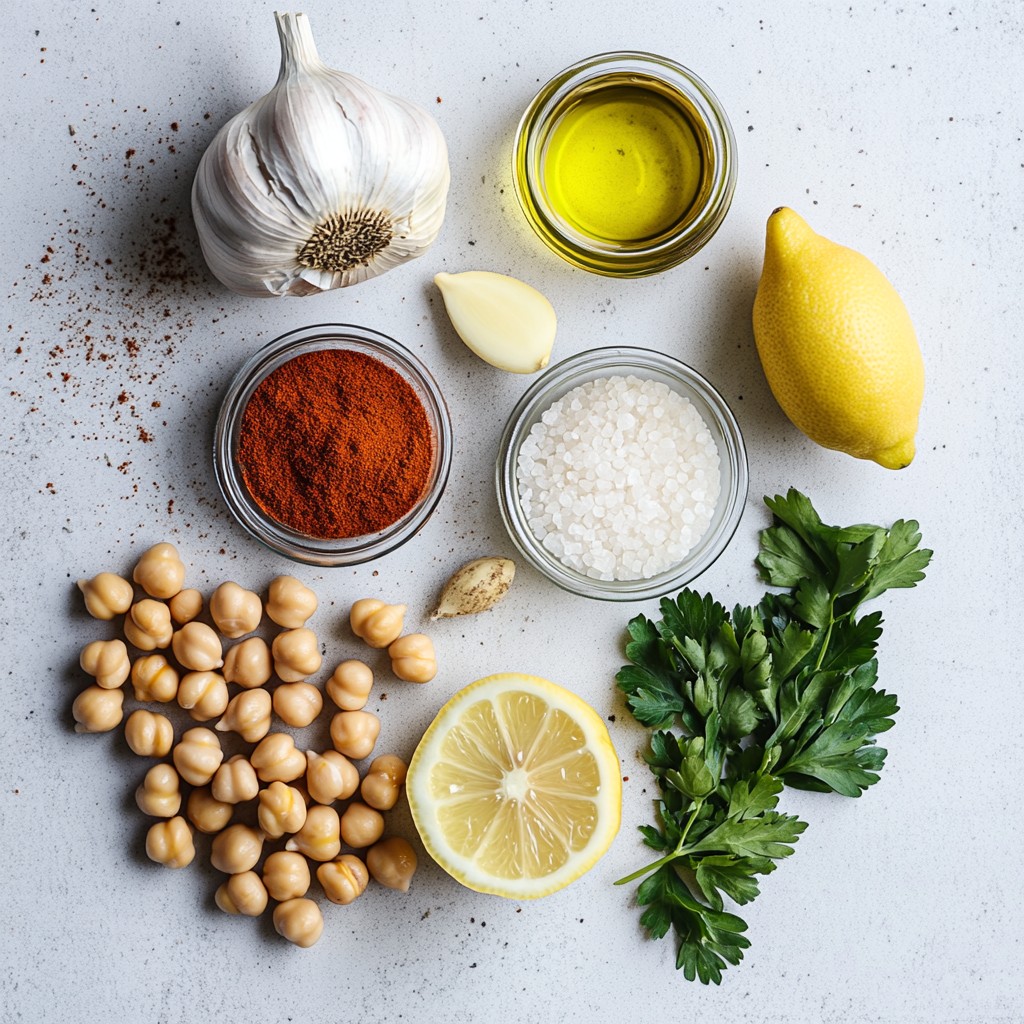
To make this delicious dip, you will need:
- 1 cup dried chickpeas (or 2 cups canned chickpeas, drained and rinsed)
- 1 large head of garlic
- 2 tablespoons tahini
- 3 tablespoons extra virgin olive oil (plus extra for drizzling)
- 2 tablespoons freshly squeezed lemon juice
- 1/2 teaspoon ground cumin
- Salt to taste
- Water, as needed for consistency
- Paprika and fresh parsley, finely chopped for garnish
These ingredients blend together to create a smooth and creamy texture. The roasted garlic adds a rich flavor that elevates the dish.
Optional Ingredients and Add-ins
You can customize your hummus with these optional ingredients:
- A pinch of cayenne for heat
- Roasted red peppers for sweetness
- Fresh herbs like basil or cilantro for freshness
- Olive oil or balsamic vinegar for extra richness
Feel free to mix and match these add-ins to create a flavor that suits your taste.
Substitutions for Dietary Needs
If you have dietary restrictions, consider these substitutions:
- Use canned chickpeas for a quicker option.
- Replace tahini with sunflower seed butter for a nut-free alternative.
- Swap lemon juice with lime juice if you prefer a different citrus flavor.
- Use water or vegetable broth instead of oil for a lighter option.
These swaps keep the essence of the hummus while accommodating different diets.
Step-by-Step Instructions
Preparing Dried Chickpeas or Using Canned
First, you need to decide if you want to use dried or canned chickpeas. If you choose dried chickpeas, soak them in water. Leave them overnight or for at least 8 hours. After soaking, drain and rinse them. Place the chickpeas in a pot, cover them with fresh water, and boil for 1 to 1.5 hours until they are soft. For canned chickpeas, simply drain and rinse them under cold water. This step reduces the saltiness and makes them ready to blend.
Roasting Garlic for Maximum Flavor
Roasting the garlic gives your hummus a rich taste. Preheat your oven to 400°F (200°C). Take a large head of garlic and cut off the top. This exposes the cloves. Drizzle a teaspoon of olive oil over the cut ends to coat them. Wrap the garlic in aluminum foil. This helps keep the heat in and cooks the cloves evenly. Roast the garlic for 30 to 35 minutes. When it’s done, the cloves should feel soft and look caramelized. Let it cool for a few minutes, then squeeze out the roasted cloves.
Blending Until Creamy
Now comes the fun part! In a food processor, add the cooked chickpeas and the roasted garlic cloves. Next, include tahini, olive oil, lemon juice, and ground cumin. Blend the mixture, starting at a low speed. Gradually add water, one tablespoon at a time, until you reach that perfect creamy texture. Taste your hummus and season with salt as needed. If you want, you can blend in more lemon juice or cumin for added flavor. Continue blending until the mixture is smooth and velvety.
Tips & Tricks
Achieving a Creamy Texture
To get the perfect creamy texture in your hummus, start with the right chickpeas. If you use dried chickpeas, soak them overnight. This step helps them cook better. When they are soft, they blend smoothly. If you choose canned chickpeas, rinse them well. This helps reduce sodium and improves flavor. Always add water slowly while blending. This method lets you control how creamy your hummus gets. Blend until it’s velvety and smooth.
Flavor Enhancements and Adjustments
For an extra flavor boost, try adding more roasted garlic. Roasting brings out a sweet, rich taste. You can also adjust the lemon juice. More juice makes it tangy and bright. Ground cumin adds warmth and depth. Taste as you go. If it’s too bland, add salt or more spices to fit your taste. You can even mix in a pinch of cayenne for heat or smoked paprika for a different twist.
Serving Suggestions for Presentation
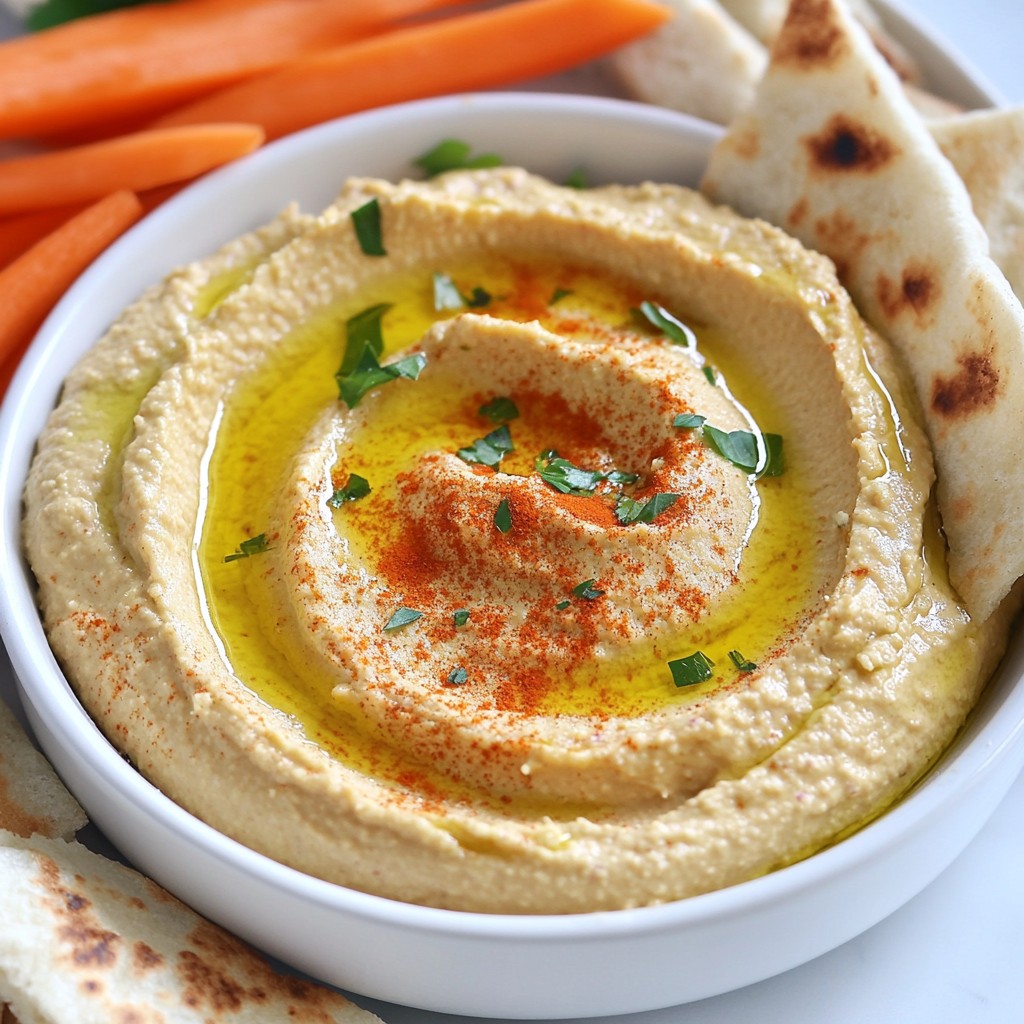
How you serve your hummus can make it even more appealing. Use a shallow bowl to display the hummus nicely. Create a small well in the center and drizzle olive oil for shine. Sprinkle paprika and chopped parsley on top for color. Arrange colorful dippers around the bowl. Fresh pita, carrot sticks, cucumber slices, and bell pepper strips not only taste great but also look beautiful. This makes the platter inviting and fun to share.
Pro Tips
- Soak for Success: Soaking dried chickpeas not only helps in cooking them faster but also enhances their digestibility. Aim for at least 8 hours of soaking for the best results.
- Perfectly Roasted Garlic: Ensure the garlic is wrapped tightly in foil to trap steam, which helps in achieving that sweet, caramelized flavor. Don’t skip the cooling step before handling!
- Adjusting Consistency: When blending, add water gradually to control the texture. If the hummus is too thick, adding ice-cold water can help maintain a creamy consistency without heating it up.
- Garnish with Flair: For a stunning presentation, use a drizzle of high-quality olive oil and sprinkle with smoked paprika and fresh parsley right before serving to add color and flavor.
Variations
Adding Spices for Extra Flavor
You can add spices to your creamy roasted garlic hummus to make it even better. Try adding a pinch of cayenne pepper for heat. If you like a smoky flavor, smoked paprika works great. For a fresh twist, add some chopped basil or cilantro. Each spice brings its own unique taste, making your hummus even more exciting.
Different Types of Beans for Alternative Hummus
While chickpeas are classic, you can use other beans too. White beans make a smooth and creamy dip. Black beans add a rich flavor and a dark color. Even lentils can work, giving a different texture. Each bean changes the taste, allowing you to experiment with your hummus.
Vegan and Gluten-Free Options
This creamy roasted garlic hummus is already vegan and gluten-free. You can serve it with gluten-free crackers or veggie sticks. If you want to make it even healthier, try adding some spinach or kale during blending. This boosts nutrition and adds a vibrant green color. Enjoy your hummus without any worry about dietary restrictions!
Storage Info
How to Store Leftover Hummus
To keep your creamy roasted garlic hummus fresh, store it in an airtight container. Place a thin layer of olive oil on top. This helps lock in moisture and flavor. You can keep it in the fridge for up to one week. Always use a clean spoon to scoop out the hummus. This prevents bacteria from growing and extends its life.
Preparing Hummus in Advance
Making hummus ahead of time is smart. You can prepare it one to two days before your event. Just follow the recipe and store it in the fridge. The flavors will blend and deepen, making it even tastier. When ready to serve, just drizzle with more olive oil and add your garnishes.
Freezing Hummus for Long-Term Use
If you want to save hummus for later, freezing works well. Place the hummus in a freezer-safe container. Leave some space at the top since it will expand when frozen. You can freeze it for up to three months. To eat, thaw it in the fridge overnight. Stir it well before serving to restore its creamy texture.
FAQs
What can I serve with Creamy Roasted Garlic Hummus?
You can pair this hummus with many tasty items. Try fresh pita bread, veggie sticks, or crackers. Carrot sticks, cucumber slices, and bell pepper strips work great too. You can also use it as a spread on sandwiches or wraps. For a fun twist, serve it as a dip with chips or pretzels.
How long does homemade hummus last?
Homemade hummus can last about five to seven days in the fridge. Store it in an airtight container to keep it fresh. Always check for any off smells or changes in texture before eating. If it looks or smells bad, it's best to toss it.
Can I use pre-roasted garlic?
Yes, you can use pre-roasted garlic to save time. Just mash it and add it to your hummus. The flavor will be similar, but freshly roasted garlic has a deeper taste. If you want that rich, sweet flavor, roasting your own garlic is the way to go.
Is hummus healthy?
Hummus is a healthy choice! It's made from chickpeas, which are high in protein and fiber. The olive oil adds healthy fats, while garlic has many health benefits. Just watch the portion size, as it can have calories that add up quickly. But overall, it's a nutritious dip.
How to make hummus without tahini?
You can easily make hummus without tahini! Just skip it and add more olive oil or a nut butter like almond or cashew. You can also use yogurt for creaminess. Just blend your chickpeas, garlic, lemon juice, and olive oil, and you'll have a tasty dip.
This blog post covered all you need to make creamy roasted garlic hummus. You learned about the key ingredients, helpful tips, and tasty variations. I shared methods for storage and made sure to answer common questions.
Making hummus is easy and fun! Don’t be afraid to try new flavors and add your twist. Enjoy sharing this delicious dip with friends and family. Your hummus can be a hit at any gathering!