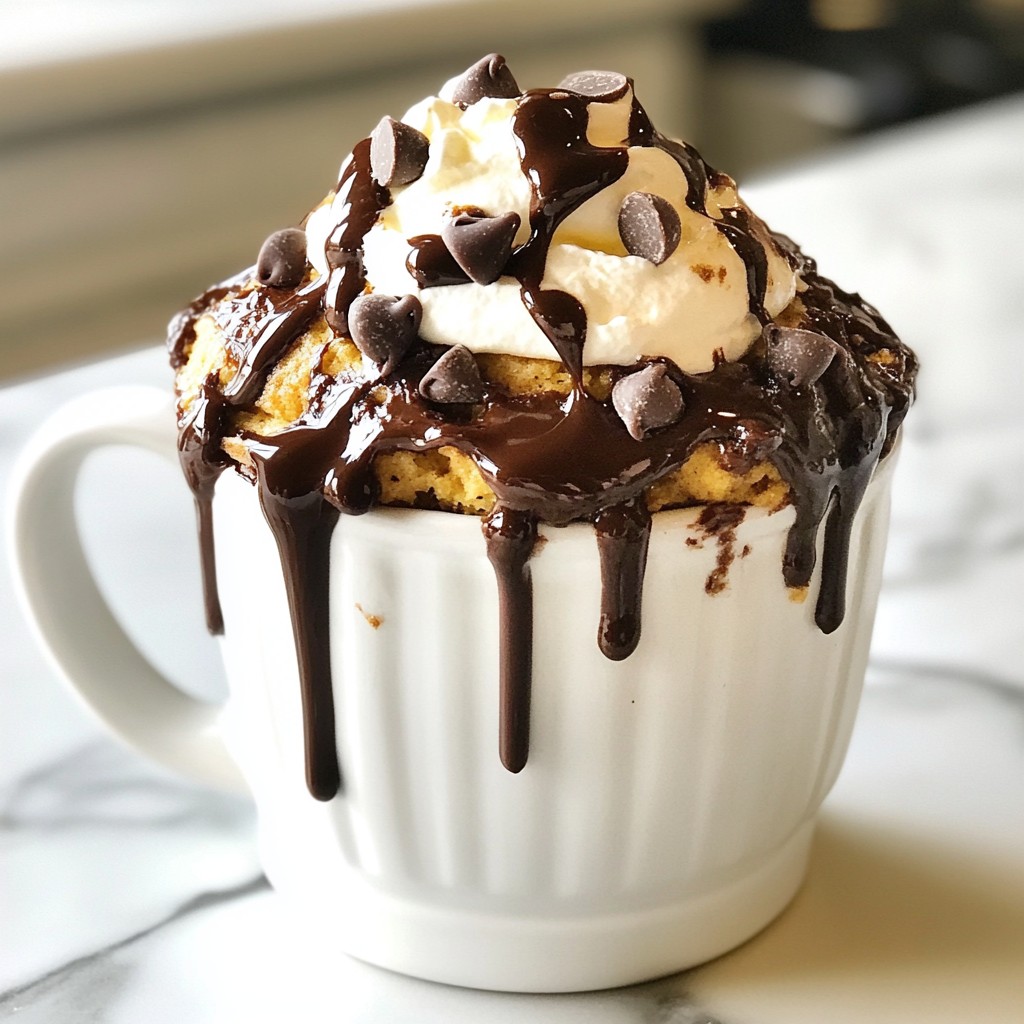
Craving a quick dessert? This Chocolate Peanut Butter Mug Cake is your answer! In just minutes, you can whip up a rich, gooey cake that satisfies your sweet tooth. With simple ingredients and easy steps, even novice bakers can enjoy this treat. Let’s dive into the world of microwave magic and discover how to make your dessert dreams come true! Get ready to indulge!
Why I Love This Recipe
- Quick and Easy: This mug cake can be prepared in just 5 minutes, making it perfect for a last-minute dessert craving.
- Single Serving: No need to bake a whole cake! This recipe yields a single serving, ideal for solo indulgence or a late-night snack.
- Customizable: Feel free to add mix-ins like chocolate chips or nuts to make it your own. The possibilities are endless!
- Deliciously Decadent: With rich chocolate and creamy peanut butter, this mug cake delivers a satisfying dessert experience in every bite.
Ingredients
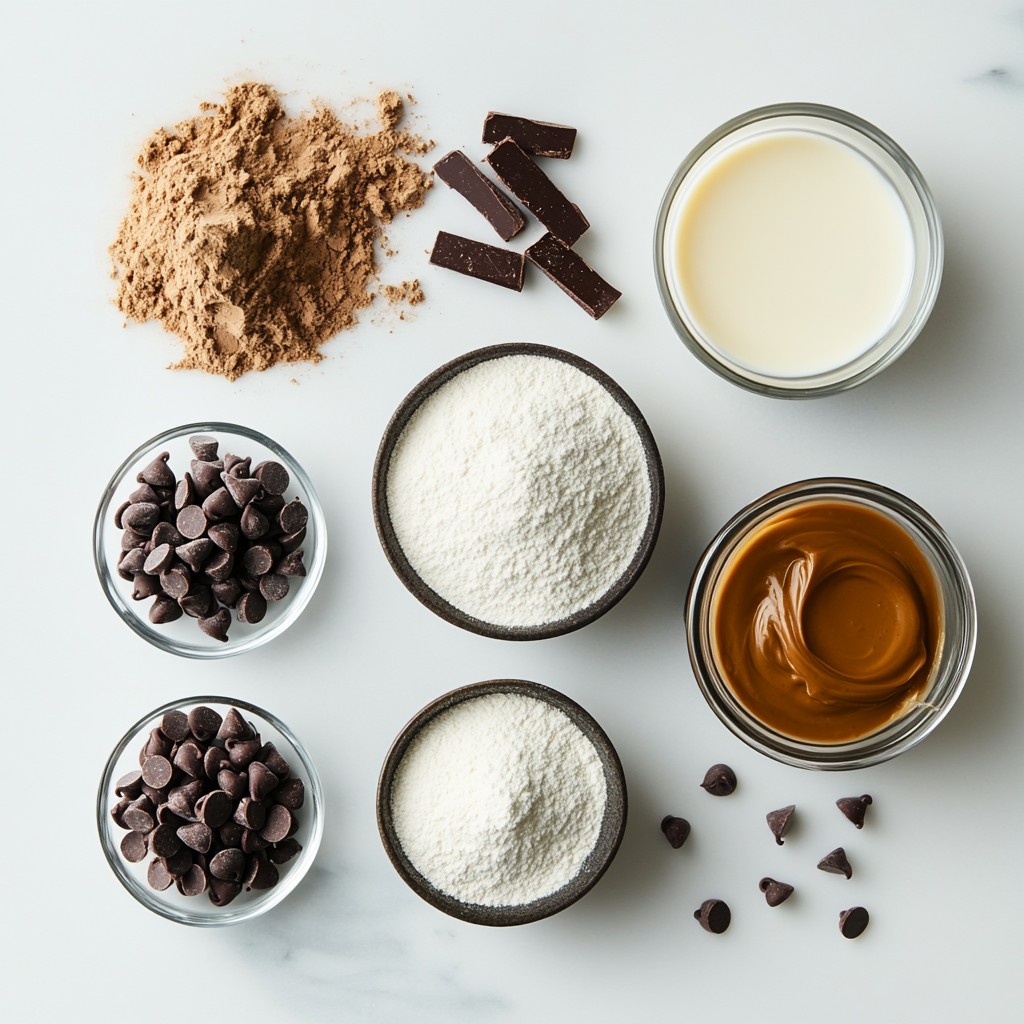
List of Ingredients
- 4 tablespoons all-purpose flour
- 2 tablespoons unsweetened cocoa powder
- 3 tablespoons granulated sugar
- 1/8 teaspoon baking powder
- 1/8 teaspoon fine sea salt
- 3 tablespoons milk (dairy or non-dairy)
- 2 tablespoons smooth peanut butter
- 1 tablespoon vegetable oil
- 1/2 teaspoon pure vanilla extract
- Optional: a handful of chocolate chips
Measurements
You will need:
- Flour: 4 tablespoons
- Cocoa powder: 2 tablespoons
- Sugar: 3 tablespoons
- Baking powder: 1/8 teaspoon
- Sea salt: 1/8 teaspoon
- Milk: 3 tablespoons
- Peanut butter: 2 tablespoons
- Vegetable oil: 1 tablespoon
- Vanilla extract: 1/2 teaspoon
- Chocolate chips (optional): a handful
Optional Ingredients
You can add chocolate chips for an extra treat. This makes the cake richer and more chocolatey. Feel free to use dark, milk, or even white chocolate chips. If you love nuts, chopped peanuts can add a nice crunch.
Step-by-Step Instructions
Preparing the Dry Ingredients
First, grab a microwave-safe mug. In the mug, combine the dry ingredients. Add 4 tablespoons of all-purpose flour. Then, mix in 2 tablespoons of unsweetened cocoa powder. Next, add 3 tablespoons of granulated sugar. Don’t forget to include 1/8 teaspoon of baking powder and 1/8 teaspoon of fine sea salt. Use a fork or small whisk and mix everything. Keep stirring until there are no lumps left. This step is key to a smooth cake.
Combining Wet Ingredients
Now, let’s add the wet ingredients. Pour in 3 tablespoons of milk. You can use dairy or any non-dairy milk you like. Next, add 2 tablespoons of smooth peanut butter. Then, include 1 tablespoon of vegetable oil for moisture. Finally, add 1/2 teaspoon of pure vanilla extract for flavor. Stir everything together with a spoon or whisk. Mix well until you have a smooth batter. If you want extra richness, fold in a handful of chocolate chips.
Microwaving the Mug Cake
Place the mug in the microwave next. Cook it on high for 1 minute and 30 seconds. Microwaves can vary, so watch it closely. The cake is done when it feels springy to the touch. If it’s not ready, microwave it for an extra 10 seconds at a time. Once it’s cooked, take the mug out (be careful, it’s hot!). Let it cool for about 1 minute before enjoying. It’s time for a delicious treat!
Tips & Tricks
Achieving the Perfect Texture
To make your mug cake soft and fluffy, mix the dry ingredients well. You want no lumps in your flour and cocoa mix. When you add the wet ingredients, stir until smooth. Overmixing can make the cake dense, so mix just enough. The batter should be thick but pourable.
Microwave Cooking Tips
Microwaves cook unevenly, so watch your mug cake closely. Start with one minute and thirty seconds. If it’s not done, cook it in ten-second bursts. The cake is ready when it feels springy to the touch. Let it cool for one minute before eating. This helps avoid burns and lets flavors settle.
Serving Suggestions
For a fun twist, top your mug cake with whipped cream or ice cream. A drizzle of chocolate syrup makes it extra tasty. You can also sprinkle nuts or extra chocolate chips on top. Enjoy it directly from the mug for a cozy dessert moment.
Pro Tips
- Use a Larger Mug: Opt for a larger mug to prevent overflow during cooking, as the cake will rise while baking.
- Experiment with Mix-ins: Feel free to add nuts, dried fruit, or different flavored chips to customize your mug cake.
- Microwave Timing: Since microwave power varies, check the cake at 1 minute and 30 seconds, and continue in 10-second increments if needed.
- Let it Cool: Allow the mug cake to cool for a minute before eating; it will continue to cook slightly with residual heat.
Variations
Alternative Flavors (e.g., nutella, cookie butter)
You can switch up the taste of your mug cake easily. Instead of peanut butter, try Nutella. Just use the same amount. It adds a sweet, hazelnut twist. Cookie butter is another great choice. It gives a spiced flavor that is hard to resist. You can even mix in your favorite nut or seed butter for a unique taste.
Dietary Adjustments (gluten-free, vegan options)
If you want a gluten-free mug cake, swap all-purpose flour with almond flour or a gluten-free blend. Both work well and keep the cake light. For a vegan option, replace the milk with almond or oat milk. Use a vegan butter instead of vegetable oil. Just make sure your chocolate chips are dairy-free too.
Toppings and Add-ins
Toppings can make your mug cake even better. A scoop of ice cream on top is a classic treat. You can also add whipped cream for a fluffy finish. Try drizzling warm chocolate syrup or caramel sauce for extra sweetness. If you want crunch, sprinkle some nuts or granola on top. These little touches will make your mug cake feel special.
Storage Info
Storing Leftovers
If you have leftover mug cake, store it in an airtight container. This keeps it fresh and moist. Place the mug cake in the fridge. It stays good for up to two days. However, I recommend eating it fresh for the best taste.
Reheating Instructions
To reheat, use the microwave. Place the mug cake back in the microwave for about 10 to 15 seconds. Keep an eye on it so it doesn't overheat. You want it warm, not hot. If it feels dry, add a splash of milk to moisten it again.
Freezing Tips
If you want to freeze the mug cake, let it cool first. Wrap it tightly in plastic wrap. Then place it in a freezer-safe bag or container. It can last up to a month in the freezer. When you're ready to eat it, thaw it in the fridge overnight. Reheat as mentioned above, and enjoy!
FAQs
How do I make chocolate peanut butter mug cake without a microwave?
You can bake the mug cake in an oven. Preheat your oven to 350°F (175°C). Use an oven-safe mug or small ramekin. Follow the same mixing steps as the microwave method. Pour the batter into the mug and place it on a baking sheet. Bake for about 15 to 20 minutes. Check for doneness by inserting a toothpick. It should come out clean. This method gives a nice, fluffy texture.
Can I use almond flour instead of all-purpose flour?
Yes, you can use almond flour. It adds a nutty flavor and works well. However, almond flour is denser. You may need to adjust the amount. Start with 3 tablespoons of almond flour instead of 4. You might also need to add a bit more liquid to the batter. Keep an eye on the cooking time, as it may vary.
What can I substitute for peanut butter?
If you need a substitute for peanut butter, try almond butter or sunflower seed butter. Both options provide a similar texture. You can also use tahini if you want a different flavor. If allergies are a concern, these substitutes are great choices. For a nut-free option, use a seed butter.
This blog post covered how to make a delicious mug cake. We explored ingredients, measurements, and optional items. I shared step-by-step instructions to guide you through the process. You learned tips for the best texture and how to microwave it perfectly. We also looked at fun flavor variations, storage, and reheating tips.
In conclusion, making a mug cake is simple and fun. You can easily personalize it to fit your taste. Enjoy your baking and have fun with your creations!