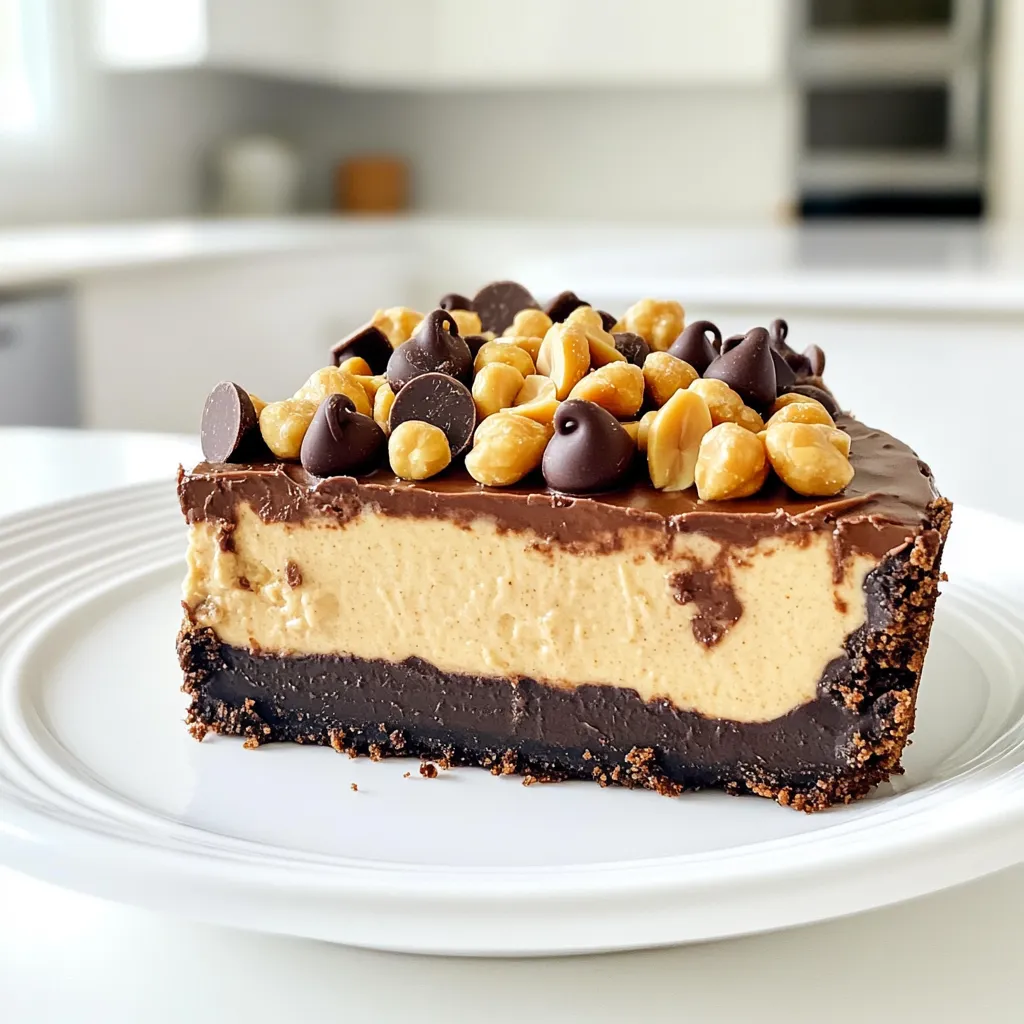
Are you ready for a dessert that’s easy and delicious? My Chocolate Peanut Butter Cheesecake No Bake Delight is perfect for anyone craving rich flavors without the oven hassle. This cheesecake layers creamy peanut butter and dreamy chocolate in a simple crust. Grab your ingredients and kitchen tools. Let’s make a treat that will impress everyone at your next gathering!
Ingredients
Main Ingredients
– 1 ½ cups chocolate graham cracker crumbs
– ½ cup unsalted butter, melted
– 1 cup cream cheese, softened to room temperature
– 1 cup creamy peanut butter
– ¾ cup powdered sugar
– 1 teaspoon pure vanilla extract
– 1 cup heavy whipping cream, chilled
Optional Toppings
– ½ cup semi-sweet chocolate chips
– ¼ cup chopped peanuts
Kitchen Equipment
– 9-inch round springform pan
– Mixing bowls
– Electric mixer
– Whisk
Gather these ingredients and tools. They are key to making this rich, no-bake cheesecake.
The chocolate graham cracker crumbs create a perfect base. They give a sweet and crunchy flavor. The unsalted butter helps the crust stick together.
Cream cheese and creamy peanut butter make the filling smooth and rich. Adding powdered sugar gives just the right sweetness. The pure vanilla extract adds a lovely aroma and taste.
Chilled heavy whipping cream is essential. It makes the cheesecake light and fluffy. If you want to add extra flavor, use semi-sweet chocolate chips and chopped peanuts as toppings.
Make sure to have a 9-inch round springform pan. This pan allows easy removal of the cheesecake. You will also need mixing bowls for combining ingredients. The electric mixer helps beat the cream cheese and peanut butter smoothly. A whisk is helpful for whipping the cream.
With these ingredients and tools ready, you’re set to create a dessert that delights everyone!
Step-by-Step Instructions
Preparing the Crust
To start, grab a medium mixing bowl. Combine 1 ½ cups of chocolate graham cracker crumbs with ½ cup of melted unsalted butter. Stir well until the mix looks like wet sand. This helps the crumbs stick together. Next, take a 9-inch round springform pan. Firmly press the crumb mixture into the bottom of the pan. Make sure it is even and compact. Now, place the pan in the freezer. This chills the crust and makes it firm.
Making the Cheesecake Filling
Now we will make the cheesecake filling. In a large mixing bowl, beat 1 cup of softened cream cheese with 1 cup of creamy peanut butter using an electric mixer. Keep mixing until it is smooth. Then, gradually add in ¾ cup of powdered sugar and 1 teaspoon of pure vanilla extract. Beat until the mixture is creamy and lump-free. In a separate bowl, whip 1 cup of chilled heavy cream. Whip until stiff peaks form. Gently fold this whipped cream into the peanut butter mix in thirds. This keeps the mixture light and airy.
Assembling the Cheesecake
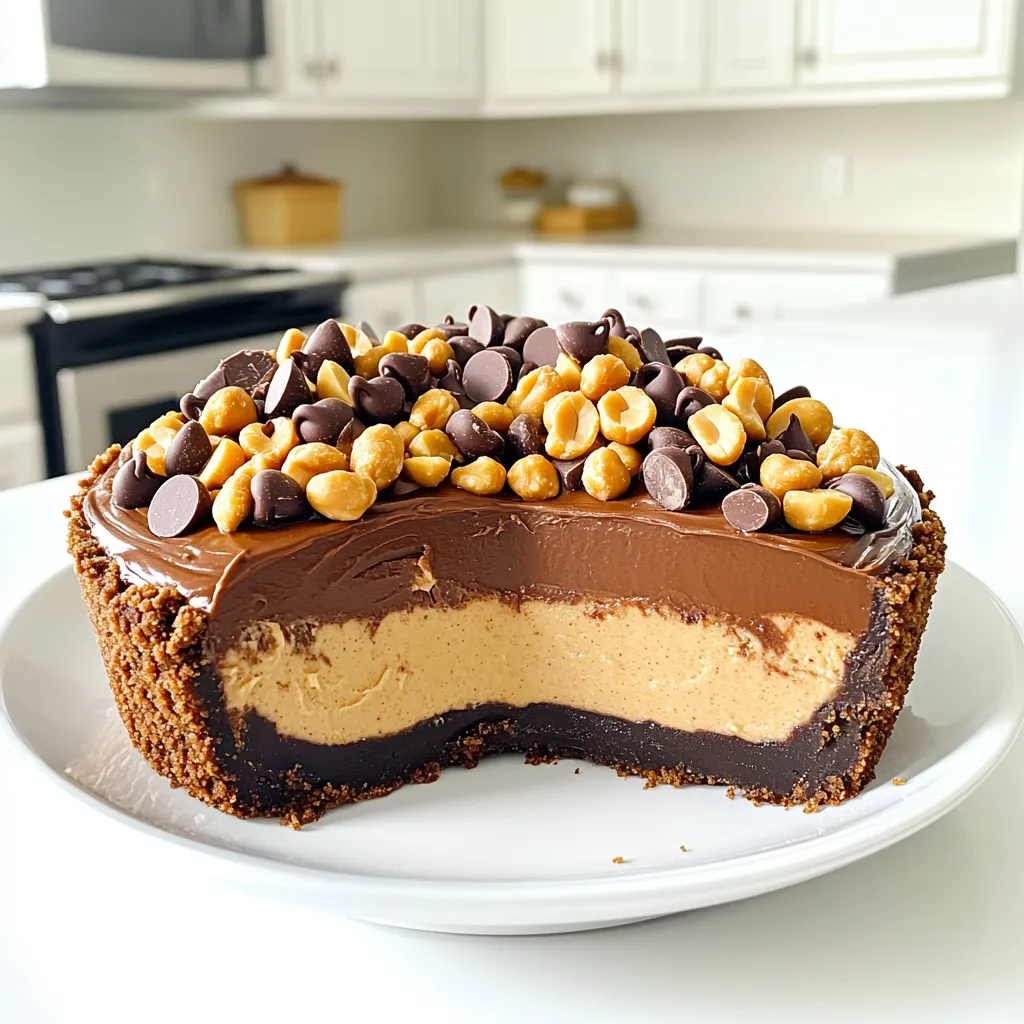
Once your filling is ready, take the springform pan out of the freezer. Pour the cheesecake filling over the chilled crust. Use a spatula to smooth the top. For extra chocolate flavor, sprinkle ½ cup of semi-sweet chocolate chips evenly over the filling. Now, cover the cheesecake with plastic wrap or aluminum foil. Place it in the fridge for at least 4 hours to set. For the best taste, let it chill overnight.
Tips & Tricks
Achieving the Perfect Texture
To make a smooth cheesecake, beat the cream cheese well. Start with softened cream cheese. Use an electric mixer for the best results. Mix until the cream cheese is fluffy and free of lumps. Next, fold in the whipped cream gently. This keeps the texture light and airy. Add the whipped cream in thirds, mixing carefully. Overmixing can make the filling dense, which we want to avoid.
Serving Suggestions
For an elegant touch, serve the cheesecake on individual dessert plates. This makes each serving special. You can add melted chocolate drizzles for flair. A dollop of whipped cream adds creaminess. Top with chocolate shavings or chopped peanuts for extra crunch. This makes each bite delightful and adds visual appeal.
Time-Saving Hacks
Plan ahead to save time. You can make the cheesecake a day before serving. This gives it time to set and develop flavors. If you need a quick prep, use store-bought whipped topping instead of making your own. This shortcut cuts down on time without losing flavor.
Variations
Flavor Variations
You can make this cheesecake your own! Try using different nut butters, like almond or cashew. Each nut butter adds a unique taste and texture. You can also swap the chocolate. Use dark chocolate for a rich flavor or white chocolate for something sweet and creamy. Experiment to find your favorite mix!
Dietary Adjustments
Want to make this cheesecake fit your diet? Use gluten-free graham crackers for the crust. This keeps it tasty for those who avoid gluten. For a vegan option, try using vegan cream cheese. It works well and still tastes great. These small changes let everyone enjoy this dessert!
Presentation Variations
Make your cheesecake pop with fun presentations! Layer fresh fruit like strawberries or bananas on top. They add color and freshness. You can also drizzle melted chocolate or caramel sauce for flair. This not only looks beautiful but also adds extra flavor. Get creative and impress your guests!
Storage Info
Best Practices for Storage
Store your cheesecake in the fridge. Use an airtight container to keep it fresh. You can also cover the cheesecake with plastic wrap if you prefer. This helps keep out moisture and odors. If you want to freeze it, slice it first. Wrap each slice in plastic wrap, then place them in a freezer bag. This way, you can enjoy a piece anytime!
Shelf Life
The cheesecake lasts about five days in the fridge. After that, it may lose flavor and texture. If you notice any mold or an off smell, it’s best to throw it away. Always check before you dig in!
Reheating and Refreezing Tips
To defrost, place the cheesecake in the fridge overnight. This method keeps it from getting too soft. Avoid using a microwave, as it can change the texture. If you refreeze, make sure to wrap it well. This helps keep the taste and texture nice. Just remember, the more you freeze and thaw, the more the quality may drop. Enjoy every bite!
FAQs
Can I use low-fat cream cheese?
Yes, you can use low-fat cream cheese. It will change the taste and feel. Low-fat cream cheese has less fat, so it might taste less rich. The cheesecake may not be as creamy or smooth. I suggest using regular cream cheese for the best flavor.
How long should I chill the cheesecake?
Chill the cheesecake for at least 4 hours. However, I recommend letting it sit overnight. This time helps the flavors blend well. It also makes the cheesecake firmer. A longer chill time gives you a better texture.
What can I substitute for chocolate graham cracker crumbs?
You can use regular graham cracker crumbs if you must. You could also try vanilla wafers for a different taste. If you’re feeling adventurous, crushed Oreos can add a fun twist. Just remember that each crust will change the flavor a bit.
This blog post covered how to make a delicious cheesecake using simple ingredients and equipment. We discussed the main components like chocolate graham cracker crumbs, cream cheese, and peanut butter. You learned tips for the perfect texture and tempting variations that fit special diets. Remember, proper storage keeps your cheesecake fresh. With these steps, you can impress anyone with your baking skills. Enjoy creating and sharing this treat!