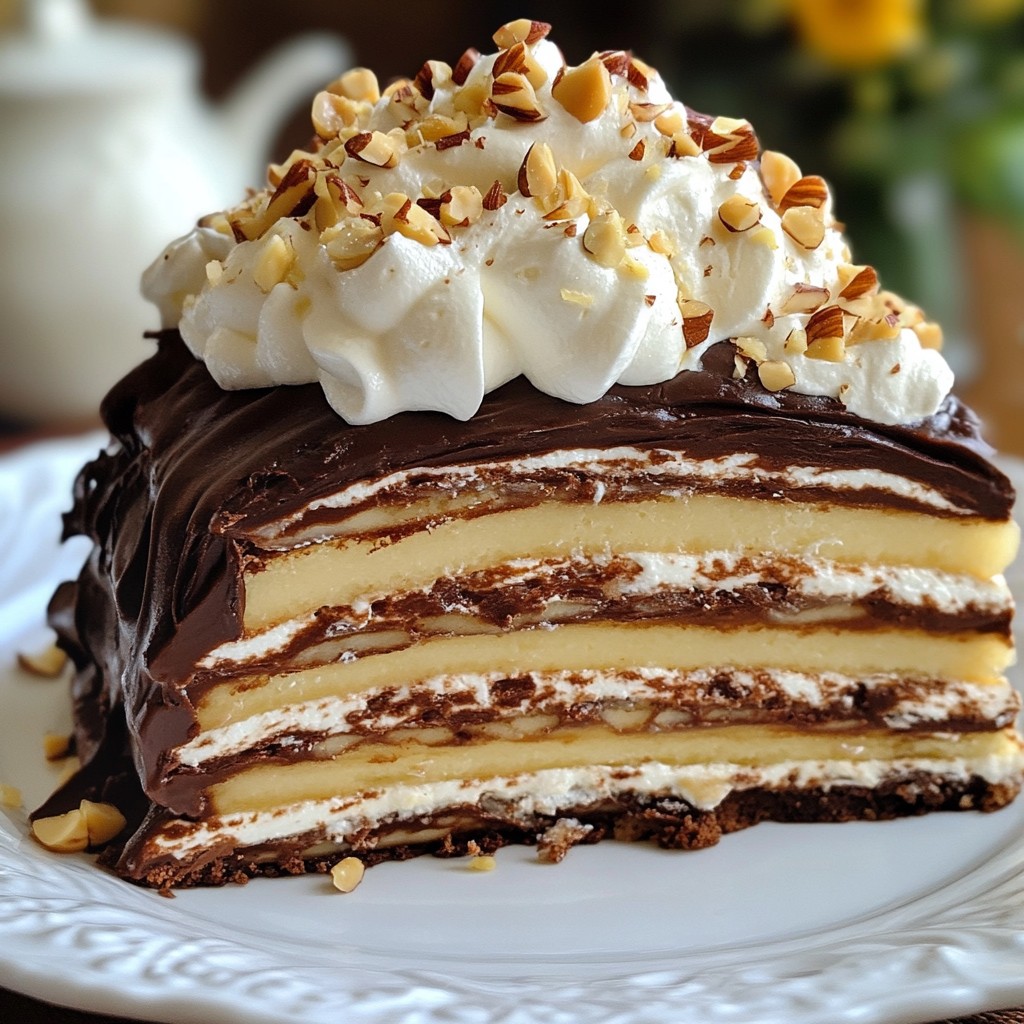
Get ready to indulge in a sweet treat that will impress everyone: Chocolate Hazelnut Crepe Cake! This delightful dessert layers thin, airy crepes with rich chocolate and creamy hazelnut flavors. Perfect for celebrating special occasions or just satisfying your sweet tooth, this recipe is easy to follow and totally rewarding. Let’s dive into the steps and ingredients you’ll need to create this tasty masterpiece!
Error: Error code: 429 - {'error': {'message': 'You exceeded your current quota, please check your plan and billing details. For more information on this error, read the docs: https://platform.openai.com/docs/guides/error-codes/api-errors.', 'type': 'insufficient_quota', 'param': None, 'code': 'insufficient_quota'}}
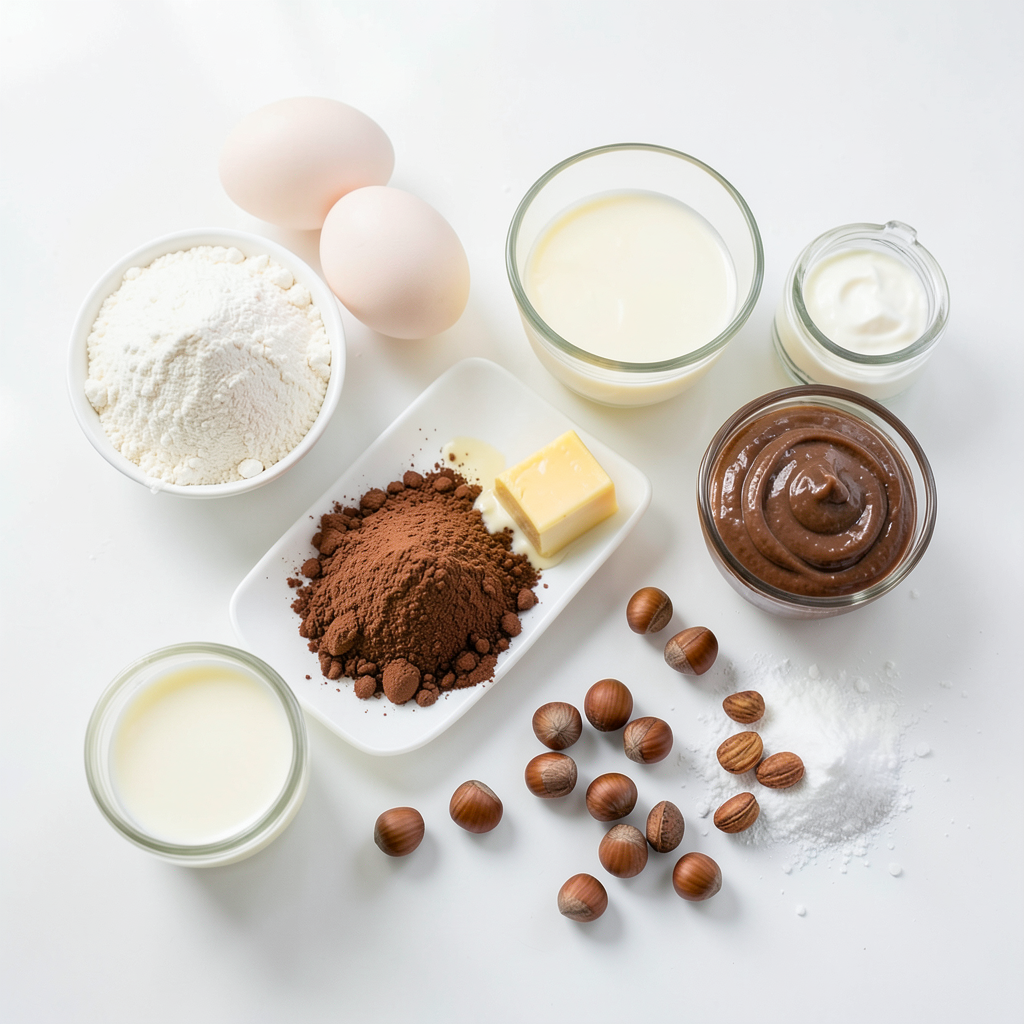
Ingredients
List of Ingredients for the Crepe Batter
- 1 ½ cups all-purpose flour
- 3 tablespoons unsweetened cocoa powder
- 3 large eggs
- 2 ½ cups milk
- 4 tablespoons melted butter, plus extra for cooking
- ¼ cup granulated sugar
- 1 teaspoon vanilla extract
- A pinch of salt
To make the crepe batter, combine flour, cocoa powder, sugar, and salt in one bowl. In another bowl, mix eggs, milk, melted butter, and vanilla. Whisk both mixtures together until smooth. Let the batter rest for 30 minutes. This helps the crepes turn out soft and tender.
Ingredients for the Whipped Cream
- 1 cup heavy cream
- 2 tablespoons powdered sugar
For the whipped cream, start with cold heavy cream in a clean bowl. Add the powdered sugar and whip until soft peaks form. This cream adds a light touch between the layers of crepes.
Garnish Components
- ½ cup toasted hazelnuts, chopped for garnish
Chop the toasted hazelnuts for garnish. They add a nice crunch to the cake. Sprinkle them on top just before serving for a lovely finish.
Step-by-Step Instructions
How to Make the Crepe Batter
To start, gather your ingredients. In a medium bowl, mix 1 ½ cups of flour, 3 tablespoons of cocoa powder, ¼ cup of sugar, and a pinch of salt. In another bowl, whisk 3 eggs, 2 ½ cups of milk, 4 tablespoons of melted butter, and 1 teaspoon of vanilla. Slowly pour the wet mix into the dry mix. Whisk until smooth. Let the batter rest for 30 minutes. This helps the gluten relax and makes your crepes thin and tender.
Cooking the Crepes
Heat a non-stick skillet over medium heat. Lightly grease it with melted butter. Pour ¼ cup of batter into the pan. Swirl it gently to cover the bottom. Cook for 1-2 minutes or until the edges lift. Flip the crepe with a spatula and cook for another 30 seconds. Stack the crepes on a plate with parchment paper in between. This keeps them from sticking together.
Preparing the Whipped Cream
In a clean bowl, combine 1 cup of heavy cream with 2 tablespoons of powdered sugar. Use a handheld mixer or whisk to whip until soft peaks form. This adds a light, airy texture to your cake.
Assembling the Crepe Cake
Start with your first crepe on a serving plate. Spread about 2 tablespoons of chocolate hazelnut spread over it. Add a layer of whipped cream on top. Smooth it out. Repeat this process with the remaining crepes. Alternate between the spread and whipped cream. Leave the last crepe plain on the top.
Chilling and Serving Recommendations
Cover your assembled crepe cake and chill it in the fridge for at least 1 hour. This helps it set well. Before serving, sprinkle chopped toasted hazelnuts on top. This adds crunch and looks great! Enjoy your delightful creation!
Tips & Tricks
Achieving Perfect Crepes
To make great crepes, start with the right batter. Mix flour, cocoa powder, sugar, and salt well. Whisk the eggs, milk, butter, and vanilla together in another bowl. Combine both mixtures slowly to avoid lumps. Let the batter rest for 30 minutes. This helps the gluten relax. Use a non-stick pan for easy flipping. Heat it over medium heat and add a little butter. Pour ¼ cup of batter into the pan. Swirl it to cover the bottom. Cook until the edges lift, then flip. Each crepe should be thin and even. Stack cooked crepes with parchment paper to keep them from sticking.
Alternative Whipped Cream Options
If you want a twist on whipped cream, try flavored options. Add a splash of vanilla or almond extract for more taste. You can also fold in some berry puree for a fruity touch. For a chocolate version, mix in cocoa powder. If you prefer something lighter, use whipped coconut cream. This works well for a dairy-free option. Just chill the coconut milk overnight. Then whip it until fluffy. These alternatives can make your cake unique and fun.
Serving Suggestions
When serving your crepe cake, presentation matters. Cut the cake into wedges for easy serving. Top each slice with extra chocolate hazelnut spread for a rich effect. Add a dollop of whipped cream on the side too. For an extra crunch, sprinkle chopped hazelnuts on each slice. You can also pair the cake with fresh berries or a scoop of ice cream. This adds color and flavor. Remember to keep the cake chilled until serving. It tastes best when slightly cold. Enjoy sharing this treat with friends and family!
Error: Error code: 429 - {'error': {'message': 'You exceeded your current quota, please check your plan and billing details. For more information on this error, read the docs: https://platform.openai.com/docs/guides/error-codes/api-errors.', 'type': 'insufficient_quota', 'param': None, 'code': 'insufficient_quota'}}
Variations
Different Flavor Additions
You can switch up the flavors in your Chocolate Hazelnut Crepe Cake. Try using different spreads like salted caramel or almond butter. For a fruity twist, add a layer of raspberry or strawberry jam between the crepes. You can also use flavored whipped cream, like orange or mint, to surprise your taste buds. This way, each bite can offer something new and exciting.
Dietary Modifications (gluten-free, dairy-free)
If you want a gluten-free version, swap the all-purpose flour for a gluten-free blend. Look for a mix that works for baking. To make it dairy-free, use almond milk or oat milk instead of regular milk. Choose a dairy-free chocolate hazelnut spread, too. These changes keep the flavors while meeting your dietary needs.
Seasonal Twists (fruits, spices)
Add seasonal fruits for a fresh touch. In summer, use ripe strawberries or peaches. In fall, think of sliced apples or spiced pears. You can also mix in spices like cinnamon or nutmeg into the batter for warmth. These additions make your cake fit any time of year and can wow your guests with new flavors.
Storage Info
How to Store Leftover Crepe Cake
To keep your Chocolate Hazelnut Crepe Cake fresh, wrap it well. Use plastic wrap or aluminum foil. This will help prevent it from drying out. You can also place it in an airtight container. Store it in the fridge for up to three days. The flavors will meld and taste even better!
Freezing Tips for Crepes and Cake
If you want to freeze the crepes, stack them with parchment paper in between. Then, place the stack in a freezer bag. They can stay in the freezer for up to two months. For the whole cake, wrap it tightly. Use plastic wrap first, then foil. You can freeze the crepe cake for up to a month.
Reheating Instructions
When you're ready to eat, let the cake thaw in the fridge overnight. If you need it sooner, leave it at room temperature for a few hours. To reheat individual crepes, use a skillet over low heat. Warm each side for about 30 seconds. This will keep them soft and tasty. Avoid reheating the whole cake in the oven, as it can dry out. Enjoy your sweet treat!
FAQs
How to prevent crepes from sticking?
To prevent crepes from sticking, use a non-stick pan. Lightly grease it with melted butter before cooking each crepe. Make sure the pan is hot enough. If you pour the batter on a cold pan, the crepe will stick. Always cook the crepes for 1-2 minutes on one side before flipping. This allows the edges to lift and makes flipping easier. You can also use parchment paper between crepes when stacking them. This helps keep them from sticking together.
Can I use a different filling?
Yes, you can use a different filling! Feel free to get creative. You can replace chocolate hazelnut spread with fruit jams, whipped cream, or even peanut butter. If you want a fruity touch, try using fresh berries or slices of banana. For a salty twist, cream cheese with herbs can work well too. Just make sure the filling complements the crepes and adds to the cake's flavor.
Is it necessary to chill the cake before serving?
Chilling the cake before serving is important. It helps the layers set and makes slicing easier. The cold cake holds its shape better. If you skip this step, the layers may slide apart. Chill the cake for at least 1 hour in the fridge. This also enhances the flavors, making each bite even more delicious.
How long will the crepe cake last in the fridge?
The crepe cake will last about 3 days in the fridge. Make sure to cover it well to keep it fresh. Use plastic wrap or an airtight container. After a few days, the crepes may become softer, but the taste will remain great. If you have leftovers, enjoy them within this time for the best flavor and texture.
We covered how to make a delicious crepe cake step by step. You learned the needed ingredients, cooking methods, and how to store leftovers. Remember, perfect crepes rely on the right touch and timing. Feel free to explore different flavors and dietary options for a personal twist. With the right tips, you can impress anyone with this treat! Enjoy making your crepe cake and sharing it with loved ones.