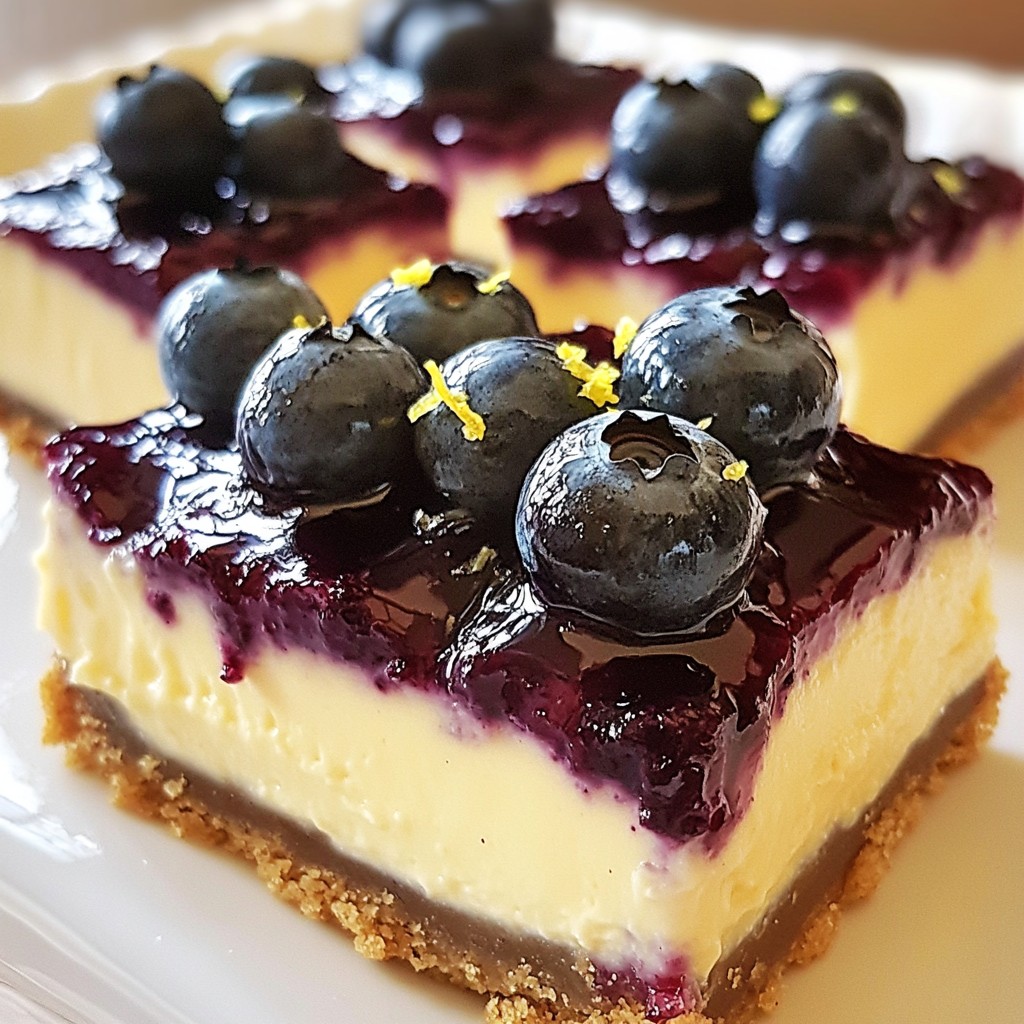
Craving a sweet and tangy dessert that’s easy to make? Look no further than these Blueberry Lemon Cheesecake Bars! With a creamy filling and a buttery crust, this treat balances rich flavors with a refreshing twist. Whether you’re baking for a special event or just for yourself, these bars are sure to impress. Let’s dive into how you can whip up this delightful dessert in no time!
Why I Love This Recipe
- Refreshing Flavor: The combination of zesty lemon and sweet blueberries creates a perfectly balanced flavor that is both refreshing and indulgent.
- Easy to Make: This recipe is straightforward and requires minimal effort, making it perfect for bakers of all skill levels.
- Perfect for Any Occasion: These cheesecake bars are ideal for gatherings, picnics, or even just a sweet treat at home.
- Make-Ahead Delight: With a chilling time of just a few hours, these bars can be prepared in advance, saving you time when hosting.
Ingredients
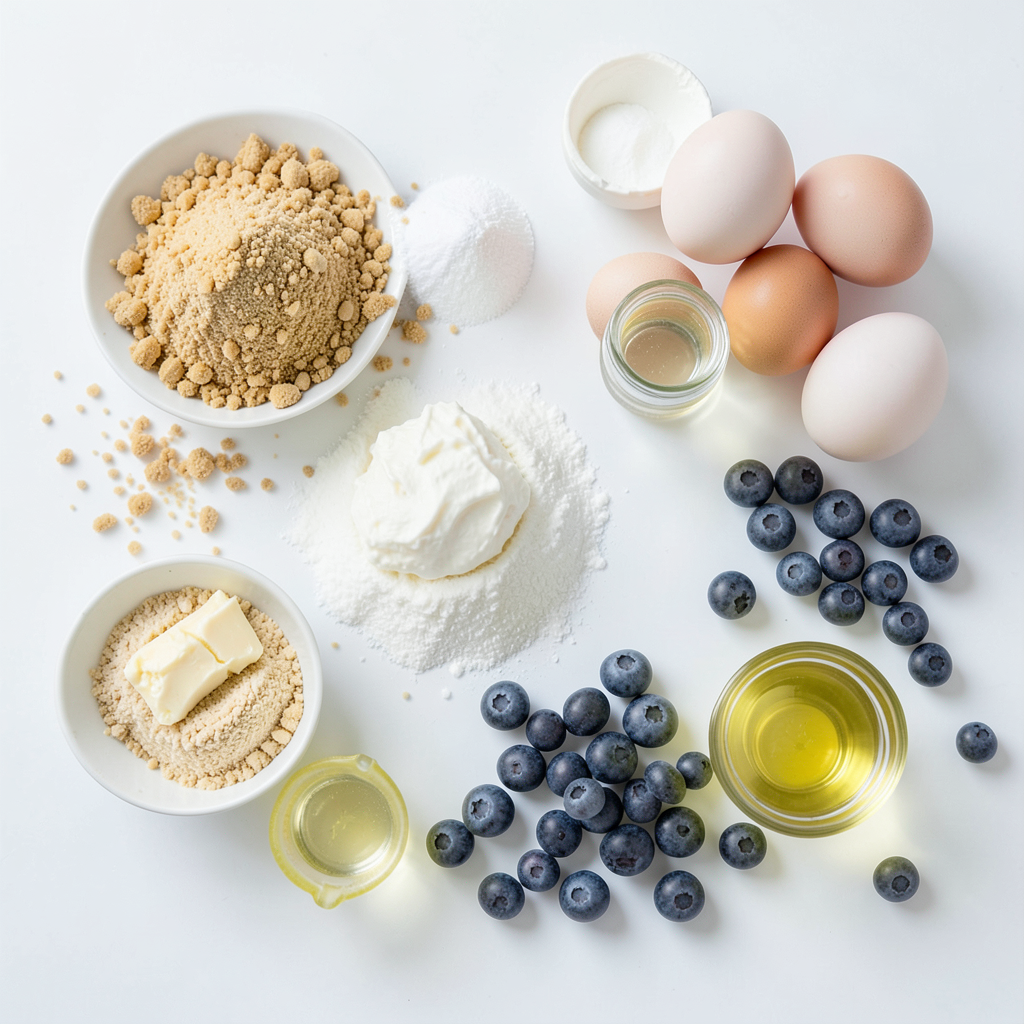
To make blueberry lemon cheesecake bars, you need a few simple yet essential ingredients. Here’s what you’ll need:
- 1 cup graham cracker crumbs
- 1/4 cup unsalted butter, melted
- 2 tablespoons granulated sugar
- 16 oz cream cheese, softened at room temperature
- 1 cup granulated sugar
- 2 large eggs, at room temperature
- 1 tablespoon lemon zest (freshly grated)
- 1/4 cup fresh lemon juice (about 1 large lemon)
- 1 teaspoon pure vanilla extract
- 1 cup fresh blueberries, plus extra for garnish
- 1 tablespoon cornstarch (optional, for thickening the blueberry layer)
The graham cracker crumbs form the base of your bars. They give a nice crunch and sweetness. The melted butter helps to bind them together. Sugar adds sweetness to both the crust and the filling.
Cream cheese is the star of the show. It provides that rich, creamy texture we love in cheesecake. Eggs help to set the filling and keep it smooth. Fresh lemon zest and juice brighten the flavor, giving a refreshing twist.
Vanilla extract adds warmth and depth. Fresh blueberries add a burst of flavor and color. If you want, you can use cornstarch to help the blueberries stay in place as you bake.
These ingredients come together to create a treat that is not only delicious but also visually stunning.
Step-by-Step Instructions
Preparing the Crust
1. Preheat your oven to 325°F (160°C). This step gets the oven ready for baking.
2. In a medium bowl, mix together the graham cracker crumbs, melted butter, and sugar. Use a fork or your hands to blend until it feels like wet sand.
3. Press this mixture firmly into the bottom of your baking dish. Make sure it’s even. Bake this crust for 10 minutes. Let it cool while you make the filling.
Making the Cheesecake Filling
1. In a large bowl, beat the softened cream cheese until it’s smooth. This takes about 1-2 minutes.
2. Slowly add in the sugar, mixing until combined. Add the eggs one by one, beating well each time. This helps make a smooth batter.
3. Now, mix in the lemon zest, lemon juice, and vanilla. Keep mixing until it’s creamy and well blended.
Combining and Baking
1. Gently fold in the fresh blueberries. If you want, you can toss them in cornstarch first to keep them from sinking.
2. Pour the cheesecake mixture over the cooled crust. Use a spatula to spread it evenly. Tap the pan on the counter to remove air bubbles.
3. Bake your cheesecake for 30-35 minutes. Look for set edges and a slight jiggle in the center. It firms up more as it cools.
Tips & Tricks
Perfecting the Cheesecake Texture
To prevent cracks in your cheesecake, avoid mixing too fast. Mix gently and just until smooth. This helps keep air bubbles out. Bubbles can cause cracks as the cheesecake bakes.
Chilling time is key for your cheesecake to set well. After baking, cool it for an hour at room temperature. Then refrigerate for at least four hours, or overnight. This extra time helps the flavors blend and firm up.
Serving Suggestions
Top your cheesecake bars with fresh blueberries or whipped cream. A drizzle of lemon glaze can add extra zest. These bars are perfect for parties, picnics, or family gatherings. They impress guests and taste great.
Common Mistakes to Avoid
Do not overmix your batter. Overmixing can make your cheesecake dense and heavy. Beat just until smooth for the best texture.
Make sure to cool your cheesecake properly. If you cut it too soon, it may fall apart. Allow it to chill fully before slicing and serving.
Pro Tips
- Use Room Temperature Ingredients: Allow the cream cheese and eggs to sit at room temperature for about 30 minutes before mixing. This ensures a smoother batter and better incorporation of ingredients.
- Prevent Blueberries from Sinking: Toss the blueberries in a bit of cornstarch before folding them into the cheesecake mixture. This helps them stay suspended in the filling during baking.
- Chill for Best Results: For the best texture and flavor, refrigerate the cheesecake bars for at least 4 hours or overnight. This allows the flavors to meld and the bars to firm up properly.
- Garnish Creatively: Enhance the presentation by garnishing with fresh blueberries and a sprinkle of lemon zest right before serving. This adds visual appeal and a burst of flavor.
Variations
Flavor Additions
You can change the flavor of your cheesecake bars easily. Swap blueberries for other berries like raspberries or strawberries. Each berry gives a different taste. You can also add spices like cinnamon or nutmeg. A touch of cinnamon can warm up the flavors. Nutmeg adds a nice twist too.
Gluten-Free/ Dairy-Free Options
If you need gluten-free options, use gluten-free graham crackers. They work just as well for the crust. For a dairy-free version, substitute regular cream cheese with dairy-free cream cheese. This keeps the creamy texture while being suitable for all diets.
Mini Cheesecake Bars
You can make mini cheesecake bars for bite-sized treats. Use a mini muffin tin instead of a baking dish. Pour the cheesecake mixture into each cup. Bake for about 20-25 minutes. Keep an eye on them to avoid overbaking. These mini bars are fun for parties or snacks.
Storage Info
How to Store Leftovers
To keep your cheesecake bars fresh, store them in the fridge. Place the bars in an airtight container. This will help them stay moist. You can also cover them tightly with plastic wrap. If you want to freeze the bars, cut them into squares first. Wrap each piece in plastic wrap, then place them in a freezer bag. This keeps them safe from freezer burn.
Shelf Life
These cheesecake bars will stay fresh for about 5 days in the fridge. If you freeze them, they can last up to 3 months. After freezing, the taste and texture will stay good if stored properly. Just remember to thaw them before eating.
Recommended Thawing Methods
To thaw your frozen cheesecake bars, place them in the fridge overnight. This method keeps them soft and tasty. If you're in a hurry, you can leave them out at room temperature for about an hour. Avoid using the microwave, as it can change the texture. Enjoy your delicious blueberry lemon cheesecake bars!
FAQs
Can I make these cheesecake bars ahead of time?
Yes, you can make these cheesecake bars ahead of time. I suggest making them a day before you want to serve them. This gives the bars enough time to chill. After baking, let them cool at room temperature. Then, refrigerate them for at least 4 hours. Chilling helps the flavors blend well. It also gives them the right texture.
What is the best way to cut cheesecake bars?
To cut cheesecake bars easily, use a sharp knife. First, dip the knife in hot water. Wipe it dry before cutting. This helps make clean cuts. Cut the bars into squares or rectangles. You can also use a ruler for even pieces. If you want to prevent sticking, spray the knife with cooking spray.
Can I use frozen blueberries?
Yes, you can use frozen blueberries in this recipe. However, they may release more juice than fresh berries. To use frozen blueberries, do not thaw them first. Just fold them into the batter directly. If you want, toss them in cornstarch to help thicken the blueberry layer. This keeps the bars from becoming too watery.
This blog post covers how to make delicious blueberry cheesecake bars. We discussed the key ingredients, step-by-step instructions, and useful tips that ensure a great texture. Remember to chill the bars properly to avoid cracks and enhance flavor. You can explore fun variations, including dairy-free options. Store leftovers in the fridge for up to a week. With these easy steps, you can impress anyone at your next gathering. Enjoy making and sharing these tasty treats!