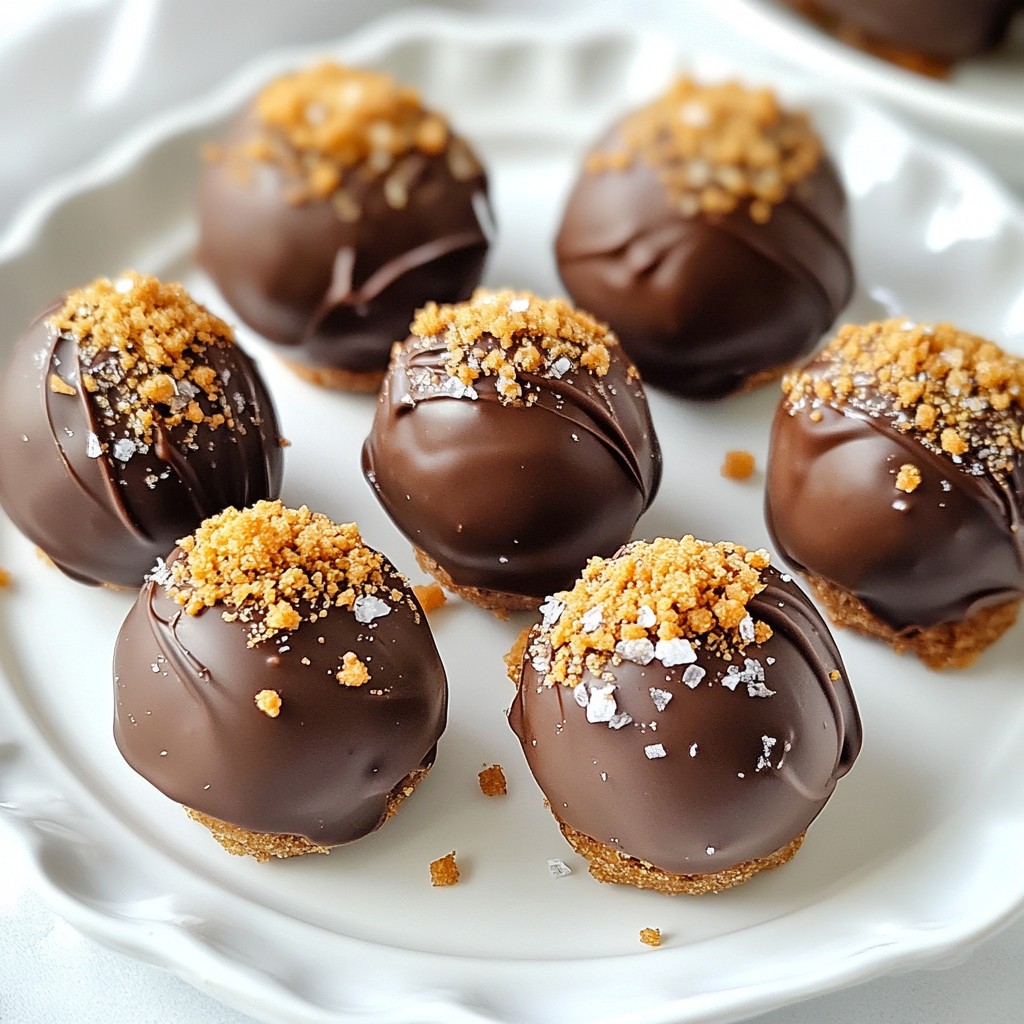
Get ready to indulge in a sweet delight with my Biscoff Cookie Butter Truffles! These easy-to-make treats combine the rich flavors of cookie butter and chocolate for a melt-in-your-mouth experience. Whether you're a baking newbie or a seasoned pro, this guide will walk you through each step, from gathering ingredients to the final touches. Let’s create something irresistible together!
Why I Love This Recipe
- Delicious Flavor Combination: The blend of Biscoff cookie crumbs and cookie butter creates a rich, caramel-like flavor that is simply irresistible.
- Easy to Make: With minimal ingredients and straightforward steps, these truffles are perfect for both novice and experienced bakers.
- Perfect for Any Occasion: Whether it's a holiday gathering, a birthday party, or just a sweet treat for yourself, these truffles are sure to impress.
- Customizable: You can easily adapt the recipe by adding your favorite mix-ins or toppings to make them uniquely yours.
Ingredients
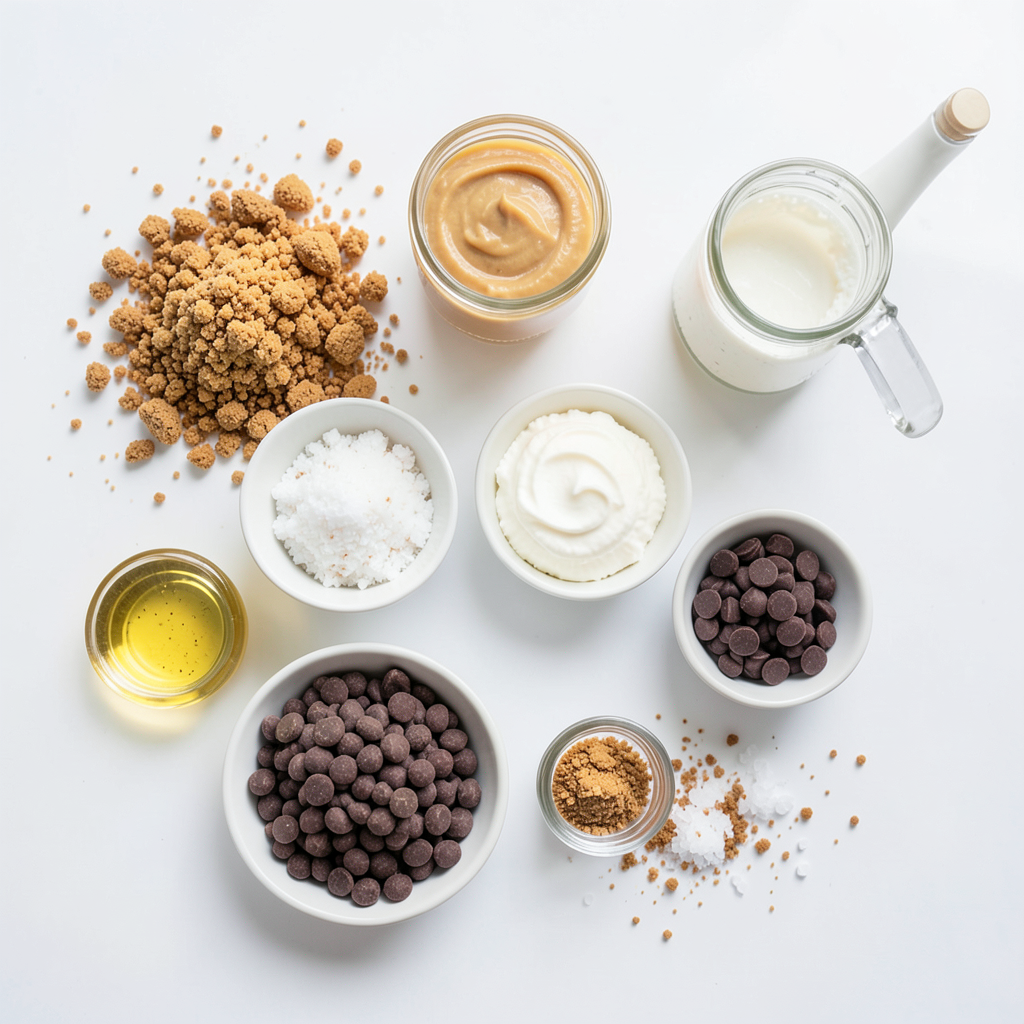
Main Ingredients for Biscoff Cookie Butter Truffles
To make these delightful truffles, you need the following key ingredients:
- 1 cup Biscoff cookie crumbs
- 1/2 cup cookie butter (speculoos spread)
- 1/4 cup cream cheese, softened to room temperature
- 1/2 teaspoon pure vanilla extract
- 1 cup semi-sweet chocolate chips
- 1 tablespoon coconut oil
- Pinch of sea salt
- Extra Biscoff cookie crumbs for coating
These ingredients come together to create a rich and creamy treat that will impress anyone.
Optional Ingredients and Flavor Enhancements
You can add a few optional ingredients to enhance the flavor. Consider using:
- A dash of cinnamon for warmth
- Chopped nuts for crunch
- A splash of coffee for depth
These extras can bring a new twist to your truffles and make them even more special.
Recommended Tools and Utensils
To make the truffles, you will need some basic tools:
- Large mixing bowl
- Spatula or fork
- Baking tray lined with parchment paper
- Microwave-safe bowl for melting chocolate
- Fork or dipping tool for coating
Having these tools ready will make your cooking experience smooth and fun.
Step-by-Step Instructions
Preparing the Biscoff Mixture
To start, gather your ingredients. In a large bowl, mix the Biscoff cookie crumbs, cookie butter, cream cheese, and vanilla extract. Use a spatula or fork to combine everything well. You want a smooth and creamy texture. This mix is the heart of your truffle magic.
Shaping the Truffles
Next, wash your hands. Scoop small amounts of the mixture and roll them into balls. Aim for about one inch in diameter. Place the truffles on a tray lined with parchment paper. This makes for easy clean-up later.
Melting the Chocolate Coating
Now, let’s melt the chocolate. In a microwave-safe bowl, combine the semi-sweet chocolate chips and coconut oil. Heat them in 30-second bursts. Stir in between each burst until smooth. Be careful not to overheat; you want it to melt, not burn.
Dipping and Finishing Touches
Once your truffles are chilled, it’s time to dip. Use a fork or your hands to coat each truffle in the melted chocolate. Let the excess chocolate drip off before placing them back on the parchment paper. While the chocolate is still warm, sprinkle extra Biscoff crumbs on top. This adds a nice touch and makes them look fancy. Let them sit at room temperature until the chocolate hardens. Enjoy your sweet creations!
Tips & Tricks
Achieving the Perfect Texture
To get the best texture for your Biscoff Cookie Butter Truffles, you need to balance the ingredients. Use one cup of Biscoff cookie crumbs and half a cup of cookie butter. Add a quarter cup of softened cream cheese to create a rich and creamy mix. Don’t skip the vanilla extract; it adds depth. Make sure to mix until the mixture is smooth. If it feels too soft, let it chill longer in the fridge.
How to Decorate Your Truffles
Decorating your truffles is easy and fun. After dipping them in melted chocolate, sprinkle extra Biscoff cookie crumbs on top. This adds a nice crunch and looks pretty. You can also use mini cupcake liners to serve them. This makes your truffles look fancy and keeps them neat. For a twist, consider drizzling white chocolate on top for contrast.
Common Mistakes to Avoid
Avoid overmixing the truffle mixture. If you mix too long, the texture can become tough. Another mistake is skipping the chilling step. Chilling helps the truffles hold their shape when you dip them in chocolate. Also, don’t overheat the chocolate. Heat it in short bursts and stir often. This keeps the chocolate smooth and glossy. Lastly, be careful not to rush the cooling time. Let the chocolate harden fully before serving for the best results.
Pro Tips
- Chill for Firmness: Make sure to chill the truffles for at least 30 minutes before coating them in chocolate. This ensures they hold their shape and don’t melt when dipped.
- Perfect Chocolate Coating: When melting chocolate, do it in short bursts and stir in between to avoid burning. A smooth, glossy coating is key to a professional finish.
- Use Quality Ingredients: Opt for high-quality chocolate chips and cookie butter to enhance the flavor of your truffles. The better the ingredients, the better the taste!
- Presentation Matters: For an elegant touch, serve the truffles in mini cupcake liners and sprinkle with extra cookie crumbs. This elevates the overall presentation and makes them look irresistible!
Variations
Flavor Variations
To make your Biscoff Cookie Butter Truffles even more exciting, try adding flavors. You can mix in spices like cinnamon or nutmeg for warmth. A dash of espresso powder adds depth. Want a hint of citrus? Zest some orange or lemon into the mix. These small tweaks create bold flavors that surprise every bite.
Different Coating Options
Coating is key to a truffle's look and taste. Instead of semi-sweet chocolate, try white chocolate for a sweeter flair. Melted dark chocolate can add a rich touch. You can even roll the truffles in chopped nuts or sprinkles. Each option changes the experience and makes your truffles unique.
Dietary Adjustments
If you have dietary needs, it's easy to adapt this recipe. Use vegan cookie butter and cream cheese for a dairy-free treat. Substitute gluten-free cookies for the crumbs to make it gluten-free. These swaps let everyone enjoy the deliciousness, no matter their diet.
Storage Info
Best Ways to Store Biscoff Cookie Butter Truffles
To keep your Biscoff Cookie Butter Truffles fresh, store them in an airtight container. This helps maintain their flavor and texture. Place a piece of parchment paper between layers if stacking them. It prevents sticking and makes them easy to serve later.
Shelf Life Details
In the fridge, these truffles last about 5 to 7 days. If you keep them in a cool, dry place, they may lose their creaminess. For the best taste, enjoy them within the first week.
Freezing Instructions for Long-Term Storage
You can freeze Biscoff Cookie Butter Truffles for longer storage. Place them in a single layer on a baking sheet. Freeze them for about 1 hour until firm. Then, transfer the truffles to a freezer-safe bag. They can last up to 3 months in the freezer. When you want to enjoy them, thaw them in the fridge overnight.
FAQs
Can I use other types of cookie butter?
Yes, you can use other types of cookie butter. Brands like Speculoos or even homemade versions work well. Each type adds its unique flavor. Just ensure it has a similar texture to Biscoff.
How do I know when the chocolate coating is set?
The chocolate coating is set when it feels firm to the touch. It should not be sticky at all. This usually takes about 15 minutes at room temperature. If you want to speed it up, place the truffles in the fridge for a few minutes.
What are some serving suggestions for these truffles?
You can serve these truffles on a pretty plate. Arrange them in mini cupcake liners for a fun touch. For an extra treat, pair them with coffee or hot chocolate. They also make a great gift!
Can truffles be made in advance?
Yes, you can make these truffles in advance. They store well in the fridge for about a week. Just keep them in an airtight container. If you want, you can freeze them for longer storage, too.
How to customize the sweetness level?
You can adjust the sweetness easily. Add more or less cookie butter or cream cheese. You can also switch to dark chocolate for a less sweet option. Taste as you go to find your perfect balance!
You learned how to make Biscoff Cookie Butter Truffles from scratch. We covered the main ingredients, tools, and step-by-step instructions. I shared tips to avoid mistakes and enhance your truffles. You also explored fun variations and storage options.
These truffles are fun and easy to make. Try your own flavors and enjoy them fresh. With a little practice, you can impress anyone with these tasty treats. Happy cooking!