FREE DINNER EBOOK! Get your copy!
  • Cookie Policy
  • GDPR Policy
  • Disclaimer
  • Terms Of Use
  • Visit my other site: Fun Cookie Recipes
homedishhaven
  • Home
  • Dinner
  • Desserts
  • Drinks
  • Appetizers
  • Contact
  • About
  • Privacy Policy
  • Home
  • Dinner
  • Desserts
  • Drinks
  • Appetizers
  • Contact
  • About
  • Privacy Policy
  • Cookie Policy
  • GDPR Policy
  • Disclaimer
  • Terms Of Use
Visit my other site: Fun Cookie Recipes

HOME / CATEGORIES /

Latest

- 200g noodles (egg or rice noodles) - 3 tablespoons vegetable oil - 4 cloves garlic, finely minced - 1-2 red chilies, thinly sliced - 2 tablespoons soy sauce - 1 tablespoon chili garlic sauce - 1 teaspoon sesame oil - 1 teaspoon sugar - 2 green onions, chopped - Fresh cilantro leaves - Lime wedges The secret to making spicy chili garlic noodles is in the ingredients. First, you need the right noodles. I love using either egg noodles or rice noodles. Both work great and taste amazing. Next, we have the oil. Vegetable oil is best here. It can handle heat well and lets the flavors shine. Garlic is a must! Use four cloves, finely minced. Garlic adds a great aroma and taste. Now, let’s talk about heat. Use 1-2 red chilies, sliced thin. Adjust how many you use based on how spicy you want it. If you love heat, go for two! For the sauce, you’ll need soy sauce, chili garlic sauce, sesame oil, and a bit of sugar. These ingredients mix to create a savory kick that pairs well with the noodles. Finally, don’t forget the garnishing! Chopped green onions and fresh cilantro make your dish pop. Lime wedges add a zesty finish. They’ll brighten the flavors and make the dish even more delicious. - Bring a large pot of water to a boil. - Add a pinch of salt for flavor. - Cook the noodles as the package says. - Typically, this takes about 3-5 minutes. - Once done, drain the noodles and set them aside. - In a small bowl, mix soy sauce, chili garlic sauce, sesame oil, and sugar. - Whisk until well combined. This sauce adds bold flavor. - Heat vegetable oil in a large skillet over medium heat. - Once hot, add minced garlic and sliced chilies. - Stir-fry for about 30 seconds. - Watch for the garlic to turn golden but not burnt. - Add the drained noodles to the skillet. - Pour the sauce mixture over the noodles. - Gently toss everything together. - Heat for about 2-3 minutes to combine flavors. - Stir in the chopped green onions. - Mix well and remove from heat. - Serve the noodles in deep bowls. - Garnish with fresh cilantro and lime wedges. To change the heat level, you can adjust the chili quantity. If you want less heat, use just one chili. For more spice, add a second chili or even a third. You can also try adding red pepper flakes or cayenne pepper. Both give extra heat without changing the flavor too much. You can enrich your dish with toppings. Sesame seeds add a nice crunch and flavor. You can also try adding chopped peanuts or cashews for a nutty twist. If you want a different taste, swap soy sauce for tamari or coconut aminos. These options work well for gluten-free diets too. For stir-frying, a large skillet or a wok works best. A wok heats evenly and allows for good tossing. You’ll also want a pair of tongs for easy noodle tossing. A spatula can help mix the ingredients well. Both tools make cooking quick and fun. {{image_4}} You can easily change up the dish by adding protein. Chicken works great here. Simply cook diced chicken in the skillet before adding garlic and chilies. Shrimp is another fantastic option. Just toss shrimp into the pan for a quick sauté. If you want a plant-based choice, tofu is perfect. Cube it and sauté until golden before mixing in. If you prefer a vegetarian or vegan option, choose plant-based noodles. Rice noodles or whole grain noodles are both excellent choices. For the sauce, make sure to use a vegan soy sauce. You can also swap out chili garlic sauce for a homemade version using garlic, chili paste, and a splash of vegetable broth. To explore new flavors, try adding veggies. Bell peppers, broccoli, or snap peas can add crunch and color. Toss in some chopped nuts like peanuts or cashews for a nice texture. You can also experiment with different herbs. Thai basil or mint can provide a fresh twist to the dish. To store leftovers, cool the noodles first. Place them in an airtight container. Keep the lid tight to avoid moisture. Store them in the fridge for up to three days. Always check for any strange smells before eating. To reheat, use a skillet for the best results. Heat a little oil over medium heat. Add the noodles and stir for about 3 to 5 minutes. You can add a splash of water or soy sauce to keep them moist. Avoid using the microwave, as it can make the noodles dry and tough. Yes, you can freeze spicy chili garlic noodles. Place cooled noodles in a freezer-safe bag. Before sealing, remove as much air as possible. They can last up to three months in the freezer. When ready to eat, thaw them overnight in the fridge and reheat as mentioned above. You can use either egg noodles or rice noodles for this dish. Egg noodles add a rich flavor. Rice noodles are light and gluten-free. Both options cook quickly and absorb the sauce well. Choose based on your taste or dietary needs. Yes, you can make this dish gluten-free. Use rice noodles and ensure your soy sauce is gluten-free. Many brands offer gluten-free soy sauce. This way, you can enjoy all the flavors without the gluten. To keep the noodles from sticking, rinse them after cooking. Drain them well and toss them with a bit of vegetable oil. This helps separate the noodles and keeps them nice and loose. If you cook them right, they should stay perfect. You can prepare the sauce ahead of time. Store it in the fridge for up to three days. Cook the noodles just before serving. This keeps everything fresh. Mix the noodles and sauce together right before you eat for the best taste. Chili garlic noodles pair well with many sides. Try spring rolls for a crunchy contrast. A light salad with fresh veggies can balance the heat. You can also serve steamed dumplings for a filling option. Each side adds a new layer of flavor. You now have all the tools to make delicious chili garlic noodles. From selecting your ingredients to perfecting your sauce, every step matters. Don’t forget to customize with your favorite toppings and proteins. Store your leftovers right for later enjoyment. With these tips, your dish will impress everyone. Get cooking and enjoy this delightful meal at home!

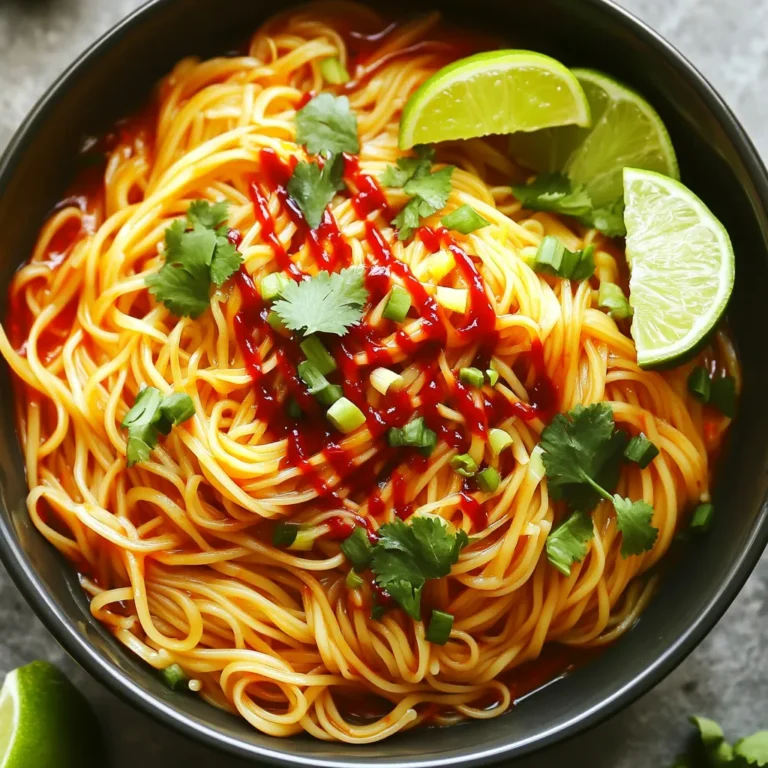
Spicy Chili Garlic Noodles in 15 Minutes Delight

To make Garlic Butter Steak Bites, you need: - 1 lb beef sirloin, cut into bite-sized cubes - 3 tablespoons unsalted butter, divided - 4 cloves garlic, minced - 1 teaspoon fresh thyme leaves (or ½ teaspoon dried thyme) - 1 teaspoon smoked paprika - Salt and black pepper, to taste - 1 cup jasmine rice - 2 cups beef broth (or water) - 1 cup frozen peas - Fresh parsley, chopped, for garnish These ingredients combine to create a rich and flavorful dish that is quick to prepare. The beef sirloin gives a nice bite, while the butter and garlic add depth. You will need a few basic tools: - Medium saucepan for cooking the rice - Large skillet for searing the steak - Wooden spoon or spatula for stirring - Measuring cups and spoons for accurate portions - Knife and cutting board for prepping the ingredients Having these tools ready makes cooking smooth and efficient. It helps you stay organized and focused on the meal. For added flavor and presentation, consider these garnishes: - Fresh parsley, chopped - Extra thyme leaves for a fragrant touch - Lemon wedges for a zesty finish These garnishes not only enhance the look of the dish but also add a fresh taste that brightens each bite. Use them to elevate your Garlic Butter Steak Bites and make your meal even more enjoyable. Start by cooking the jasmine rice. In a medium saucepan, bring 2 cups of beef broth to a boil. You can also use water, but broth adds more flavor. Stir in 1 cup of jasmine rice. Reduce the heat to low. Cover the pot and let it simmer for about 10-12 minutes. The rice will absorb the liquid and become tender. Once done, fluff the rice gently with a fork and keep it warm. While the rice cooks, prepare the steak bites. Use 1 pound of beef sirloin, cut it into bite-sized cubes. This size helps the beef cook quickly. Season the cubes with salt, black pepper, and 1 teaspoon of smoked paprika. Make sure each piece is well-coated for the best flavor. Next, heat a large skillet over medium-high heat. Add 1 tablespoon of unsalted butter once the skillet is hot. When the butter melts and bubbles, add the seasoned steak bites in a single layer. Avoid overcrowding the pan to keep the heat high. Sear the beef for about 2-3 minutes on each side. The cubes should be nicely browned and cooked to your liking. If needed, work in batches to keep the skillet hot. After searing, return all the steak bites to the skillet. Lower the heat to medium. Now, add 4 minced garlic cloves and 1 teaspoon of fresh thyme leaves. Pour in the remaining 2 tablespoons of butter. Sauté everything for 1-2 minutes. Stir often until the garlic becomes fragrant and soft. Now, gently stir in 1 cup of frozen peas. Let them heat through for about 1-2 minutes. Taste the mixture and adjust seasoning with extra salt or black pepper, if needed. Now it’s time to assemble your meal. Take the fluffy jasmine rice and put it on plates. Evenly distribute the garlic butter steak bites and peas over the rice. For a nice touch, garnish each plate with freshly chopped parsley. This adds color and freshness to your dish, making it even more inviting. Enjoy your meal! To make great steak bites, start with good beef. I like beef sirloin for its flavor. Cut the beef into even cubes. This helps them cook at the same time. Season them well with salt, pepper, and smoked paprika. This adds a nice flavor. Heat your skillet over medium-high heat. Add butter and let it melt. Once it bubbles, add the steak in one layer. Don't overcrowd the pan. Cook for 2-3 minutes on each side. Use tongs to turn them. This gives a nice brown crust. For fluffy jasmine rice, use beef broth for extra flavor. Boil it in a medium pot. Add the rice and stir once. Then, reduce the heat and cover. Let it simmer for about 10-12 minutes. Avoid lifting the lid. This keeps the steam in. Once done, fluff the rice with a fork. This helps separate the grains. Keep it warm off the heat until ready to serve. Feel free to adjust the seasonings to fit your taste. If you like more heat, add a pinch of cayenne pepper. For a fresh taste, try adding lemon zest. Fresh herbs like basil or oregano can also add flavor. Always taste as you go. This way, you can make changes to suit your palate. Don’t forget to add a bit more salt and pepper if needed. Enjoy experimenting! {{image_4}} You can swap beef sirloin for other meats. Try chicken, pork, or shrimp. Each protein gives a unique taste. For chicken, use thighs for juiciness. Pork tenderloin works well too. If you choose shrimp, cook them until they turn pink. This change adds a fun twist to your meal. While jasmine rice is great, you can use other types. Brown rice is a healthy choice and adds a nutty flavor. If you want something different, try basmati rice. It has a lovely aroma and texture. You can also cook rice in chicken broth for extra taste. Adding herbs or spices to the rice can make it even better. Consider saffron or turmeric for a vibrant color and flavor. For a meatless version, try using mushrooms. Portobello or shiitake mushrooms have a meaty texture. You can also use tofu or tempeh for plant-based protein. Season them like you would the steak, using garlic and thyme. This way, you still get all the rich flavors. To keep your garlic butter steak bites and rice fresh, store them in airtight containers. Let the dish cool down before sealing. This helps prevent moisture buildup. You can keep leftovers in the fridge for up to three days. Label the containers with the date to track freshness. When it’s time to enjoy your leftovers, use the stovetop or microwave. For stovetop reheating, place the steak bites and rice in a skillet over medium heat. Add a splash of beef broth or water to keep it moist. Stir occasionally until heated through, about 5-7 minutes. In the microwave, cover the dish and heat for 2-3 minutes, stirring halfway. Check that it’s hot all the way through before eating. If you want to store your meal longer, freezing is a great option. Portion the garlic butter steak bites and rice into freezer-safe bags or containers. Make sure to remove as much air as possible. This helps prevent freezer burn. You can freeze the dish for up to three months. When ready to eat, thaw it in the fridge overnight and then reheat using the stovetop or microwave methods described above. Yes, you can use other rice types. Long-grain rice or basmati rice work well. Just adjust the cooking time according to the rice type you choose. Keep in mind that different rice may change the dish's flavor slightly. If you want to swap beef sirloin, try using tender cuts like ribeye or filet mignon. You can also use chicken breast or shrimp for a different flavor. Each option will give you a tasty meal, but cooking times may vary. Cooking steak bites takes about 6 to 8 minutes. Sear them for 2 to 3 minutes on each side. The time may change based on how cooked you want the steak. Always check for doneness to ensure a perfect bite. Yes, you can make this dish without peas. If you prefer, add other vegetables like bell peppers or broccoli. They will add color and nutrition without changing the cooking method. Feel free to customize the dish to your taste! In this blog post, we explored how to make delicious garlic butter steak bites. We covered the key ingredients, cooking tools, and suggested garnishes. You learned step-by-step instructions, helpful tips, and variations to try. Remember, practice makes perfect when cooking steak. With the right ingredients and techniques, you can impress anyone at your table. Enjoy your cooking journey!

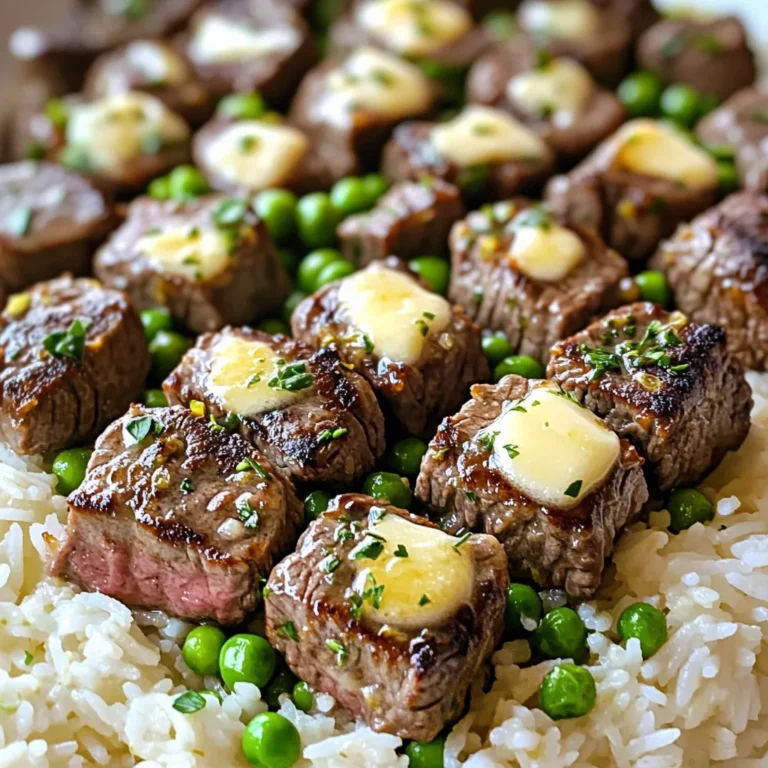
Garlic Butter Steak Bites & Rice in 15 Minutes Meal

- 1 cup cornmeal - 1 cup all-purpose flour - 1 tablespoon baking powder - ½ teaspoon salt - 1 cup buttermilk (or milk with 1 tablespoon vinegar) - 2 large eggs - ¼ cup honey - 4 tablespoons unsalted butter, melted - 1 cup sharp cheddar cheese, shredded - 2 fresh jalapeños, finely chopped (remove seeds for less heat) - ¼ teaspoon smoked paprika These ingredients create a delightful mix of flavors and textures. The cornmeal gives a hearty base, while the buttermilk keeps the muffins moist. The cheddar cheese adds a rich, savory taste, and the jalapeños bring a spicy kick. You can adjust the heat by removing the seeds from the jalapeños. Smoked paprika adds depth, making your muffins unique. Using fresh ingredients is key for the best flavor. For the cheese, sharp cheddar works wonders, but feel free to experiment with other cheeses if you like. Enjoy the process of mixing and measuring. Each step brings you closer to warm, tasty muffins that everyone will love! Start with a large mixing bowl. Sift 1 cup of cornmeal, 1 cup of all-purpose flour, 1 tablespoon of baking powder, and ½ teaspoon of salt together. Sifting helps mix and aerate the dry ingredients. Stir well to ensure they are blended evenly. In a separate bowl, whisk together 1 cup of buttermilk, 2 large eggs, ¼ cup of honey, and 4 tablespoons of melted unsalted butter. Mixing these wet ingredients well creates a smooth base for the muffins. If you don't have buttermilk, you can mix regular milk with 1 tablespoon of vinegar as a substitute. Now, gently fold the wet mixture into the dry ingredients. Use a spatula to combine them, but don’t overmix. It's okay if some lumps remain; this keeps the muffins from becoming tough. Next, add 1 cup of shredded sharp cheddar cheese, 2 finely chopped jalapeños, and ¼ teaspoon of smoked paprika. Make sure everything is evenly mixed. Preheat your air fryer to 350°F (175°C) for about 5 minutes. This step ensures even cooking. Prepare a muffin pan that fits your air fryer. You can line it with paper liners or lightly grease each cup with cooking spray to avoid sticking. Evenly divide the cornbread batter among the muffin cups, filling each about ¾ full. This allows the muffins room to rise. Place the muffin pan in the air fryer basket. Cook at 350°F (175°C) for 12 to 15 minutes. To check for doneness, insert a toothpick into the center of a muffin. If it comes out clean, the muffins are ready. After cooking, let the muffins cool in the pan for 5 minutes before moving them to a wire rack. To get the best texture, avoid overmixing. When you combine the wet and dry mixes, fold gently. Some lumps are okay. Overmixing makes the muffins tough. You want them soft and fluffy, not dense. Do you want a milder muffin? Remove the seeds from the jalapeños. This makes them less spicy. If you like heat, add more jalapeños or leave the seeds in. You can also try different types of peppers for varied spice levels. Serve the muffins warm for the best flavor. Top them with extra cheddar cheese or a dollop of honey. For a nice display, arrange them on a wooden board. Adding fresh herbs gives color and makes them look fancy. Enjoy them with soup or chili for a tasty meal! {{image_4}} You can change the cheese in these muffins. Try using pepper jack for a spicy kick. Feta adds a creamy, tangy taste. If you prefer a milder flavor, use mozzarella. Each choice gives a new twist to the recipe. Want more flavor? Add spices like cumin or cayenne pepper. These spices boost the heat. You can also try garlic powder for a savory touch. Italian herbs like oregano can make the muffins herbaceous and fragrant. Experiment and find your favorite blend. If you need a gluten-free version, swap the all-purpose flour. Use gluten-free all-purpose flour instead. Make sure it has xanthan gum to help with texture. This way, everyone can enjoy the tasty muffins without worry. To keep your cheddar jalapeño cornbread muffins fresh, store them in the fridge. Let them cool fully before placing them in an airtight container. This helps keep moisture inside while keeping them soft. They will stay good for about three days in the fridge. If you want to enjoy them warm, just pop them in the microwave for a few seconds. You can freeze these muffins for longer storage. First, let them cool completely. Wrap each muffin in plastic wrap or foil. Then, place them in a freezer bag. Press out as much air as you can before sealing. They will stay fresh for about three months. When you want to eat them, remove a muffin and let it thaw at room temperature. You can also reheat it in the air fryer at 350°F (175°C) for about 5-7 minutes. The shelf life of these muffins depends on how you store them. In the fridge, they last up to three days. If you freeze them, they can last up to three months. At room temperature, they are best eaten within two days. Keep them in a cool, dry place away from sunlight for the best taste. Yes, you can! If you don't have an air fryer, use your oven. Preheat it to 400°F (200°C). Line a muffin pan with paper liners. Fill each cup with batter. Bake for 18 to 22 minutes. Check for doneness with a toothpick. It should come out clean. You can make buttermilk at home. Use 1 cup of milk and add 1 tablespoon of vinegar. Let it sit for five minutes. This will create a similar taste and texture. Other options include yogurt or sour cream. Just thin them with water to match the consistency. Check the muffins after 12 minutes. They should rise and look golden. Insert a toothpick into the center of a muffin. If it comes out clean, they are done. If there's batter on the toothpick, cook for a few more minutes. You learned how to make delicious cornbread muffins using dry and wet ingredients. I covered steps for mixing, air frying, and achieving the best texture. You also got tips on customizing flavors and storing muffins for freshness. My final thoughts? Enjoy experimenting with flavors and share your tasty results! Cooking is fun, and these muffins are a great way to impress friends and family. Happy baking!

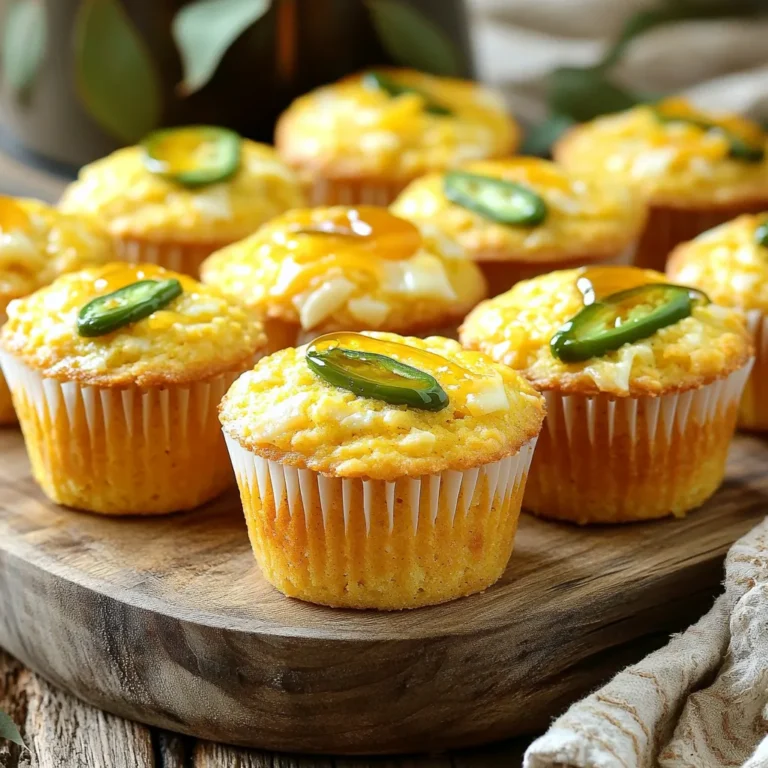
Air Fryer Cheddar Jalapeño Cornbread Muffins Delight

- 4 boneless, skinless chicken thighs - 1 pound of fresh broccoli florets - 1/4 cup balsamic vinegar - 2 tablespoons honey - 3 tablespoons extra virgin olive oil For this recipe, chicken thighs are my go-to. They stay juicy and tender. Fresh broccoli florets add color and crunch. Balsamic vinegar brings a sweet and tangy flavor. Honey balances the vinegar with a touch of sweetness. Olive oil helps everything roast perfectly. - 4 garlic cloves, finely minced - 1 teaspoon dried oregano - Salt and freshly ground black pepper, to taste - 1/4 cup cherry tomatoes, halved (for a vibrant garnish) - Fresh basil leaves, for a fragrant garnish Garlic gives a warm, rich flavor. Dried oregano adds an earthy touch. Don’t forget salt and pepper to enhance the dish. Cherry tomatoes bring brightness and sweetness. Fresh basil adds a lovely aroma and freshness. Use these ingredients to create a delicious, well-balanced meal. - Preheating the Oven Start by preheating your oven to 425°F (220°C). This step ensures the chicken cooks evenly and the broccoli becomes tender and crisp. - Marinating the Chicken In a large bowl, mix together 1/4 cup balsamic vinegar, 2 tablespoons honey, and 3 tablespoons olive oil. Add 4 minced garlic cloves and 1 teaspoon dried oregano. Season with salt and pepper. Whisk until smooth. Place the 4 chicken thighs in the marinade. Make sure each piece is well-coated. Let the chicken marinate for at least 15 minutes. For even more flavor, let it sit for up to 1 hour. - Arranging Chicken and Broccoli on Sheet Pan While the chicken marinates, wash and cut the broccoli florets. Aim for bite-sized pieces. After marinating, grab a large baking sheet. Place the chicken on one side of the sheet. On the other side, arrange the broccoli florets. Drizzle some olive oil over the broccoli and sprinkle with salt and pepper. Toss them to coat evenly. - Adding Cherry Tomatoes For a pop of color and flavor, slice 1/4 cup of cherry tomatoes in half. Scatter them over the broccoli about 5 minutes before the dish finishes cooking. - Roasting in the Oven Put the sheet pan into the preheated oven. Roast the chicken and broccoli for 20-25 minutes. The chicken should reach an internal temperature of 165°F. The broccoli will turn tender with some crispy edges. - Final Touches Before Serving When done, take the pan out of the oven. Let it rest for a few minutes. To brighten the dish, add fresh basil leaves on top before serving. This adds a lovely fragrance and a splash of color. Importance of Marinating Time Marinating the chicken is key for flavor. I recommend at least 15 minutes. If you can, let it sit for up to an hour. This extra time helps the chicken absorb the balsamic vinegar and honey. You will taste the difference, trust me! How to Properly Season Seasoning is simple but crucial. Use salt and black pepper generously. Toss the broccoli with olive oil, salt, and pepper too. This will bring out its natural sweetness. Remember, good seasoning makes every bite better. Oven Temperature Insights Preheat your oven to 425°F (220°C). This high heat helps the chicken cook quickly. It also gives the broccoli crispy edges. A hot oven is your best friend for roasting. Checking Doneness of Chicken and Broccoli The chicken should reach an internal temperature of 165°F. Use a meat thermometer for accuracy. The broccoli is done when it is tender and slightly crispy. Check both to ensure your meal is perfect! {{image_4}} You can easily switch the chicken for other meats. Try using pork chops or salmon fillets. Both options work well with the balsamic marinade. For pork, choose boneless chops. They cook fast and stay juicy. Salmon offers a rich flavor that pairs nicely with the sweet balsamic. If you want a vegetarian dish, consider using tofu. Firm tofu soaks up the marinade well. You can also try chickpeas for a hearty option. They add protein and texture. Just roast them alongside the veggies for a simple, tasty meal. You can add many other vegetables to this dish. Carrots, bell peppers, and zucchini go well with the chicken and broccoli. They add great color and flavor. Just chop them into similar sizes for even cooking. Seasonal veggies are also a fun option. In the fall, try Brussels sprouts or butternut squash. In the spring, asparagus or snap peas work nicely. This recipe is flexible, so feel free to experiment. Mix and match your favorite veggies to make it your own! - Storing Leftovers Safely: After your meal, let leftovers cool to room temperature. Place them in an airtight container. Store in the fridge for up to three days. Always check for any signs of spoilage before eating. - Best Practices for Reheating: To reheat, use a microwave or oven. If using a microwave, cover the dish to keep moisture in. Heat until the chicken reaches 165°F. In the oven, set it to 350°F. Heat for about 15-20 minutes, or until warm. - How to Freeze Roasted Chicken and Broccoli: For freezing, let the dish cool completely. Place the chicken and broccoli in a freezer-safe container. Use plastic wrap or foil to protect from freezer burn. This dish can last up to three months in the freezer. - Thawing and Reheating Tips: When ready to eat, thaw in the fridge overnight. You can also use the microwave for quick thawing. Reheat in the oven or microwave, ensuring it warms evenly. Check the internal temperature to confirm it reaches 165°F again. Yes, you can use bone-in chicken. Bone-in chicken adds flavor and can be very juicy. However, you need to adjust the cooking time. Bone-in chicken usually takes longer to cook. Roast it for 30-35 minutes instead of 20-25 minutes. Always check that the internal temperature reaches 165°F. You can serve many tasty side dishes with this meal. Here are some great options: - Quinoa or rice for a hearty base. - A fresh green salad for a crisp contrast. - Garlic bread to soak up the balsamic sauce. - Mashed potatoes for comfort. - Roasted carrots or Brussels sprouts for more veggies. Marinating chicken is key for flavor. I recommend marinating for at least 15 minutes. If you have more time, let it sit for up to 1 hour. The longer it sits, the more flavor it absorbs. Just make sure to keep it in the fridge while marinating. You learned how to make delicious balsamic chicken with broccoli. We covered the key ingredients, step-by-step instructions, and helpful tips. Remember, marinating is key for flavor. You can swap chicken or add different veggies based on your taste. Storing leftovers properly can make meals easier later. Enjoy experimenting with this simple recipe for healthy dinners. Keep it fun and tasty!

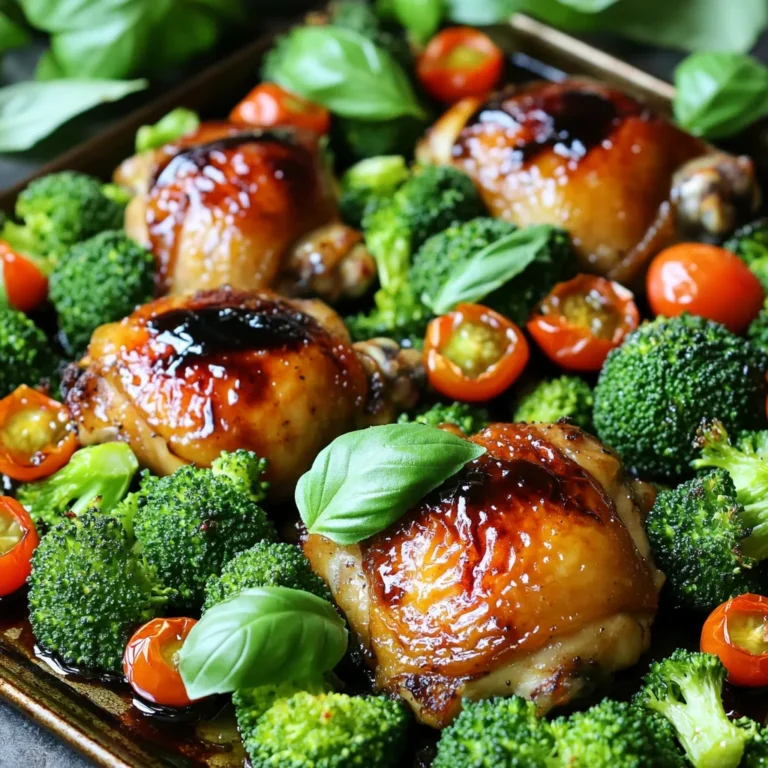
Sheet-Pan Balsamic Roasted Chicken and Broccoli Recipe

To make Slow Cooker Sweet Potato Black Bean Chili, you need a few simple ingredients that pack a lot of flavor. Here’s what you will need: - 2 large sweet potatoes, peeled and cut into 1-inch cubes - 1 can (15 oz) black beans, thoroughly drained and rinsed - 1 can (14.5 oz) diced tomatoes with jalapeños or green chilies - 1 medium red bell pepper, chopped into bite-sized pieces - 1 medium onion, diced finely - 3 cloves garlic, minced - 2 cups vegetable broth (low-sodium preferred) - 2 tablespoons chili powder (adjust to taste) - 1 teaspoon ground cumin - 1 teaspoon smoked paprika - Sea salt and freshly ground black pepper to taste - 1 tablespoon extra virgin olive oil - Fresh cilantro leaves, chopped, for garnish - Slices of ripe avocado, for serving Each ingredient adds a unique taste. Sweet potatoes give a nice sweetness. Black beans add protein. Diced tomatoes bring acidity and flavor. The red bell pepper and onion add crunch and sweetness. Garlic gives depth to the dish. Vegetable broth keeps everything moist. Spices like chili powder and cumin add warmth. Olive oil helps in cooking the onion and bell pepper. Finally, garnishes like cilantro and avocado make this chili look great and taste even better. When you combine these ingredients, you create a hearty dish. Each bite will burst with flavor and warmth, perfect for any meal. Enjoy the process of gathering these ingredients and the joy they will bring to your table. Start by heating 1 tablespoon of extra virgin olive oil in a medium skillet over medium heat. Once the oil is hot, add 1 medium onion, diced finely, and 1 medium red bell pepper, chopped into bite-sized pieces. Sauté them for about 5 minutes. Stir often until they soften and become clear. This step adds flavor and sweetness to your chili. Next, add 3 cloves of minced garlic to the skillet. Sauté for 1 more minute. The garlic should smell wonderful, but be careful not to let it burn. Now, it is time to transfer your sautéed mix to the slow cooker. Add 2 large sweet potatoes, peeled and cut into 1-inch cubes. Then, add 1 can of black beans, drained and rinsed. Don't forget to add 1 can of diced tomatoes with jalapeños or green chilies, including their juice. Next, pour in 2 cups of vegetable broth. This broth gives your chili a nice base. Now, sprinkle your spices on top. Use 2 tablespoons of chili powder, 1 teaspoon of ground cumin, 1 teaspoon of smoked paprika, sea salt, and black pepper to taste. Gently stir all the ingredients together until they are mixed well. Cover the slow cooker with its lid and set it to cook. You can choose to cook on low for 6-7 hours or on high for 3-4 hours. The goal is to make the sweet potatoes tender enough to pierce with a fork. After the cooking time, taste your chili. You can adjust the seasoning to your liking. If you want a thicker chili, mash a portion of the sweet potatoes with a fork and stir it back in. This adds a creamy texture that is delicious! Serve the chili hot. Top it with freshly chopped cilantro and slices of creamy avocado for a tasty finish. Enjoy the warmth and flavor of your home-cooked chili! To make your chili taste just right, you can adjust the spices. Start with the chili powder. Add two tablespoons for a mild heat. If you want more spice, add a bit more chili powder. You could also try different types of chili powders. Each type gives a unique flavor and warmth. Ground cumin adds a nice earthiness. A little smoked paprika will deepen the taste. Always taste your chili as you go. This way, you can find the perfect balance for your palate. To thicken the chili, you can mash some sweet potatoes. After cooking, take a fork and mash a portion of them. Stir the mashed sweet potatoes back into the chili. This adds creaminess and makes the dish heartier. If you want an even thicker texture, you can let it cook longer with the lid off. This helps some of the liquid evaporate, giving you a thicker chili. Garnishing your chili makes it more appealing. I love adding fresh cilantro on top. It adds a bright flavor and looks beautiful. Slices of ripe avocado bring creaminess and a rich taste. You can also serve the chili with tortilla chips for crunch. This makes a fun contrast to the soft chili. Enjoy your meal with a dollop of sour cream if you like. Each garnish adds flavor and flair to your dish. {{image_4}} You can add proteins to this chili for extra flavor and texture. Ground meat works well. Use beef, turkey, or chicken. If you prefer plant-based options, try adding lentils or crumbled tofu. Both options will give your chili more heartiness. Just brown the meat first, then add it to the slow cooker with the other ingredients. To make sure your dish is fully plant-based, check all ingredients. Use vegetable broth instead of chicken broth. Also, ensure your canned tomatoes don’t have any animal products. Many brands are vegan-friendly. This way, everyone can enjoy the chili without worry. Feel free to mix up the spices for more flavor. Try different types of chili powders, like chipotle or ancho, for a smoky twist. You can also add hot sauces, like sriracha or tabasco, for a kick. Adjust the spice levels to suit your taste. Always start small, and you can add more if needed! After cooking your chili, let it cool for a bit. Store it in an airtight container. It stays fresh in the fridge for about 4 to 5 days. Label your container with the date for easy tracking. This way, you know when it’s time to eat it! You can freeze the chili for later use. First, let it cool completely. Then, pour it into freezer-safe bags or containers. Squeeze out as much air as you can. This helps prevent freezer burn. Your chili can last up to 3 months in the freezer. When you're ready to eat, just thaw it overnight in the fridge. To reheat, use a pot on the stove over medium heat. Stir it often to keep it from sticking. If it's too thick, add a splash of vegetable broth or water. You can also use a microwave. Place it in a microwave-safe bowl and cover it. Heat for 2-3 minutes, stopping to stir halfway. This keeps the flavor fresh and tasty! Yes, you can use other methods. You can cook it on the stove. Just use a pot. Sauté the onion and bell pepper first, then add the rest of the ingredients. Let it simmer for about 30-40 minutes. Stir often to prevent sticking. If you want more heat, there are some easy ways to spice it up. You can add diced jalapeños or a dash of hot sauce. You can also use a spicier chili powder. Try adding chipotle powder for a smoky flavor. Always taste as you go. Yes, feel free to swap in other veggies. Corn adds sweetness and texture. Zucchini is another great choice. You can also add carrots or bell peppers. Just remember to cut them into small pieces for even cooking. This blog post covers how to make a delicious chili with sweet potatoes and black beans. You learned about the key ingredients, how to prepare and cook them, and tips for perfecting the dish. We also explored variations, storage options, and answers to common questions. In closing, this chili is versatile and easy to make. It suits many tastes and diets. Enjoy crafting your unique version and sharing it with friends!

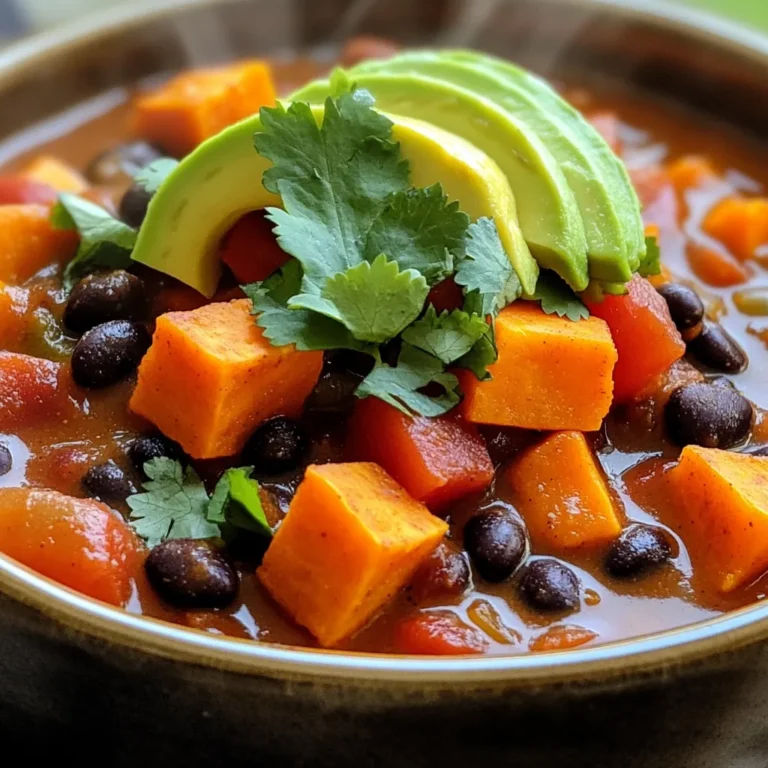
Slow Cooker Sweet Potato Black Bean Chili Delight

- 4 salmon fillets (about 6 ounces each) - 2 cups broccoli florets - 1 cup bell peppers, sliced (mix of red and yellow for color) - 1 cup snap peas, trimmed - 3 tablespoons sweet chili sauce - 2 tablespoons olive oil - 2 cloves garlic, minced - 1 teaspoon ginger, freshly grated - Salt and black pepper to taste - Sesame seeds for garnish - Fresh cilantro leaves, chopped for garnish This recipe uses simple measurements. Each salmon fillet is about 6 ounces. You need 2 cups of broccoli, 1 cup of sliced bell peppers, and 1 cup of snap peas. The sauce calls for 3 tablespoons of sweet chili sauce and 2 tablespoons of olive oil. You’ll also need 2 cloves of garlic and 1 teaspoon of ginger for flavor. Don’t forget salt and black pepper! Fresh ingredients make a big difference in flavor. Fresh salmon gives a nice texture and taste. When you pick vibrant veggies, they add color and crunch. For herbs like cilantro, fresh is best; it enhances the dish. Using fresh garlic and ginger boosts the aroma and taste. Always choose the best quality you can find, as it brings out the dish's full potential. First, set your oven to 400°F (200°C). This heat cooks the salmon and veggies just right. Next, line a large baking sheet with parchment paper. This step keeps your food from sticking and makes cleanup easy. In a small bowl, mix together the sweet chili sauce, olive oil, garlic, and ginger. This mix gives the salmon a sweet and spicy flavor. Don’t forget to add a pinch of salt and black pepper. Whisk it well until it blends together smoothly. Now it’s time to set up your baking sheet. Place the salmon fillets on one side of the sheet. Use a brush or spoon to coat the tops with half of the sweet chili marinade. This gives the fish great flavor. In another bowl, combine broccoli, bell peppers, and snap peas. Drizzle the rest of the marinade over them and toss well. This ensures every veggie gets coated. Transfer the veggies to the other side of the baking sheet, next to the salmon. This creates a colorful and inviting dish. Slide the baking sheet into the oven. Roast everything for about 15-20 minutes. Keep an eye on the salmon. It should flake easily with a fork when done. The veggies should stay tender yet crisp, giving you the best texture. When you take it out of the oven, sprinkle sesame seeds and cilantro over the dish. This adds a nice touch to both flavor and look. Enjoy your tasty meal! To cook salmon well, start by choosing fresh fillets. Look for firm, bright fish. When cooking, keep an eye on the time. Bake at 400°F for 15-20 minutes. Check doneness by gently flaking with a fork. The fish should look opaque, not raw. If you want a crispy top, broil the salmon for the last few minutes. You can mix and match vegetables in this recipe. Carrots, zucchini, or asparagus work well too. Feel free to use what you have on hand. Just remember to cut them to similar sizes for even cooking. Keep the colors bright for a beautiful dish. A rainbow of veggies adds fun and flavor. For extra flavor, add a splash of lime juice or zest. You can also sprinkle some red pepper flakes for heat. If you love herbs, add fresh dill or basil. A bit of soy sauce can deepen the taste too. Experiment with flavors to make the dish your own! {{image_4}} You can swap salmon for other proteins. Try chicken breast for a leaner choice. Shrimp also works great. Just adjust the cooking time. Fish like tilapia or cod can replace salmon easily. They will soak up the sweet chili sauce, too. Using seasonal veggies keeps your dish fresh and fun. In spring, add asparagus or peas. Summer brings zucchini and corn. In fall, try butternut squash or Brussels sprouts. During winter, root veggies like carrots and parsnips shine. Mix and match based on what’s in season. Want a kick? Add red pepper flakes to your marinade. For milder taste, use less chili sauce. You can also mix in a bit of honey for sweetness. This balance keeps your meal enjoyable for everyone. Adjust the heat to fit your family’s taste. After cooking, let the salmon and veggies cool for about 30 minutes. Place them in an airtight container. Store in the fridge for up to 3 days. This keeps the flavors fresh and ready to enjoy again. To freeze, separate the salmon from the veggies. Wrap each salmon fillet in plastic wrap and foil. Place the veggies in a freezer-safe bag. This way, they don’t stick together. You can freeze them for up to 3 months. Remember to label the bags with the date. To reheat, place the salmon and veggies on a baking sheet. Preheat your oven to 350°F (175°C). Bake for about 10-15 minutes until heated through. This keeps the salmon moist and the veggies crisp. You can also use a microwave. Heat in short bursts, checking often to avoid overcooking. Enjoy your tasty meal again! Yes, you can use frozen salmon. Just make sure to thaw it first. I suggest placing it in the fridge overnight. If you're short on time, you can also run it under cold water for quicker thawing. Once thawed, follow the same steps in the recipe. The sweet chili sauce will still work well with frozen salmon. The best sweet chili sauce is one that balances sweetness and heat. Look for brands with natural ingredients. I like sauces that have a little garlic and vinegar for extra flavor. You can also make your own if you prefer. Just mix sugar, vinegar, chili flakes, and garlic. You can tell salmon is fully cooked when it flakes easily with a fork. This means it is tender inside. The color should change to a light pink. If you have a food thermometer, aim for 145°F (63°C) in the thickest part. Keep an eye on it while roasting to avoid overcooking. Absolutely! You can swap out the broccoli, bell peppers, and snap peas for your favorites. Carrots, zucchini, or asparagus work great too. Just make sure to cut them into similar sizes for even cooking. You can also add more veggies if you like a colorful plate. In this post, we explored key ingredients, step-by-step instructions, and helpful tips for cooking salmon. We discussed the importance of fresh ingredients and provided ideas for variations and storage. You now have everything you need for a delicious meal. Remember, cooking is fun, so experiment and make it your own. Enjoy your tasty dish, and don't hesitate to share your results!

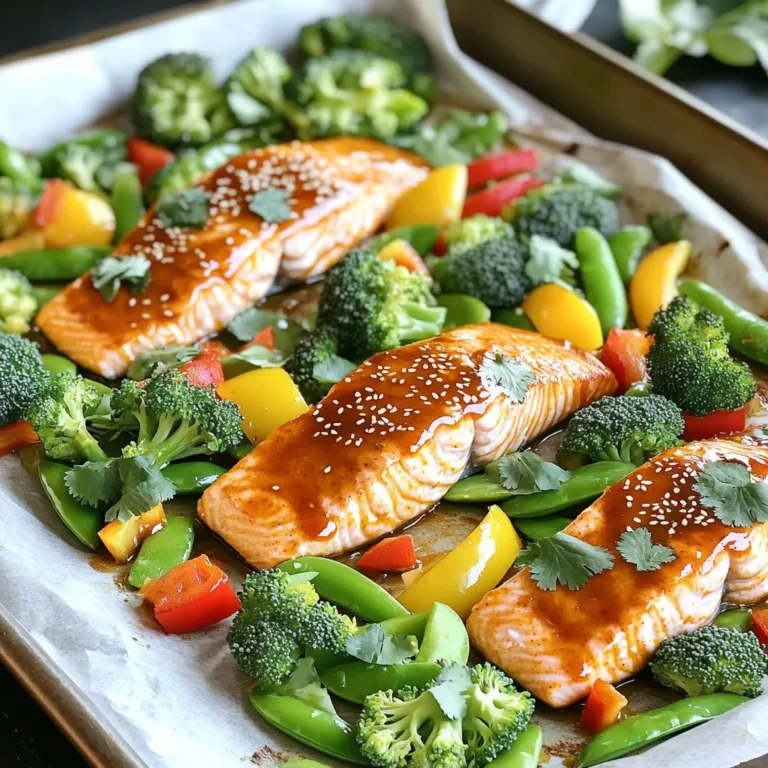
Sheet-Pan Sweet Chili Salmon and Veggies Delight

To make No-Bake Cookie Dough Protein Bites, you will need the following ingredients: - 1 cup almond flour - 1/2 cup rolled oats - 1/3 cup natural peanut butter or almond butter - 1/4 cup honey or maple syrup - 1/4 cup protein powder (preferably vanilla or chocolate flavor) - 1/4 teaspoon sea salt - 1/2 teaspoon pure vanilla extract - 1/3 cup mini chocolate chips (options: dark or dairy-free) - Optional: 1/4 cup chopped nuts (suggestions: walnuts or pecans) These simple ingredients create a tasty snack that powers you through your day. Almond flour gives a nutty flavor and keeps the bites gluten-free. Rolled oats add heartiness and texture. Peanut butter or almond butter provides creaminess and protein. Honey or maple syrup sweetens the bites. Protein powder boosts the nutrition. Sea salt balances the flavors, while vanilla extract enhances the taste. Mini chocolate chips add a fun treat, and nuts give a nice crunch. Choose your favorites for a personalized touch! First, grab a large mixing bowl. Add 1 cup of almond flour, 1/2 cup of rolled oats, 1/4 cup of protein powder, and 1/4 teaspoon of sea salt. Stir them together well until they mix fully. This step makes sure your dry ingredients are ready for the next part. In another bowl, measure out 1/3 cup of natural peanut butter and 1/4 cup of honey. You can also use maple syrup if you prefer. Add 1/2 teaspoon of pure vanilla extract. Whisk these until the mixture becomes smooth and creamy. It should look nice and thick with no lumps. Now, pour the wet mixture into your big bowl with the dry ingredients. Use a spatula or your hands to mix them together. Keep mixing until the dough is fully combined and forms a cohesive mixture. You might need to use a bit of strength to get it all blended. Next, gently fold in 1/3 cup of mini chocolate chips. If you want some crunch, add 1/4 cup of chopped nuts like walnuts or pecans. Make sure to mix them evenly throughout the dough. This gives each bite a tasty surprise! Take small portions of the dough, about 1 tablespoon each, and roll them into bite-sized balls. Place these on a baking sheet lined with parchment paper. Once you have rolled them all, put the tray in the fridge. Let the bites chill for at least 30 minutes. This helps them firm up before you enjoy them! To make sure your dough holds together, keep these points in mind: - Use precise measurements for your dry and wet ingredients. - If the dough feels too dry, add a bit more nut butter or sweetener. - If it feels too wet, sprinkle in more almond flour or oats. - Mix until everything is well combined. A good mix creates a strong dough. You can easily change the flavor and texture of your protein bites. Try these options: - Swap almond butter for peanut butter or use sunflower seed butter. - Replace honey with maple syrup for a vegan choice. - Experiment with different sweeteners, like agave or coconut sugar. - Add spices like cinnamon or cocoa powder for extra flavor. Make your protein bites look as good as they taste. Here are some ideas: - Serve the bites on a small platter lined with parchment paper. - Sprinkle a pinch of sea salt on top for a gourmet touch. - Place a small bowl of extra chocolate chips nearby for fun. - Use colorful mini cupcake liners to add flair and make serving easy. {{image_4}} You can change the flavor of your protein bites by using different protein powders. Vanilla and chocolate are popular choices. But you can try peanut butter or even cookie dough-flavored protein powder. Each flavor brings a new twist. You can mix and match to find your favorite! These bites can fit various diets. To make them gluten-free, use certified gluten-free oats and almond flour. For a vegan version, simply swap honey for maple syrup. You can also choose a plant-based protein powder. This way, everyone can enjoy these tasty snacks! Mix-ins can jazz up your protein bites. You can add dried fruits like cranberries or raisins for sweetness. Chia seeds or sunflower seeds add crunch and nutrition. You can even use shredded coconut for a tropical flavor. The options are endless! Get creative and make these bites your own! To keep your No-Bake Cookie Dough Protein Bites fresh, use an airtight container. Glass or plastic containers work well. Line the bottom with parchment paper for added protection. This helps prevent sticking and keeps the bites intact. Store the container in a cool, dry place, like your pantry or refrigerator. These protein bites last about one week in the fridge. If you want them to last longer, freeze them. When stored in the freezer, they can last for up to three months. Just make sure to wrap each bite in plastic wrap or place them in a freezer-safe bag. This keeps them fresh and ready for a quick snack. No heating is needed for these bites. They are best enjoyed cold. However, if you prefer a warm treat, you can microwave them for about 10-15 seconds. This softens them a bit and makes the chocolate chips melty. Just be careful not to overheat, or they may lose their shape! Yes, you can. Here are some good options: - Whey protein - Plant-based protein - Casein protein - Egg white protein Each type has its own taste and texture. Choose one that you enjoy. If you're unsure, start with vanilla or chocolate flavors. They blend well with the other ingredients. To make these bites vegan, swap out a few ingredients: - Use almond butter instead of peanut butter. - Replace honey with maple syrup or agave nectar. - Choose a plant-based protein powder. These changes will keep the bites tasty and suitable for a vegan diet. Yes, these protein bites are great for kids! They are packed with nutrients. They have protein from the nut butter and protein powder. Here are some benefits: - Good source of healthy fats - Provides energy for playtime - Easy to grab and eat Make sure to watch the serving size. One or two bites is a perfect snack for kids. This blog post covered how to make tasty protein bites. We went over the ingredients, steps, tips, and storage ideas. Remember, you can switch up nut butters or sweeteners. You can also try new flavors with the protein powder. These bites are easy to make and great for snacks. With a little creativity, you can make them your own. Enjoy making and sharing these healthy treats!

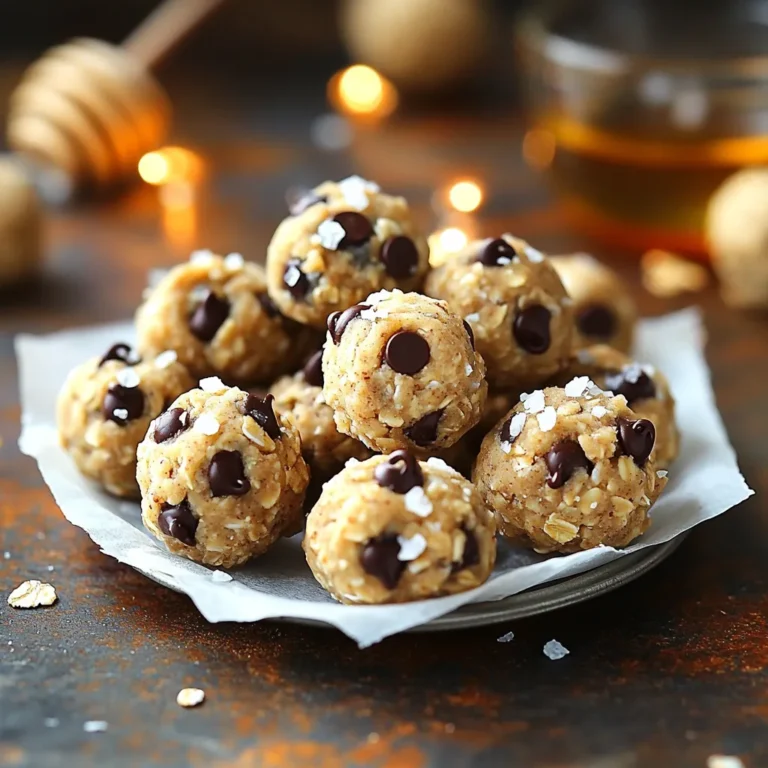
No-Bake Cookie Dough Protein Bites Tasty Snack Recipe

- 4 salmon fillets (6 oz each) - 1 cup broccoli florets - 1 cup cherry tomatoes, halved - 1 cup baby carrots, sliced - 4 cloves garlic, minced - 1/4 cup olive oil - 2 tablespoons fresh lemon juice - 1 tablespoon fresh parsley, chopped - 1 teaspoon dried oregano - 1 teaspoon salt - 1/2 teaspoon freshly ground black pepper - Lemon slices for garnish Gather these ingredients before you start. Fresh salmon fillets are key for taste. Use bright, crisp vegetables like broccoli, cherry tomatoes, and baby carrots. These add color and nutrients to your meal. Minced garlic brings a wonderful, bold flavor. Fresh herbs like parsley and oregano elevate the dish. Olive oil and lemon juice add richness and brightness. Don't forget salt and pepper; they enhance the flavors of all the ingredients. This mix of fresh ingredients makes for a delightful meal. Each component plays a role in creating a balanced plate. Enjoy the process of cooking and the tasty results! 1. First, preheat your oven to 400°F (200°C). This helps cook the salmon and veggies evenly. 2. Next, prepare your baking sheet. Line it with parchment paper. This keeps food from sticking. 3. In a medium bowl, combine these ingredients: - 1/4 cup olive oil - 2 tablespoons fresh lemon juice - 4 cloves garlic, minced - 1 tablespoon fresh parsley, chopped - 1 teaspoon dried oregano - 1 teaspoon salt - 1/2 teaspoon freshly ground black pepper Whisk them together until well mixed. This garlic herb sauce adds great flavor. 4. Now, arrange the salmon fillets on the baking sheet. Place them in the center. Make sure each fillet has space around it. 5. Surround the salmon with: - 1 cup broccoli florets - 1 cup cherry tomatoes, halved - 1 cup baby carrots, sliced This colorful mix looks nice and tastes great. 6. Drizzle the garlic herb mixture over both the salmon and vegetables. Make sure everything is coated well for the best flavor. 1. Place the sheet pan in the preheated oven. Bake for 15-20 minutes. 2. Check if the salmon is done. It should flake easily with a fork. The veggies should be tender but still crisp. 3. When finished, carefully remove the pan from the oven. 4. For a nice touch, garnish with lemon slices. You can also sprinkle a little extra parsley on top for color. 5. To serve, you can keep the meal on the sheet pan for a family-style feast or plate it individually. Adding extra lemon slices on the side makes a bright display. To check for flakiness, use a fork. Gently press down on the salmon. If it flakes easily, it is done. This method ensures you serve perfect salmon. To prevent overcooking, keep an eye on the timer. Salmon usually cooks in 15 to 20 minutes. Take it out once the inside is just opaque. Overcooking makes the fish dry and less tasty. You can add extra seasonings to boost flavor. Consider adding a pinch of red pepper flakes for heat. A dash of balsamic vinegar can also add depth. Experiment with spices to find your favorite mix. Choosing the right vegetables is key. Broccoli, cherry tomatoes, and carrots are great choices. They roast well and keep their shape. You can also try bell peppers or zucchini for variety. {{image_4}} You can change the fish in this recipe. Try using tilapia or cod. These options offer a mild flavor and work well with garlic. You can also use chicken breasts or shrimp for a twist. Each protein brings its own taste to the dish and keeps it fresh. For the veggies, feel free to swap in your favorites. Zucchini, bell peppers, or asparagus all work great. You can even use frozen veggies if you’re short on time. Just remember to adjust the cooking time if needed. This way, you can enjoy a new dish each time you make it. You can play with the herbs in this recipe. Instead of parsley, try dill or thyme. Both herbs can add a bright taste that pairs well with salmon. You can also mix herbs for a unique flavor profile. If you like spice, consider adding red pepper flakes. A dash can bring warmth to the dish without overpowering it. You might also try a bit of smoked paprika for a different twist. These small changes can make the meal exciting and new each time you prepare it. To store your leftover sheet pan garlic herb salmon and veggies, first let them cool. Then, place them in an airtight container. This will help keep the food fresh. Make sure to refrigerate it right away. Your leftovers will stay good for about three days in the fridge. After that, the taste and texture may change. When you’re ready to enjoy your leftovers, there are a few ways to reheat them. The best method is to use the oven. Preheat it to 350°F (175°C). Place your salmon and veggies on a baking sheet. Heat them for about 10 to 15 minutes or until warm. This keeps the flavor and texture nice. You can also use the microwave if you're in a hurry. Just put your food in a microwave-safe dish and cover it. Heat in short bursts until it’s hot, but be careful not to overcook it. This way, you keep that delicious taste intact. Salmon cooks quickly in the oven. It usually takes 15 to 20 minutes at 400°F (200°C). The salmon is done when it flakes easily with a fork. I recommend checking it around the 15-minute mark. This helps avoid overcooking. The veggies should be tender but still crisp. Yes, you can prep ingredients ahead of time! Chop the vegetables and store them in the fridge. You can also mix the garlic herb sauce early. Just keep it in a sealed container to keep it fresh. Marinating the salmon for 30 minutes to an hour can boost flavor. Just remember to store it in the fridge. This dish pairs well with several sides. Here are some great options: - Quinoa or rice for a filling base. - A fresh green salad for a light touch. - Garlic bread for a nice crunch. - Mashed potatoes for comfort food. These sides balance the flavors of the salmon and veggies. Enjoy experimenting with your favorites! This recipe for sheet pan salmon is simple and tasty. We covered ingredients, preparation steps, and baking tips. Perfectly cooked salmon and roasted veggies can impress anyone. You can also swap ingredients and add your favorite flavors. Remember to store leftovers right. This dish is easy to make and fun to customize. Enjoy trying new ideas and sharing your meals with others. Cooking can be a great adventure!

Sheet Pan Garlic Herb Salmon Veggies Delightful Meal

- 1 lb boneless chicken breast, cut into bite-sized pieces - 1 cup assorted bell peppers (red, green, yellow), diced - 1 cup pineapple chunks (fresh or canned) The main ingredients give sweet and sour chicken its unique flavor. Chicken breast forms the base of this dish. It is tender and soaks up all the great flavors. The bell peppers add color and crunch. They also bring a sweet taste that balances the dish. Pineapple adds a juicy sweetness that makes this dish special. - 1/2 cup all-purpose flour - 2 large eggs, beaten - 1 cup breadcrumbs Breading is key to getting that perfect crunch. Flour helps the eggs stick to the chicken. The eggs coat the chicken, helping the breadcrumbs adhere. Breadcrumbs give the chicken a golden-brown crust when fried. This crunch pairs nicely with the soft chicken and sweet sauce. - 1/2 cup ketchup - 1/4 cup apple cider vinegar - 1/4 cup brown sugar The sauce is the heart of sweet and sour chicken. Ketchup gives it a rich base. Apple cider vinegar adds tanginess. Brown sugar brings sweetness, balancing the other flavors. Together, they create a sauce that clings perfectly to the chicken and veggies. - Marinating the Chicken: Start by seasoning the chicken pieces with salt, pepper, garlic powder, and ground ginger. This adds great flavor. Let it sit for about 15 minutes. This step helps the chicken taste better. - Setting Up the Breading Station: Next, set up a three-bowl system. Put all-purpose flour in the first bowl. Pour beaten eggs into the second bowl. Fill the third bowl with breadcrumbs. This setup makes breading easy and organized. - Breading the Chicken: Take each piece of marinated chicken. First, dip it into the flour. Make sure to coat it well. Next, move it to the egg bowl. Let any extra egg drip off. Finally, roll the chicken in breadcrumbs. Press gently to get a good coating. - Frying the Chicken: Heat vegetable oil in a large skillet over medium-high heat. Once hot, add the breaded chicken pieces in batches. Don’t overcrowd the pan. Fry until golden brown, about 4-5 minutes per batch. Use a slotted spoon to take out the chicken and place it on paper towels to drain. - Sautéing the Vegetables: In another pan, add diced onions and bell peppers. Sauté them over medium heat for about 3-4 minutes. Cook until they start to soften and smell good. - Mixing the Sauce: In a bowl, mix ketchup, apple cider vinegar, brown sugar, and soy sauce. Whisk until smooth and well mixed. This sauce gives the dish its sweet and tangy flavor. - Incorporating the Chicken: Add the sautéed onions, bell peppers, and pineapple chunks to the pan. Stir in the sauce mixture. Bring everything to a simmer. Let the flavors blend for a few minutes. - Final Presentation Tips: Gently add the fried chicken to the pan. Toss it to coat every piece. Cook for another 2-3 minutes until everything is warmed through. Serve the sweet and sour chicken in a colorful bowl or platter. Garnish with fresh cilantro and lime slices for a bright touch. Serve with fluffy rice or egg noodles. Adjusting Sweetness and Sourness To make your sweet and sour chicken just right, you can adjust the sauce. If you want it sweeter, add more brown sugar or ketchup. If you like it tangy, add more apple cider vinegar. Start with small amounts and taste as you go. This way, you find your perfect balance. Spice Level Customization Want a kick? Add red pepper flakes or a dash of hot sauce. Start with a little, then taste it. You can always add more heat, but it’s hard to take it out. This way, you can make it mild or spicy, just how you like it. Avoiding Overcrowding When Frying When frying your chicken, keep the pieces spaced apart. If you crowd the pan, the chicken won't fry well. It will steam instead of crisp. Fry in batches, so each piece gets the heat it needs. This helps make your chicken nice and crispy. Best Practices for Sautéing Vegetables When sautéing your veggies, heat your pan first. Add a little oil, then toss in the onions and bell peppers. Keep stirring them. This helps them cook evenly and stay crunchy. Cook them just until they're soft but still bright in color. You want them to keep their flavor. Complementary Side Dishes Serve your sweet and sour chicken with steamed rice or egg noodles. These sides soak up the sauce well. You can also add a fresh salad for a crunchy contrast. This makes your meal more balanced and tasty. Garnishes for Presentation For a beautiful touch, garnish with fresh cilantro leaves and lime slices. This adds color and a fresh flavor. Place everything in a big bowl or nice platter. It makes the dish look inviting and fun to eat. {{image_4}} Alternative Proteins You can swap chicken for shrimp, tofu, or pork. Each option gives a unique taste and texture. Shrimp cooks fast and adds a nice touch. Tofu works well for a vegan meal. Pork adds a hearty flavor that some enjoy. Different Vegetables Feel free to mix in other veggies. Broccoli, snap peas, or carrots can brighten the dish. You can also try zucchini or mushrooms for new textures. The goal is to keep it colorful and fun. Gluten-Free Options To make this dish gluten-free, use gluten-free flour and breadcrumbs. Check the soy sauce label too. Some brands offer gluten-free versions that work great in this recipe. Vegetarian/Vegan Alternatives For a vegetarian twist, use tofu or tempeh instead of chicken. You can use vegetable broth in the sauce for added flavor. This way, you keep the sweet and sour taste without meat. Using Different Types of Vinegar Apple cider vinegar is great, but rice vinegar or white vinegar can also shine in this dish. Each vinegar brings its own flavor, so try what you like best. Adding Fruit or Other Flavor Enhancements You can add mango or orange juice for a fruity twist. This change can make the dish sweeter and even more exciting. Try adding chili flakes for a spicy kick, too. To store leftovers, let the Sweet and Sour Chicken cool down first. Place it in an airtight container. This keeps the flavors fresh. You can store it in the fridge for up to three days. Make sure to separate the chicken from any rice or noodles to keep everything fresh. Best Containers for Storage: - Use glass containers with tight lids. - Plastic containers also work well but check for BPA-free options. - Label the containers with the date to track freshness. You can freeze cooked Sweet and Sour Chicken for longer storage. First, cool it completely. Then, transfer it to freezer-safe bags or containers. Squeeze out as much air as possible before sealing. This helps prevent freezer burn. Reheating Tips: - Thaw in the fridge overnight before reheating. - Use a microwave or stovetop to warm it up. - Add a splash of water to keep it moist while reheating. To recognize spoiled food, check for any off smells or changes in color. If the chicken looks or smells strange, it’s better to throw it away. Tips for Extending Freshness: - Always store leftovers in airtight containers. - Keep the fridge at or below 40°F (4°C). - Use leftovers within three to four days for best quality. Can you make Sweet and Sour Chicken ahead of time? Yes, you can make Sweet and Sour Chicken ahead. Cook the chicken and sauce first. Cool it down, then store it in the fridge. When you are ready, reheat it on the stove or in the microwave. This way, the flavors blend nicely. How do you make Sweet and Sour Chicken spicier? To make Sweet and Sour Chicken spicier, add red pepper flakes or diced jalapeños to the sauce. You can also use a spicy ketchup. For a kick, mix in some hot sauce when you combine the chicken and sauce. Adjust the spice to your taste. What type of oil is best for frying? Vegetable oil is best for frying Sweet and Sour Chicken. It has a high smoke point and is neutral in flavor. You can also use canola oil or peanut oil for a richer taste. Avoid oils with strong flavors that may alter the dish. How can you achieve crunchy chicken? To achieve crunchy chicken, follow the breading steps carefully. Coat the chicken well in flour, egg, and breadcrumbs. Fry in hot oil, not overcrowding the pan. This allows the chicken to cook evenly and stay crispy. Let it drain on paper towels to remove excess oil. Can I use frozen chicken for this recipe? Yes, you can use frozen chicken. Just make sure to thaw it completely before marinating. Thaw in the fridge overnight or use the microwave. This ensures even cooking and better flavor absorption. What can I use instead of pineapple? If you don't have pineapple, you can use mango or diced peaches for a fruity touch. For a tart flavor, try diced green apples or even bell peppers. These will still give you a delicious sweet and sour taste. In this blog post, I covered how to make sweet and sour chicken. You learned about the key ingredients like chicken, bell peppers, and pineapple. I also shared step-by-step instructions on preparing, cooking, and serving this tasty dish. Exploring tips on flavor balance and cooking techniques helped enhance your dish. Plus, I provided ideas for variations, storage, and answered common questions. Ultimately, sweet and sour chicken is flexible, fun, and satisfying. Now, you’re ready to create a delicious meal your family will love.

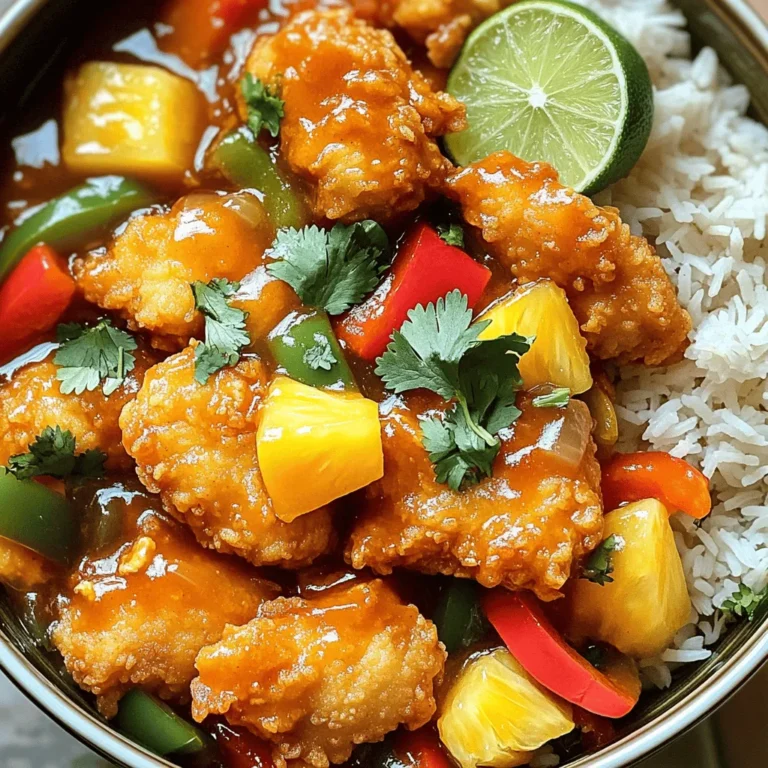
Savory Sweet and Sour Chicken Simple Dinner Recipe

- 2 cups cooked chicken, shredded - 3 cups fresh spinach, chopped - 1 cup cream cheese, softened - 1 cup shredded mozzarella cheese - ½ cup grated Parmesan cheese - 1 cup sour cream - 1 teaspoon garlic powder - 1 teaspoon onion powder - Salt and black pepper to taste These ingredients create a creamy and hearty dish. The chicken and spinach blend well with the cheeses. Cream cheese adds a rich texture. Mozzarella gives it a nice stretch, while Parmesan adds a salty kick. - 1 cup breadcrumbs - 2 tablespoons olive oil Breadcrumbs add a crunchy topping. You can mix them with olive oil for extra flavor. This step is optional but highly recommended for texture. - Salt and black pepper to taste Seasoning is vital for flavor. Adjust the salt and pepper to your liking. You can also add your favorite herbs for extra taste. This will help make your casserole even more delicious. {{ingredient_image_2}} First, you need to preheat your oven to 375°F (190°C). This step makes sure the oven is hot when your casserole goes in. Grab a 9x13 inch baking dish and grease it lightly with olive oil or cooking spray. This helps keep the casserole from sticking. Next, heat 2 tablespoons of olive oil in a large skillet over medium heat. Add 3 cups of chopped spinach and stir it for about 3 minutes. You want the spinach to wilt down and reduce. Once it’s done, take the skillet off the heat and set the spinach aside. In a big mixing bowl, combine the following: - 2 cups cooked chicken, shredded - The wilted spinach - 1 cup softened cream cheese - 1 cup shredded mozzarella cheese - 1 cup sour cream - 1 teaspoon garlic powder - 1 teaspoon onion powder - Salt and black pepper to taste Use a spatula or a wooden spoon to mix everything together. Keep stirring until you have a smooth and well-blended mixture. Now it’s time to transfer your mixture to the baking dish. Pour the chicken and spinach mix into the greased dish. Spread it out evenly to cover the bottom well. If you want some crunch, sprinkle 1 cup of breadcrumbs over the top. This step is optional, but I highly recommend it! Sprinkle ½ cup of grated Parmesan cheese on top. Then, place the dish in the oven and bake for 25-30 minutes. Look for the cheese to bubble and turn golden brown. When it’s done, take it out and let it cool for 5 minutes. This helps the casserole set. Serve it hot, and enjoy your Cheesy Chicken and Spinach Delight! To get that creamy and smooth texture, use softened cream cheese. It blends well with the other ingredients. Mix everything until it is smooth. If you want a crispy top, add breadcrumbs. They give a nice crunch when baked. Fresh herbs can really boost the flavor of your casserole. Try adding chopped basil or parsley to the mix. You can also sprinkle some dried Italian seasoning for an extra kick. These herbs pair well with chicken and spinach. If you're short on time, use rotisserie chicken. It saves you cooking time and adds great flavor. You can also buy pre-washed spinach. This cuts down on prep time and makes cooking easier. Pro Tips Use Leftover Chicken: This recipe is a great way to utilize leftover rotisserie chicken, saving you time and enhancing the flavor. Fresh Spinach vs. Frozen: While fresh spinach is recommended for its texture, you can use frozen spinach—just be sure to thaw and drain it well before using. Customize Your Cheeses: Feel free to experiment with different cheese blends, such as adding cheddar or pepper jack for a spicier kick. Make It Ahead: Prepare the casserole a day in advance, cover it, and refrigerate. Just pop it in the oven when you're ready to bake! {{image_4}} You can swap the chicken for other proteins. Try turkey for a lighter dish. You could also use cooked shrimp for a seafood twist. If you want a meatless option, chickpeas or lentils work well too. These alternatives keep the dish hearty and satisfying while adding different flavors. For those needing dairy-free options, you can use vegan cream cheese. This will still give that creamy texture. Use gluten-free breadcrumbs if you need to avoid gluten. You can also substitute sour cream with a non-dairy yogurt. These swaps help everyone enjoy the casserole without worry. If you love heat, add some diced jalapeños or crushed red pepper. Mixing in a teaspoon of hot sauce can elevate the flavors. For a smoky taste, try adding smoked paprika. These additions transform the dish into a spicy delight that awakens your taste buds. You can store leftovers in the fridge. Place the casserole in an airtight container. It will stay fresh for about 3 to 4 days. Make sure to let it cool before sealing the container. This helps keep moisture in check. To freeze the casserole, let it cool completely first. Use a freezer-safe container or wrap it tightly in plastic wrap. It can last for up to 2 months in the freezer. When ready to eat, thaw it overnight in the fridge before reheating. Reheat the casserole in the oven for best results. Preheat it to 350°F (175°C). Cover it with foil to prevent drying out. Heat for about 20-25 minutes, or until hot. You can also use a microwave, but the oven will give you a better texture. Yes, you can use leftover chicken. It cuts down on prep time. Shredded rotisserie chicken works well too. Just make sure it is cooked and cooled before adding it to the mix. To make this dish gluten-free, simply use gluten-free breadcrumbs. Check labels on cream cheese and sour cream. Most brands are gluten-free. Always confirm that your chicken broth or any other added ingredients are also gluten-free. This casserole pairs well with a fresh salad or steamed vegetables. Garlic bread is a great side too. It adds a nice crunch and enhances the meal. You can also serve it with rice or quinoa for a heartier option. Yes, you can prep this casserole a day before. Just store it covered in the fridge. When ready, bake it straight from the fridge. You might need to add a few extra minutes to the baking time. We covered the key ingredients for a tasty chicken and spinach casserole. You learned how to prepare each step, from sautéing the spinach to baking it perfectly. I shared tips to enhance flavor and texture. Remember, you can mix it up with different proteins or dietary swaps. Store your casserole well to keep it fresh. With this recipe, you can enjoy your meal today or save it for later. Enjoy your cooking adventure and create a dish everyone will love!

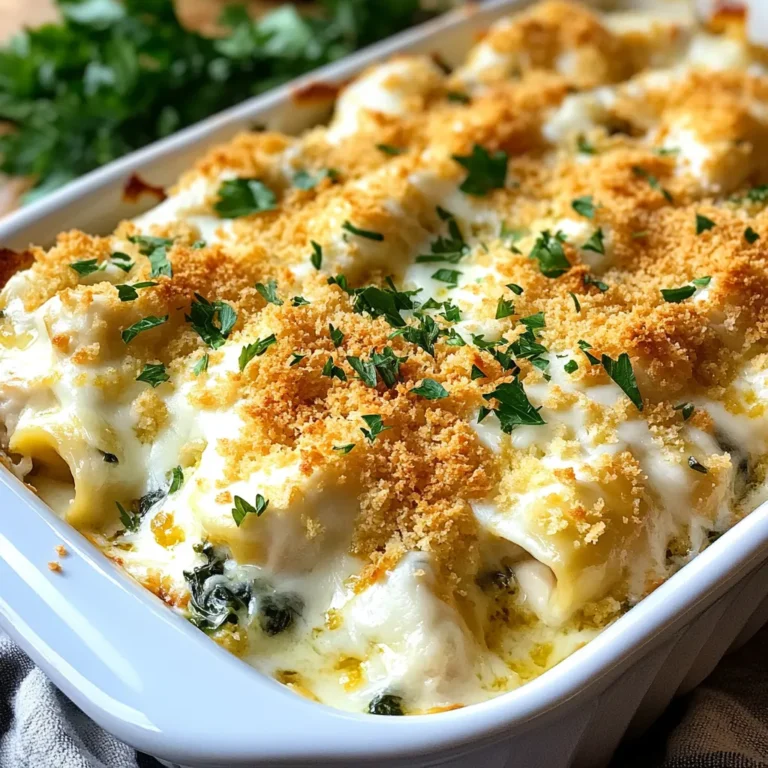
Chicken and Spinach Casserole with Cream Cheese Delight

PREV 1 … 4 5 6 … 20 NEXT
homedishhaven

explore

DessertsDinnerAppetizersDrinks

Our Policies

  • Cookie Policy
  • Copyright Policy
  • Disclaimer
  • GDPR Policy
  • Terms Of Use
Back to Top
  • About
  • Contact Us
  • Privacy Policy
© 2025 homedishhaven