FREE DINNER EBOOK! Get your copy!
  • Cookie Policy
  • GDPR Policy
  • Disclaimer
  • Terms Of Use
  • Visit my other site: Fun Cookie Recipes
homedishhaven
  • Home
  • Dinner
  • Desserts
  • Drinks
  • Appetizers
  • Contact
  • About
  • Privacy Policy
  • Home
  • Dinner
  • Desserts
  • Drinks
  • Appetizers
  • Contact
  • About
  • Privacy Policy
  • Cookie Policy
  • GDPR Policy
  • Disclaimer
  • Terms Of Use
Visit my other site: Fun Cookie Recipes

HOME / CATEGORIES /

Latest

- Chicken breasts and marinade components - 2 boneless, skinless chicken breasts - 1 tablespoon olive oil - 2 cloves garlic, finely minced - 1 teaspoon paprika - 1 teaspoon garlic powder - 1 teaspoon onion powder - Salt and black pepper to taste - Vegetables and grains - 2 cups broccoli florets - 1 cup cooked quinoa - 1 red bell pepper, thinly sliced - Garnishes and serving suggestions - 1 ripe avocado, sliced (for garnish) - Lemon wedges (for serving) This meal is simple to make and packed with flavor. The chicken provides lean protein, while broccoli and quinoa add important nutrients. The red bell pepper adds a nice crunch and color to your bowl. Avocado gives a creamy touch and healthy fats, while lemon brightens the dish. Each ingredient works together to create a balanced meal. You can easily customize this bowl based on your taste. The marinade boosts the chicken's flavor and makes it juicy. Enjoy the process of cooking and getting creative with your ingredients! {{ingredient_image_2}} First, mix the marinade. In a small bowl, combine: - 1 tablespoon olive oil - 2 cloves garlic, finely minced - 1 teaspoon paprika - 1 teaspoon garlic powder - 1 teaspoon onion powder - Salt and black pepper to taste Stir these well until blended. Next, coat the chicken breasts evenly with the marinade. Make sure to cover all sides. Allow the chicken to marinate for at least 30 minutes. This helps the flavors soak into the meat. Preheat your grill to a medium-high setting. This step is key for a good sear on the chicken. Once the grill is hot, place the marinated chicken breasts on the grates. Grill them for about 6-7 minutes on each side. Use a meat thermometer to check for doneness. The safe internal temperature is 165°F (75°C). After grilling, let the chicken rest for several minutes before slicing. This keeps it juicy. While the chicken grills, prepare the broccoli. You can choose to steam or grill it. If steaming, bring a pot of water to a simmer. Steam the broccoli florets for about 4-5 minutes. They should be bright green and tender yet crisp. If you prefer grilling, toss the florets on the grill for the last 3-4 minutes. Grilling adds a nice smoky flavor. Now it's time to assemble your bowls. Start with a base of cooked quinoa in a large bowl or deep dish. Then, layer the sliced grilled chicken on top. Add the steamed broccoli and some vibrant red bell pepper slices. For a finishing touch, garnish each bowl with fresh avocado slices. Serve with lemon wedges on the side. Squeeze some lemon over the bowl for a bright, fresh taste. For an extra inviting look, consider serving the bowls on a wooden board. You can add microgreens or fresh herbs as a garnish. A drizzle of extra virgin olive oil can elevate the dish further. To keep your chicken juicy, let it rest after grilling. This step helps the juices stay in the meat. Slice the chicken against the grain. This makes each bite tender and easy to chew. For seasoning, use a mix of olive oil, garlic, and spices. Marinade the chicken for at least 30 minutes. This allows the flavors to soak in. Use salt and pepper to enhance the taste. Try different marinades to boost flavor. You can use lemon juice, soy sauce, or yogurt. These add zest and moisture. Spices like cumin or coriander can bring warmth to the dish. For extra taste, add toppings like nuts or seeds. Fresh herbs like cilantro or parsley can brighten up your bowl. A drizzle of balsamic reduction can also add a sweet touch. Make the chicken and broccoli ahead of time. Store them in airtight containers in the fridge. This helps save time on busy days. You can also keep cooked quinoa in the fridge for quick meals. For weeknight dinners, reheat the chicken and veggies. Serve with fresh greens or a simple salad. This gives you a balanced meal in minutes. Pro Tips Marinate Longer for Flavor: For enhanced flavor and tenderness, try marinating the chicken for at least 1-2 hours or even overnight. Use a Meat Thermometer: To ensure perfect doneness, use a meat thermometer to check that the internal temperature of the chicken reaches 165°F (75°C). Customize Your Veggies: Feel free to add or substitute other vegetables like zucchini or asparagus based on your preference or seasonal availability. Quinoa Cooking Tip: For extra flavor, cook your quinoa in vegetable or chicken broth instead of water to give it a richer taste. {{image_4}} You can switch out chicken for other meats. Try turkey or pork for a tasty change. If you prefer plant-based options, use tofu or tempeh. Both soak up flavors well and make the dish hearty. For turkey, use a similar marinade as chicken. For tofu, press it first to remove excess water. Then, marinate and grill it until it gets nice grill marks. Each protein brings its own flavor and texture. Quinoa is great, but feel free to try other grains. Brown rice or farro works well and adds a different taste. If you want more protein, add legumes like chickpeas or black beans. They pair wonderfully with the veggies and chicken. Switching bases can change the total meal. Each option offers unique nutrients and flavors. A sauce can really change the vibe of your dish. Try teriyaki or a spicy sriracha sauce for a flavor boost. You can also use a creamy dressing like ranch or tahini. Adding spices creates a new taste profile. Try cumin for warmth or chili powder for heat. Just a little sprinkle can make a big difference. Enjoy experimenting with flavors until you find your perfect mix! Store your grilled chicken broccoli bowls in airtight containers. This keeps the food fresh and safe. You can use glass or plastic containers. Make sure they are clean and dry before use. Place the bowls in the fridge right after they cool down. For best taste, eat them within 3-4 days. Always check for any signs of spoilage before eating. To reheat, use the microwave or a skillet. If using a microwave, heat in short bursts. This helps keep the chicken juicy. For the skillet, add a splash of water. Cover it to trap the steam. This keeps the chicken moist. Avoid high heat to prevent overcooking. Enjoy your bowls warm, just like when they were freshly made! Yes, you can use frozen chicken. Start by thawing it safely. Place the frozen chicken in the fridge overnight. If you need it faster, run it under cold water. Once thawed, follow the marinating steps in the recipe. Cook it on the grill until it reaches 165°F. This ensures it is safe to eat. If you want alternatives, try brown rice or couscous. These grains have a similar texture and flavor. For a low-carb option, you can use cauliflower rice. It adds a nice crunch and pairs well with the chicken and veggies. Check the chicken with a meat thermometer. It should read 165°F. If you don’t have a thermometer, cut into the thickest part. The meat should be white and juices should run clear. This means it is safe to eat. Absolutely! You can marinate the chicken a day ahead. Store it in the fridge until you are ready to grill. You can also cook the quinoa and steam the broccoli ahead of time. Store them in airtight containers. This makes it easy to assemble your bowls when you need a quick meal. This blog post covered how to create a tasty and healthy chicken bowl. We discussed ingredient choices, marinating the chicken, and cooking it right on the grill. You learned about preparing broccoli and assembling your meal for the best look. I shared tips for juicy chicken and storage ideas, plus some fun variations. In final thoughts, this dish is flexible and easy. You can adjust it to fit your taste. Enjoy making your delicious bowls!

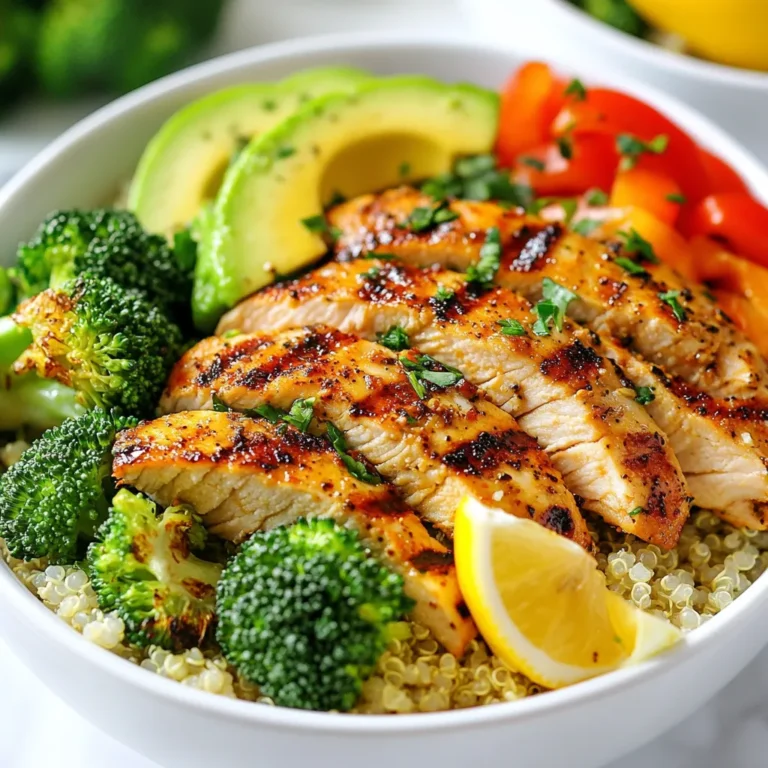
Grilled Chicken Broccoli Bowls Healthy Meal Prep Idea

- 4 fresh salmon fillets - 2 tablespoons extra virgin olive oil - 2 lemons (one sliced into rounds, and the other juiced) Fresh salmon fillets are the star of this dish. They give you a rich taste and firm texture. Extra virgin olive oil adds a nice depth of flavor. It also helps the seasoning stick. Lemons brighten the dish and make it zingy. You need one lemon for juice and slices from the other. - 3 cloves garlic, finely minced - 1 teaspoon dried oregano - 1 teaspoon dried thyme - Sea salt and freshly cracked black pepper, to taste Garlic brings a warm, savory aroma. It pairs perfectly with salmon. Dried oregano and thyme add a herby taste that lifts the dish. Sea salt and black pepper enhance all the flavors. They help balance the zesty lemon and rich salmon. - 1 cup cherry tomatoes, halved - 1 cup asparagus spears, trimmed - Fresh parsley, finely chopped, for garnish Cherry tomatoes add sweetness and color. Their juices mix with the salmon for a tasty sauce. Asparagus gives a nice crunch and green freshness. Fresh parsley is the final touch. It adds a pop of color and a fresh taste when you sprinkle it on top. {{ingredient_image_2}} Start by preheating your oven to 400°F (200°C). This high heat helps cook the salmon quickly and evenly. To make cleanup easy, line a baking sheet with parchment paper. This way, your salmon and veggies won’t stick. In a small bowl, mix together two tablespoons of extra virgin olive oil, the juice of one lemon, and three minced garlic cloves. Add one teaspoon each of dried oregano and thyme. Don’t forget to sprinkle in sea salt and black pepper! Whisk everything until it blends well. This mixture gives the salmon a fresh and zesty flavor. Place four salmon fillets skin-side down on the baking sheet. Using a brush or spoon, coat the tops of each fillet with your lemon herb mix. Make sure every bit of salmon gets the tasty sauce. Next, take the sliced lemon rounds and arrange them on top of the fillets. The lemon slices will add a lovely aroma as they bake. In another section of the baking sheet, add one cup of halved cherry tomatoes and one cup of trimmed asparagus spears. Drizzle them with a little olive oil and season them with salt and pepper. This adds color and nutrients to your meal. Now, slide the baking sheet into your preheated oven. Bake for about 12 to 15 minutes. You’ll know your salmon is done when it flakes easily with a fork, and the veggies are tender. Keep an eye on it to avoid overcooking. If you check it, you’ll be sure to serve a perfect dish! Cooking salmon right is key to great texture. You want to cook it at 400°F for 12-15 minutes. This high heat helps keep the fish moist and flaky. Check it with a fork; if it flakes easily, it’s ready. Don’t overcook it, or it can dry out fast. Fresh herbs really boost flavor. They add bright notes to your dish. Use fresh parsley, thyme, or oregano for the best taste. Dried herbs work too, but fresh is better. You can also try marinades. A simple mix of olive oil, lemon, and garlic adds great depth. Experiment with spices like paprika or cumin for a fun twist. How you serve your dish matters. For a rustic look, keep the salmon and veggies on the baking sheet. This makes it easy and casual. For a plated option, arrange the food nicely. Add extra lemon slices on the side for color. A sprinkle of fresh parsley on top makes it pop. Enjoy your meal and impress your guests! Pro Tips Fresh Ingredients Matter: Always opt for fresh salmon and seasonal vegetables to enhance the flavor of your dish. Don’t Overcook: Keep an eye on your salmon; it should be cooked just until it flakes easily with a fork for the best texture. Lemon Zest Boost: For an extra zing, add some fresh lemon zest to the herb mixture before brushing it on the salmon. Meal Prep Friendly: This dish is perfect for meal prep—simply store leftovers in an airtight container for up to three days. {{image_4}} If you want a change from salmon, you can try other fish or seafood. Cod is a great option. It has a mild flavor and cooks well on a sheet pan. Tilapia also works nicely, as it is flaky and absorbs flavors well. For seafood lovers, shrimp can add a fun twist. Just remember to adjust the cooking time since shrimp cooks faster than fish fillets. You can mix up the veggies based on what is fresh or in season. Instead of asparagus, try broccoli or green beans. Both add great crunch and flavor. You can also use zucchini or bell peppers for a colorful touch. Just cut them into similar sizes for even cooking. Carrots are another good option; they add sweetness and pair well with lemon. Change the flavor by using different herbs or spices. Instead of oregano, try basil or dill for a fresh taste. You can add a pinch of red pepper flakes if you like heat. For a sweeter note, mix in some honey or maple syrup with the lemon juice. This adds a nice glaze to the salmon and veggies. Don't be afraid to experiment and find your favorite flavor combinations! To keep your salmon fresh, store leftovers in an airtight container. Place the salmon and veggies together, if possible. Refrigerate them within two hours of cooking. This helps prevent bacteria growth. Enjoy the leftovers within three days for the best taste and safety. When reheating salmon, keep it moist. Preheat your oven to 350°F (175°C). Place the salmon on a baking dish and cover it with foil. This helps trap moisture, so it doesn’t dry out. Heat for about 10 minutes or until warmed through. You can also use a microwave. Just cover the salmon with a damp paper towel to keep it moist. Freezing the dish is easy. Wrap the salmon and veggies tightly in plastic wrap or aluminum foil. Then place them in a freezer-safe bag. Make sure to remove as much air as possible. Label the bag with the date. You can freeze the dish for up to three months. When ready to eat, thaw in the fridge overnight. Then reheat using the tips above for the best results. You can tell salmon is done when it flakes easily with a fork. The flesh should change from a bright pink to a more opaque color. A good rule is to cook it for about 12 to 15 minutes at 400°F. If you have a meat thermometer, the internal temperature should reach 145°F. Let it rest for a minute before you serve it. This gives the juices time to settle. Yes, you can use frozen salmon fillets. However, it is best to thaw them first. Place the fillets in the fridge overnight for safe thawing. If you need to cook them right away, you can also run them under cold water for about 30 minutes. Once thawed, pat them dry before you coat them with the lemon herb mixture. This helps the flavors stick better. Sheet pan salmon goes well with many sides. Here are a few ideas: - Roasted vegetables: You can add bell peppers, zucchini, or Brussels sprouts. - Salads: A simple green salad with lemon vinaigrette works well. - Grains: Serve with quinoa, rice, or couscous for a filling meal. - Potatoes: Mashed or roasted potatoes are tasty too. Mix and match to find your favorite combinations! This blog post covered how to create a delicious sheet pan salmon meal. We discussed key ingredients like fresh salmon, olive oil, and vibrant veggies. You learned the step-by-step process, along with useful tips for flavor and presentation. I shared variations for alternative proteins and vegetables to keep it fresh. Finally, we highlighted best practices for storage and reheating. Embrace these ideas to make cooking easier and enjoyable. You’ll impress anyone at your table with this tasty dish. Happy cooking!

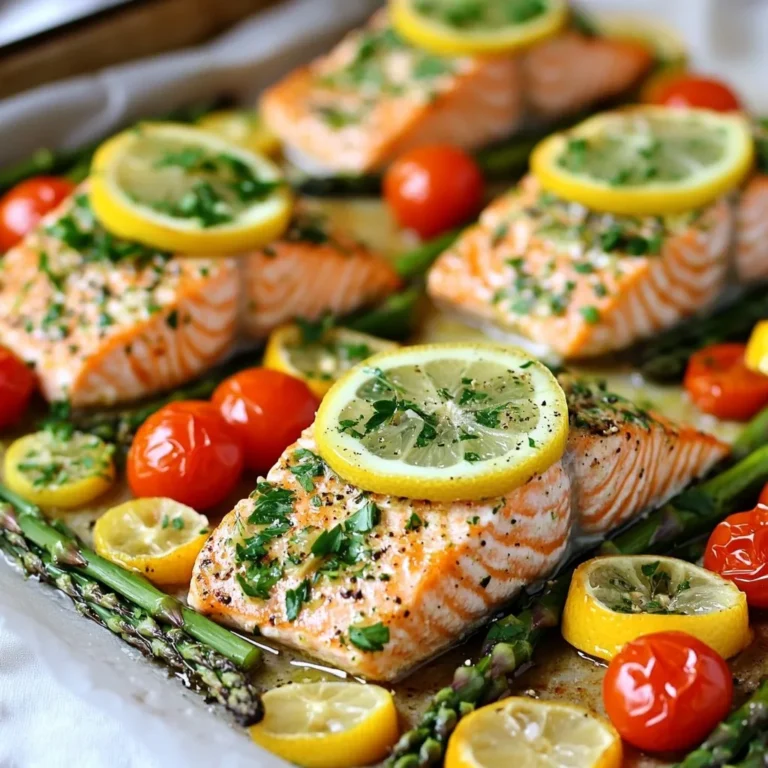
Sheet Pan Lemon Herb Salmon Flavorful and Easy Meal

- 1 pound Brussels sprouts - 2 tablespoons extra virgin olive oil - 1 teaspoon garlic powder - 1 teaspoon smoked paprika - 1/2 teaspoon fine sea salt - 1/4 teaspoon freshly ground black pepper - 1 tablespoon balsamic glaze - Grated Parmesan cheese (optional) To make crispy air fryer Brussels sprouts, you need some simple ingredients. First, gather 1 pound of Brussels sprouts. Look for ones that are firm and bright green. Next, you'll need 2 tablespoons of extra virgin olive oil. This oil adds flavor and helps the sprouts crisp up. Then, grab 1 teaspoon of garlic powder. This spice gives a nice savory kick. You'll also want 1 teaspoon of smoked paprika. This will add a touch of smokiness that enhances the flavor. Don’t forget the seasoning! You will need 1/2 teaspoon of fine sea salt and 1/4 teaspoon of freshly ground black pepper. These will give the Brussels sprouts a balanced taste. Lastly, for a sweet and tangy finish, have 1 tablespoon of balsamic glaze ready. If you love cheese, consider adding grated Parmesan cheese on top. It makes the dish even richer and more delicious. With these ingredients, you can create a side dish that is both tasty and healthy. Enjoy making crispy air fryer Brussels sprouts that everyone will love! {{ingredient_image_2}} Start by setting your air fryer to 375°F (190°C). This step is key for crispy Brussels sprouts. Let it heat for about 5 minutes. A good preheat helps the sprouts cook evenly. Grab a large bowl and add 1 pound of halved Brussels sprouts. Pour in 2 tablespoons of extra virgin olive oil. Then, add 1 teaspoon of garlic powder, 1 teaspoon of smoked paprika, 1/2 teaspoon of fine sea salt, and 1/4 teaspoon of freshly ground black pepper. Mix well with your hands or a spatula. Make sure every sprout is coated in the seasoning. This blend of flavors makes them tasty. Carefully place the seasoned Brussels sprouts in the air fryer basket. Spread them out in a single layer. This helps them crisp up nicely. Set the timer for 12 to 15 minutes. Halfway through, shake the basket gently. This step promotes even cooking. When they finish, the Brussels sprouts will look golden brown and have a crispy texture. Use tongs to take them out. Drizzle 1 tablespoon of balsamic glaze over the top for a sweet touch. If you like, add grated Parmesan cheese for extra flavor. Serve these delights hot for the best taste! To make your Brussels sprouts super crispy, here are some tips. First, dry the sprouts well after washing. Any water can make them soggy. Second, cut them in half for more surface area. This helps them cook evenly and get that nice crunch. Use enough olive oil but not too much; two tablespoons is just right. When you place them in the air fryer, make sure they are in a single layer. Overcrowding can lead to steaming instead of crisping. Shake the basket halfway through cooking to help them brown better. Crispy Brussels sprouts are great on their own but can shine with a few extras. Drizzle balsamic glaze over them right before serving. This adds a sweet and tangy kick. If you love cheese, sprinkle some grated Parmesan on top. It melts slightly and enhances the flavor. You could also toss in some cooked bacon bits for a savory twist. Serve them alongside roasted meats or as part of a veggie platter. Presentation is key to making your dish shine. Arrange the crispy Brussels sprouts on a nice serving platter. Drizzle more balsamic glaze over them for a glossy finish. You can also add a light dusting of Parmesan cheese to make them look fancy. For a pop of color, add some fresh herbs like parsley or chives. Serve them hot, right out of the air fryer, for the best taste and texture. Pro Tips Choose Fresh Sprouts: Select bright green Brussels sprouts that are firm to the touch. Freshness ensures better flavor and texture. Don’t Overcrowd the Basket: For optimal crispiness, make sure the Brussels sprouts are in a single layer. Cooking in batches if necessary will yield the best results. Experiment with Seasonings: Feel free to customize the seasoning mix! Add chili flakes for heat or lemon zest for a citrusy kick to elevate the flavor profile. Serve Immediately: For the best texture and flavor, serve the Brussels sprouts right after cooking while they are still hot and crispy. {{image_4}} To make crispy Brussels sprouts even better, try adding different flavors. You can mix in lemon zest for a fresh taste. A sprinkle of red pepper flakes gives a nice kick. If you love herbs, fresh thyme or rosemary works great too. You can even add a splash of soy sauce for an umami boost. These small changes can bring new life to your dish. If you don’t have an air fryer, you can roast Brussels sprouts in the oven. Preheat the oven to 425°F (220°C). Place the seasoned sprouts on a baking sheet. Roast them for about 20-25 minutes, shaking the pan halfway to ensure even cooking. They may not be as crispy, but they will still taste delicious. You can also steam them for a softer texture before roasting if you want a different bite. Feel free to swap ingredients based on what you have. If you’re out of garlic powder, fresh garlic works well too. Just chop it finely and add it to the oil. For the balsamic glaze, you can use honey or maple syrup for a sweet touch. Instead of Parmesan, try feta or goat cheese for a tangy flavor. Each swap can change the taste and make the dish your own. To keep your crispy air fryer Brussels sprouts fresh, let them cool first. Place them in an airtight container. They will stay good in the fridge for about 3 days. For best taste, eat them within this time. When you're ready to enjoy the leftovers, reheat them in the air fryer. Set it to 375°F (190°C) for about 5 minutes. This will bring back their crispiness. You can also use a microwave, but the texture won't be as nice. If you want to freeze your Brussels sprouts, it’s best to do this before cooking. Trim and halve them, then blanch them in boiling water for 3 minutes. Cool them in ice water, then drain. Place them in a freezer bag, and they will last about 3 months. When you're ready to cook, just air fry them straight from the freezer. Yes, you can use frozen Brussels sprouts. However, fresh sprouts will give you a better texture. If you use frozen, thaw them first and pat them dry. This helps them crisp up better in the air fryer. To reduce bitterness, you can try a few tricks. First, trim the ends and remove any yellow leaves. Second, roast them longer to develop sweetness. Adding garlic powder and smoked paprika also helps balance the flavor. Lastly, a drizzle of balsamic glaze adds a sweet touch. Crispy Brussels sprouts pair well with many dishes. You can serve them with grilled chicken, fish, or steak. They also go great with a quinoa salad or pasta. For a vegetarian option, try them with a creamy risotto. Don't forget a sprinkle of Parmesan for extra flavor! In this post, we explored how to make crispy Brussels sprouts using the air fryer. We covered the key ingredients needed, provided step-by-step cooking instructions, and shared tips for perfecting your dish. You learned about variations and storage methods to keep your sprouts fresh. In closing, this recipe is easy and full of flavor. Enjoy experimenting with different spices and serving ideas. Crispy Brussels sprouts can be a hit at any meal!

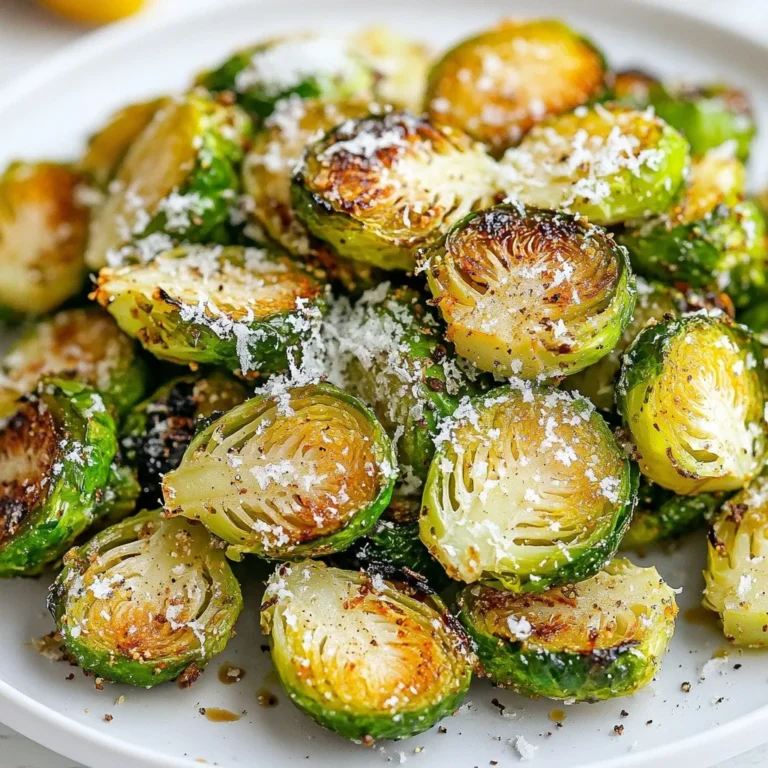
Crispy Air Fryer Brussels Sprouts Flavorful Side Dish

- 4 boneless, skinless chicken breasts - 1 cup all-purpose flour - 1 cup grated Romano cheese - 2 large eggs - 2 tablespoons milk - 1 teaspoon garlic powder - 1 teaspoon dried oregano - 1 teaspoon salt - ½ teaspoon black pepper - ½ cup olive oil (for frying) - 2 lemons (one for zesting and juicing, one sliced for garnish) For Lemon Chicken Romano, quality ingredients make a big difference. I like to use fresh chicken breasts. They cook evenly and stay juicy. The all-purpose flour helps create a nice crust. Grated Romano cheese adds a salty, tangy flavor. Garlic powder and oregano bring warmth to the dish. - Fresh parsley, chopped - Lemon slices Garnishing is key to presentation. Fresh parsley adds a pop of color and fresh taste. Lemon slices not only look great but also give a citrusy kick. If you can't find Romano cheese, Parmesan works well too. For a gluten-free option, use almond flour instead of all-purpose flour. You can skip the milk in the egg mixture if you're out. Just whisk the eggs alone; it still coats the chicken well. {{ingredient_image_2}} Start by taking the chicken breasts. Use a meat mallet to pound them gently. Aim for an even thickness of about ½ inch. This helps them cook well. After that, use paper towels to pat them dry. Removing excess moisture is key for a great sear. Next, set up your coating station. In a shallow dish, mix the all-purpose flour, garlic powder, dried oregano, salt, and black pepper. In another bowl, whisk the eggs and milk until smooth. Dip each chicken breast into the flour mixture first. Make sure it is covered well. Then, dip it into the egg mix and let the excess drip off. For the final touch, coat it again in the flour mixture. Press grated Romano cheese onto the chicken to make the flavor pop. Heat the olive oil in a large skillet over medium-high heat. When the oil shimmers, lay the coated chicken breasts in the skillet. Cook them for about 5-7 minutes on each side. Look for a golden brown color and check that they reach an internal temperature of 165°F (75°C). While the chicken cooks, zest one lemon and then juice it. Set both aside. Once the chicken is done, place it on a paper towel-lined plate. This helps absorb extra oil. Lower the heat and pour in the lemon juice. Add the zest and scrape the bottom of the skillet. Let this simmer for 1-2 minutes until it thickens slightly. Finally, serve the chicken topped with the lemon sauce, lemon slices, and chopped parsley. Enjoy your flavorful meal! To get great chicken, start with even thickness. Pound each chicken breast to about ½ inch. This helps them cook evenly. Dry the chicken with paper towels to remove excess moisture. Use medium-high heat for frying. Cook the chicken for 5-7 minutes on each side. Use a meat thermometer to check for 165°F (75°C). This ensures the chicken is safe and juicy. Adding the right flavors makes this dish pop. Use fresh lemon juice for the sauce. The zest adds a bright taste. Don't skip pressing the Romano cheese onto the chicken. This gives a cheesy crust that pairs well with the lemon. Fresh parsley as a garnish not only looks nice but adds a fresh taste too. Avoid cooking chicken straight from the fridge. It should be at room temperature. This helps it cook more evenly. Don’t rush the frying process. If the oil isn’t hot enough, the chicken will absorb too much oil. Finally, don’t skip the lemon sauce. It pulls all the flavors together and makes the dish special. Pro Tips Even Thickness: Pounding the chicken breasts to an even thickness ensures they cook uniformly, preventing dry or undercooked spots. Double Coating: For an extra crispy and cheesy crust, double-coat the chicken by dipping it in the egg mixture twice before the final flour and cheese coating. Heat Control: Keep an eye on the oil temperature; if it’s too hot, the chicken will brown too quickly without cooking through. Medium-high heat is ideal. Lemon Zest: Adding lemon zest to the sauce not only enhances the flavor but also gives a vibrant aroma that elevates the dish. {{image_4}} You can easily switch up the flavors in Lemon Chicken Romano. Add fresh herbs to the flour mix for a twist. Try adding chopped thyme, rosemary, or basil. These herbs work well with lemon and cheese, creating a great taste. You can also mix in some Italian seasoning for a more robust flavor. If you need a gluten-free option, swap the all-purpose flour for a gluten-free blend. Many brands offer great alternatives that work well in this recipe. You can also use almond flour or coconut flour as options. Just make sure to adjust the cooking time if needed. When serving Lemon Chicken Romano, pair it with a fresh salad or steamed veggies. A side of roasted potatoes or rice goes well too. These sides will soak up the lemon sauce and add to the meal's fun. For a tasty touch, offer lemon wedges on the side for extra zing. To store leftover Lemon Chicken Romano, place it in an airtight container. Make sure the chicken is cool before sealing it. This keeps moisture in and prevents drying. Store it in the fridge for up to three days. You can also separate the chicken from the sauce to maintain texture. When reheating, use a skillet for best results. Heat it on medium-low. Add a splash of water or chicken broth to keep the chicken moist. Cook for about five minutes, flipping halfway. You can also microwave it. Place the chicken on a microwave-safe plate, cover with a damp paper towel, and heat for about 1-2 minutes. To freeze, wrap Lemon Chicken Romano tightly in plastic wrap, then place it in a freezer bag. Remove as much air as possible. This prevents freezer burn. It can last up to three months in the freezer. When ready to eat, thaw it in the fridge overnight before reheating. You can serve Lemon Chicken Romano with many sides. Here are some great options: - Steamed broccoli - Garlic mashed potatoes - Simple green salad - Lemon rice - Roasted carrots These dishes add color and balance to your meal. The sides also complement the lemony taste of the chicken. Yes, you can swap Romano cheese for other cheeses. Some good choices are: - Parmesan cheese - Pecorino cheese - Grated mozzarella These cheeses melt well and add flavor. Each cheese gives a unique twist to the dish. To check if the chicken is done, use a meat thermometer. Insert it into the thickest part. The chicken should reach 165°F (75°C). You can also cut into the chicken. If the juices run clear, it's cooked through. To zest a lemon, use a microplane or a fine grater. Follow these steps: 1. Wash the lemon well. 2. Hold the lemon in one hand. 3. Gently scrape the grater over the lemon skin. Only take off the yellow part. Avoid the white pith, as it tastes bitter. Use the zest to add bright flavor to your dishes! This blog post covered everything you need for Lemon Chicken Romano. We explored main ingredients, how to prepare and cook the dish, and tips for the best results. You learned about tasty variations, storage tips, and common questions. By following this guide, you can make a delicious meal. Don’t be afraid to try new ingredients or flavors. Enjoy cooking and sharing this lovely dish with others.

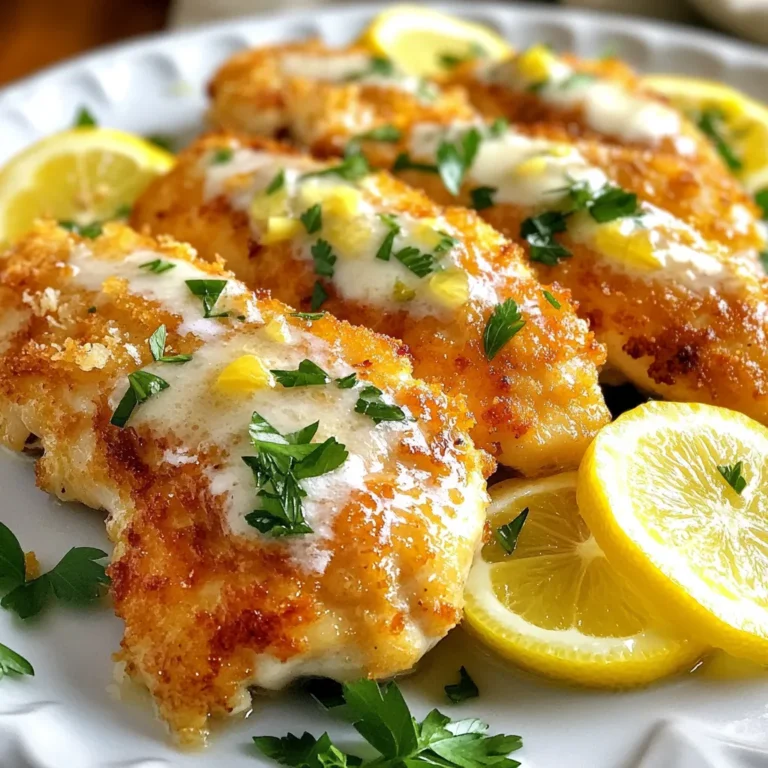
Lemon Chicken Romano Tasty and Simple Dinner Dish

For these tasty sliders, you will need: - 12 slider buns - 1 pound sliced ham - 8 ounces Havarti cheese, sliced - 1/4 cup unsalted butter, melted - 1 tablespoon Dijon mustard - 1/2 teaspoon garlic powder - 1 teaspoon poppy seeds - Salt and pepper to taste - Fresh arugula or spinach for garnish These ingredients create a savory blend. Each item plays a key role in flavor and texture. You can switch out some ingredients if needed: - Slider buns: Use whole wheat buns or gluten-free options for a healthier choice. - Sliced ham: Turkey or chicken can work well if you want a lighter flavor. - Havarti cheese: Try gouda or mozzarella for a different cheese taste. - Unsalted butter: Olive oil or a dairy-free spread can replace the butter. - Dijon mustard: Yellow mustard or honey mustard adds a nice touch too. These swaps let you adjust the sliders to fit your taste or dietary needs. Serve these sliders with fun sides to make a meal: - Pair them with a fresh salad for a light option. - Serve with sweet potato fries for a twist on tradition. - Add dipping sauces like honey mustard or barbecue for extra flavor. These ideas make your slider meal even more enjoyable. Explore different combinations to find what you love! {{ingredient_image_2}} First, set your oven to 350°F (175°C). This heat helps cook the sliders evenly. While the oven warms, grab a baking dish. Coat it lightly with cooking spray or butter. This step keeps the sliders from sticking. In a small bowl, melt 1/4 cup of unsalted butter. Add 1 tablespoon of Dijon mustard to the melted butter. Then, mix in 1/2 teaspoon of garlic powder. Finally, add a pinch of salt and pepper. Whisk all the ingredients until they blend well. This mixture gives the sliders a tasty top. Take your slider buns and slice them in half. Keep the top and bottom halves attached. Place the bottom halves in the greased baking dish. Start layering by adding half of the sliced ham. Make sure to cover every bun. Next, add a generous layer of Havarti cheese on the ham. Then, add the rest of the ham on top. Gently place the top halves of the buns over the stacked ham and cheese. Drizzle the mustard butter mixture on top of the buns. Sprinkle poppy seeds over the sliders for extra flavor. Cover the dish with aluminum foil. Bake for 15 minutes. This keeps the cheese melty and warms the ham. After 15 minutes, remove the foil. Bake for an extra 5-10 minutes. Look for bubbling cheese and golden-brown tops. When done, take the dish out and let it cool for a few minutes. Use a spatula to lift the sliders carefully. Garnish with fresh arugula or spinach. Slice the sliders for serving, and enjoy! To get that perfect melt with Havarti cheese, you need to use low heat. Bake your sliders at 350°F (175°C) for the right time. Cover them with foil for the first part of baking. This keeps the heat in and helps the cheese melt nicely. After 15 minutes, take off the foil to let the top brown. The cheese should be gooey and stretchy. If you want more flavor, mix in some shredded cheese with the Havarti. Want to add a kick to your sliders? You can tweak the spices to fit your taste. Add a pinch of cayenne pepper for heat. If you love herbs, sprinkle in some dried oregano or thyme. For a sweet touch, mix in a bit of honey with your mustard. Always taste the mustard butter mixture before you add it to the sliders. Adjust the salt and pepper to your liking as well. Moist sliders are key to a tasty bite. Make sure to cover the baking dish with foil while baking. This traps steam, keeping the sliders soft. Use unsalted butter for the mixture, as it adds richness without overpowering. Serve sliders right after baking for the best texture. If you have leftovers, store them in an airtight container to keep them from drying out. A little extra melted butter on top before serving can also help add moisture back in. Pro Tips Use Fresh Ingredients: Always opt for high-quality, fresh ham and cheese for the best flavor and texture in your sliders. Customize Your Cheese: While Havarti is delicious, feel free to experiment with other cheeses like Swiss or Gruyère for different flavor profiles. Make Ahead: You can prepare the sliders in advance and store them in the refrigerator. Just pop them in the oven when you're ready to serve! Experiment with Toppings: Don't hesitate to add other toppings like caramelized onions or sliced jalapeños for an extra kick of flavor. {{image_4}} You can switch up the cheese in your sliders for fun. Cheddar offers a sharp taste. Swiss cheese adds a nutty flavor. Provolone melts well and has a mild taste. Pepper jack gives a spicy kick. Each cheese brings its own unique flavor, making your sliders special. Want to mix it up? Add layers of veggies like roasted peppers or sautéed onions. Fresh spinach or arugula gives a nice crunch. You could also use turkey or chicken instead of ham. This way, you can customize your sliders to fit your cravings. To make gluten-free sliders, use gluten-free buns or lettuce wraps. Look for brands that offer gluten-free options. For a low-carb version, skip the buns and use slices of cucumber or bell pepper. This keeps the taste while making it healthier. To keep your leftover sliders fresh, place them in an airtight container. If you don’t have one, wrap them tightly in plastic wrap. This helps prevent the buns from getting dry. Store them in the fridge for up to three days. If you want to keep them longer, consider freezing. When you’re ready to enjoy your sliders again, preheat your oven to 350°F (175°C). Place the sliders on a baking sheet. Cover them with foil to keep them moist. Heat for about 10 to 15 minutes. This method keeps the cheese melty and the buns soft. You can also use a microwave for quick reheating. Just heat them for about 30 seconds, but know the buns might get a bit chewy. If you want to freeze your sliders, assemble them without baking. Wrap each slider in plastic wrap, then place them in a freezer bag. They will last for up to three months. When you’re ready to bake, remove the sliders from the freezer, let them thaw in the fridge overnight, and then bake as directed. This way, you can enjoy fresh, warm sliders anytime! Yes, you can! These sliders are great with other meats. Try turkey or chicken for a leaner option. Roast beef adds a nice flavor, too. You can use any deli meat you like. Just make sure the meat pairs well with Havarti cheese. This cheese melts nicely and balances flavors. You can prepare the sliders a few hours in advance. Assemble them as the recipe says, but do not bake them yet. Cover the dish with plastic wrap and keep it in the fridge. When you're ready, bake the sliders straight from the fridge. Just add a few extra minutes to the bake time for best results. Dipping sauces can really enhance your sliders. Honey mustard brings a sweet and tangy kick. Barbecue sauce adds a smoky flavor that goes well with ham. You can also try ranch dressing for a creamy dip. For a zesty option, sriracha mayo mixes heat with creaminess. Pick your favorite and enjoy! In this blog post, we covered how to make delicious Ham and Havarti Sliders. You learned about the key ingredients, easy steps for baking, and tips for perfecting the sliders. We also explored variations and how to store leftovers. Remember, these sliders can be customized to fit your taste. Think about different cheeses or meats to try. Making these sliders is fun and allows for creativity. Enjoy every bite and share with others!

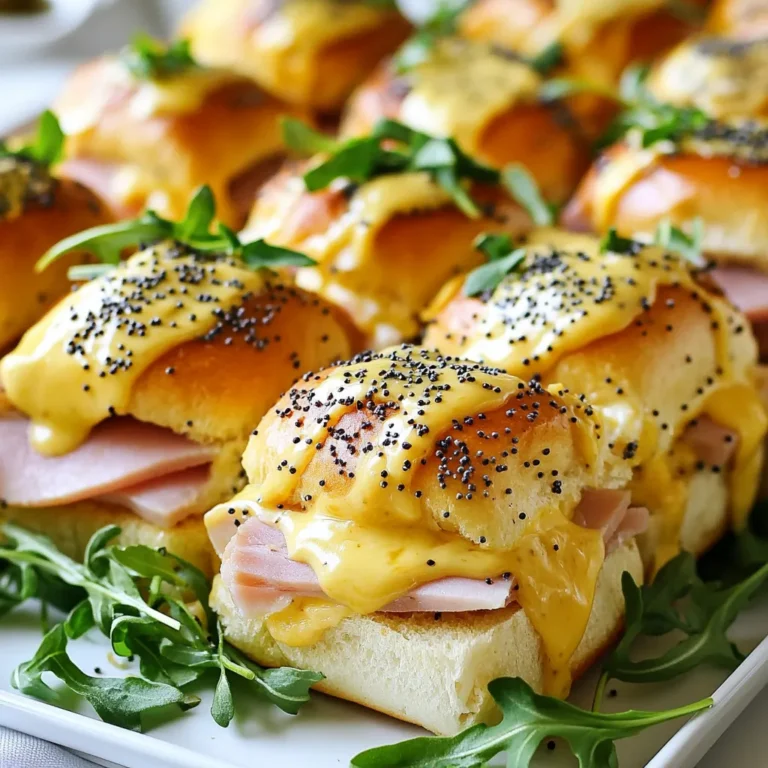
Ham and Havarti Sliders Savory and Easy Recipe

- 1 lb sirloin steak, cut into bite-sized cubes - 1 tablespoon olive oil - 1 large onion, finely diced - 3 cloves garlic, minced - 1 red bell pepper, chopped - 1 green bell pepper, chopped - 2 jalapeño peppers, finely minced The main ingredients create a rich base for the chili. I love using sirloin steak for its great flavor and tenderness. Olive oil helps to brown the steak nicely. The onion and garlic add depth and aroma. Bell peppers bring sweetness and color. Jalapeños give that spicy kick, which you can adjust based on your taste. - 1 can (14 oz) diced tomatoes with their juices - 1 can (15 oz) kidney beans, drained and rinsed - 1 can (15 oz) black beans, drained and rinsed Canned ingredients make this chili easy and quick. Diced tomatoes add moisture and flavor. Kidney beans and black beans provide protein and fiber. They also help to thicken the chili and create a hearty texture. - 2 tablespoons chili powder - 1 teaspoon ground cumin - 1 teaspoon smoked paprika - ½ teaspoon cayenne pepper (optional, adjust to taste) - Salt and pepper to taste Spices are key to making chili special. Chili powder gives a classic taste. Ground cumin adds warmth and earthiness. Smoked paprika brings a hint of smokiness. Cayenne pepper is perfect for those who love heat. Don’t forget to season with salt and pepper to enhance all the flavors. {{ingredient_image_2}} To start, heat olive oil in a large pot over medium-high heat. I like to use a Dutch oven for even cooking. Once the oil shimmers, add your cubed sirloin steak. Sauté the steak for about 5-7 minutes. Stir it often to get it brown on all sides. This browning step adds deep flavor to your chili. Once browned, take the steak out and set it aside on a plate. Next, keep the pot hot and add the diced onion. Cooking the onion for about 3-4 minutes helps it soften and turn translucent. Then, add minced garlic and cook for another 30 seconds. This step is vital as it builds a rich flavor base for your chili. Now, it’s time to add the fun ingredients! Toss in the chopped red and green bell peppers and minced jalapeños. Sauté these for about 5 minutes until tender. Return the browned steak to the pot. Now, pour in the diced tomatoes with their juices, kidney beans, and black beans. Sprinkle in chili powder, ground cumin, smoked paprika, and cayenne pepper. Mix everything well. Next, pour in the beef broth and bring it to a boil. Lower the heat and cover the pot, letting it simmer for 30-40 minutes. Stir it occasionally to blend the flavors. After simmering, taste the chili and adjust with salt or cayenne if you want more heat. Finally, serve the hot chili in bowls. Garnish with fresh cilantro and, if you like, add a dollop of sour cream or shredded cheese. Enjoy this hearty comfort food! To get the best flavor, start with fresh ingredients. Use quality sirloin steak for the best taste. Sauté the steak until it is browned. This step adds depth to your chili. Next, cook the onion and garlic together. This mix builds a rich base flavor. When adding peppers, chop them evenly. This helps them cook at the same rate. Stir the chili often while it simmers. This prevents sticking and helps blend the flavors. Garnish your chili with fresh cilantro. The bright flavor adds a nice touch. You can also sprinkle shredded cheese on top. This adds creaminess and texture. Serve the chili with crusty bread or cornbread. These sides soak up the delicious sauce. For a refreshing twist, add lime wedges. A squeeze of lime brightens the dish. To change the heat, use more or fewer jalapeños. If you want a milder chili, remove the seeds. For more heat, add more cayenne pepper. You can also try different peppers. Poblano or serrano peppers can add flavor and heat. Each pepper brings its unique taste. Adjust spice levels to match your preference. This way, everyone can enjoy the chili. Pro Tips Choose Your Cut Wisely: For a tender and juicy chili, opt for well-marbled cuts like sirloin or chuck. They hold up well during the long cooking process. Layer the Flavors: Don’t rush the sautéing step! Taking the time to properly brown the meat and cook the vegetables will enhance the overall flavor of your chili. Adjust the Heat: If you prefer a milder chili, remove the seeds and membranes from the jalapeños before chopping. For more heat, include the seeds or add extra cayenne pepper. Let It Rest: For the best flavor, allow your chili to cool and then refrigerate it overnight. The flavors will meld beautifully, making it even tastier the next day! {{image_4}} If you want a meat-free chili, you can easily switch out the steak. I suggest using hearty ingredients that pack flavor. Try using: - 1 lb of mushrooms, diced - 1 cup of lentils - 1 cup of chopped zucchini - 1 cup of corn Beans are great too! I love using: - 1 can of kidney beans - 1 can of chickpeas These options give a nice texture and taste. They make the chili rich and filling without meat. You can make this chili in different ways. The stovetop is quick and easy, but a slow cooker makes it even better. For stovetop: - Brown the steak and sauté the veggies as usual. - Then let it simmer for about 30-40 minutes. With a slow cooker, do this: - Brown the steak first. - Add everything to the slow cooker and cook on low for 6-8 hours. The Instant Pot is a fun option too! Just: - Use the sauté setting for the steak and veggies. - Add all the ingredients and cook on high pressure for 15 minutes. Each method gives a unique flavor to your chili! Chili varies a lot by region. In some places, you might find unique spices. For example: - In Texas, they use more chili powder and less tomato. - In the Southwest, cumin and coriander add depth. Traditional toppings are also key. Here are some favorites: - Diced onions - Fresh jalapeños - Avocado slices These toppings enhance the chili and add a fresh touch. Try mixing and matching to find your favorite spin! To keep your chili fresh, store it in an airtight container. This helps prevent spills and keeps it tasty. Let the chili cool down before sealing it. You can keep spicy steak chili in the fridge for about 3 to 4 days. If you want to enjoy it later, freezing is a great option. Freezing chili is easy and smart. Use a freezer-safe container or a heavy-duty freezer bag. Leave some space at the top for expansion. Your chili can stay frozen for up to 3 months. When you want to eat it, take it out and thaw it overnight in the fridge. Heat it on the stove or in the microwave until it's hot throughout. Batch cooking is a great way to save time. Make a big pot of spicy steak chili on the weekend. Portion it into containers for easy meals. You can enjoy it as a quick weeknight dinner. Pair it with rice, cornbread, or tortilla chips for a full meal. This way, you get delicious food without extra work during the week. You can use flank steak or chuck roast. Both options have great flavor and tenderness. If you want a leaner choice, try turkey or chicken breast. For a plant-based option, use mushrooms or jackfruit. These substitutes will still give your chili a hearty feel. Spicy steak chili lasts about 3 to 4 days in the fridge. Make sure to store it in an airtight container. Let it cool before sealing to keep it fresh. If you want to keep it longer, you can freeze it. Absolutely! To add more heat, increase the jalapeños or cayenne pepper. You can also add a few dashes of hot sauce. If you want a smoky flavor, consider adding chipotle peppers. Just be careful, as too much can overpower the dish. Chili pairs well with cornbread, rice, or tortilla chips. A fresh salad can balance the heat. For a fun twist, serve it with baked potatoes. These sides add texture and flavor to your meal. Yes, spicy steak chili is great for meal prep. You can make a large batch and divide it into portions. It reheats well, making it perfect for busy days. Just store it in the fridge or freezer for easy meals later. You have learned how to make a flavorful spicy steak chili. We covered key ingredients, including sirloin steak, beans, and spices that boost flavor. The step-by-step guide ensures perfect cooking. You can adjust heat levels and explore vegetarian options for everyone. Don't forget the serving tips and storage info for leftovers. Try this recipe for your next meal. Enjoy it today or save it for later. You’ll impress your friends and family with your delicious chili.

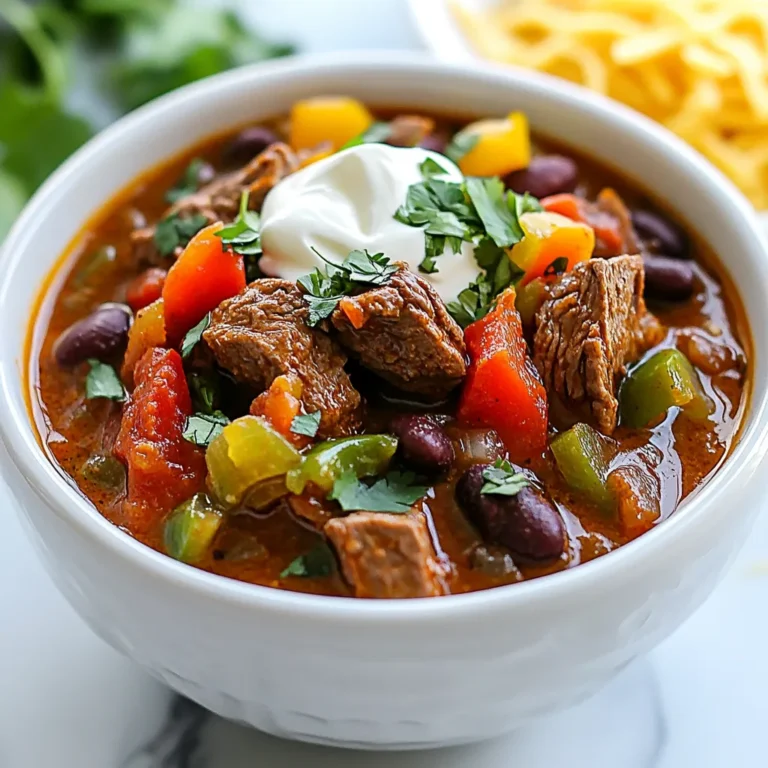
Spicy Steak Chili Flavorful and Hearty Comfort Food

To make these tasty Chocolate Chip Banana Bread Muffins, gather the following ingredients: - 3 ripe bananas, thoroughly mashed - 1/3 cup melted coconut oil (or substitute with vegetable oil) - 1/2 cup packed brown sugar - 1 large egg, beaten until frothy - 1 teaspoon pure vanilla extract - 1 teaspoon baking soda - Pinch of salt - 1 teaspoon ground cinnamon - 1 1/2 cups all-purpose flour - 1/2 cup semi-sweet or dark chocolate chips - Optional: 1/4 cup chopped walnuts or pecans for added crunch If you don’t have certain ingredients, don’t worry! Here are some easy swaps: - Coconut oil: Use vegetable oil or melted butter. - Brown sugar: White sugar can work in a pinch. - All-purpose flour: Whole wheat flour can add a nutty flavor. Feel free to mix and match these substitutes based on what you have at home. Want to elevate your muffins? Try these add-ins for extra flavor and fun textures: - Nuts: Chopped walnuts or pecans add a nice crunch. - Dried fruit: Raisins or cranberries can give a sweet twist. - Spices: A dash of nutmeg or ginger can add warmth. These options let you customize your muffins to your taste! {{ingredient_image_2}} 1. Preheat your oven to 350°F (175°C). This step is key to getting a nice rise. 2. Line a muffin tin with paper liners or grease each cup lightly. This prevents sticking. 3. In a large bowl, mash the 3 ripe bananas until smooth. Use a fork for best results. 4. Add 1/3 cup melted coconut oil to the bananas. Mix until they are blended well. 5. Stir in 1/2 cup packed brown sugar, 1 beaten egg, and 1 teaspoon pure vanilla extract. Whisk until smooth. 6. Now, sprinkle in 1 teaspoon baking soda, a pinch of salt, and 1 teaspoon ground cinnamon. Mix gently. 7. Gradually fold in 1 1/2 cups all-purpose flour. Stop mixing when just combined to keep muffins soft. 8. Finally, fold in 1/2 cup chocolate chips. If you like, add 1/4 cup chopped walnuts or pecans. 1. Spoon the batter into the muffin cups, filling each about 2/3 full. This allows room for rising. 2. Place the muffin tin in the oven and bake for 18-20 minutes. Set a timer to avoid overbaking. 3. Keep an eye on the muffins. They should rise nicely and look golden. 1. To check if they are done, insert a toothpick into the center of a muffin. It should come out clean or with a few crumbs. 2. Once baked, remove the tin from the oven. Let the muffins cool in the pan for 5 minutes. 3. Carefully transfer the muffins to a wire rack to cool completely. This helps them stay soft and fluffy. To make your muffins moist, use ripe bananas. They add natural sweetness and moisture. The more spots on your bananas, the better. Also, melt coconut oil instead of using solid butter. This keeps the muffins soft. Mix the wet ingredients well but don’t overmix. Stop as soon as the flour disappears. A big mistake is using unripe bananas. They won't give the same flavor or texture. Another common error is overmixing the batter. This can make your muffins tough. Always check your oven temperature with a thermometer. An oven that’s too hot can burn the muffins outside while leaving them raw inside. You can boost the flavor in many ways. Add a pinch of nutmeg for warmth. A splash of almond extract adds a nice twist, too. If you want a crunch, mix in walnuts or pecans. For a richer taste, swap the chocolate chips for dark chocolate. Each addition creates a new flavor experience. Pro Tips Choose Ripe Bananas: The riper the bananas, the sweeter and more flavorful your muffins will be. Look for bananas with lots of brown spots for the best results. Don’t Overmix: To ensure tender muffins, mix the batter just until the flour is incorporated. Overmixing can lead to dense, tough muffins. Experiment with Mix-ins: Feel free to get creative! Add in dried fruits, different types of nuts, or even a swirl of peanut butter for a unique twist on the classic recipe. Storing Muffins: Keep your muffins fresh by storing them in an airtight container at room temperature for up to 3 days, or freeze them for longer storage. {{image_4}} You can make this recipe healthier with some easy swaps. Instead of brown sugar, use honey or maple syrup. These natural sweeteners add flavor and moisture. You can also replace all-purpose flour with whole wheat flour. This change adds more fiber to your muffins. If you want to cut down on oil, use unsweetened applesauce. It keeps the muffins moist without extra fat. You can get creative with flavors! Try adding Nutella for a rich, chocolatey twist. Just swirl it into the batter before baking. You can also mix in fresh berries like blueberries or strawberries. They add a nice pop of color and taste. If you like nuts, go for walnuts or pecans. They add crunch and flavor. Add a teaspoon of espresso powder for a coffee kick, too. Want to make these muffins vegan? Replace the egg with a flax egg. Just mix one tablespoon of ground flaxseed with three tablespoons of water. Let it sit for a few minutes until it thickens. For gluten-free muffins, use a gluten-free flour blend. You can also add a bit of almond flour for texture. These options keep the muffins delicious while meeting your diet needs. To keep your chocolate chip banana bread muffins fresh, store them in an airtight container. This will help them stay soft and moist. You can keep them at room temperature for up to three days. If you want to keep them longer, the fridge is a good choice, but they may dry out a bit. To avoid this, wrap them in plastic wrap before placing them in the fridge. If you want to freeze your muffins, wait until they cool completely. Wrap each muffin tightly in plastic wrap. Then, place them in a freezer-safe bag or container. They can last for about three months in the freezer. To reheat, simply take a muffin out and let it thaw at room temperature. You can also warm it in the microwave for 15-20 seconds. This will bring back that fresh-baked taste. For storing muffins, I recommend using glass or plastic containers with tight lids. These types of containers help keep air out, which keeps the muffins soft. You can also use zip-top bags, but make sure to remove as much air as possible before sealing. For freezing, heavy-duty freezer bags work best. They prevent freezer burn and keep your muffins tasting great. Chocolate chip banana bread muffins stay fresh for about 3 to 5 days. Store them at room temperature in an airtight container. If you want them to last longer, you can freeze them. They freeze well for up to 3 months. Just make sure to wrap them tightly in plastic wrap before placing them in a freezer bag. Yes, you can use frozen bananas! Just thaw them before mashing. Frozen bananas are often sweeter and softer. This makes them perfect for baking. The moisture from the thawed bananas helps keep the muffins moist. To ripen bananas quickly, place them in a paper bag. The bag traps the ethylene gas they release, speeding up ripening. You can also add an apple or a tomato to the bag to enhance this effect. For an even faster method, you can bake unpeeled bananas at 300°F (150°C) for about 15 to 20 minutes. Let them cool before mashing. This blog post covered ingredients, step-by-step instructions, and tips for making great muffins. We discussed substitutions, optional adds, and how to keep muffins moist. I shared ways to add flavor and create variations, like using Nutella or making them vegan. Lastly, I provided storage tips to keep your muffins fresh. Muffins can be simple or fancy, depending on what you want. With these tips, you can bake the best muffins every time. Happy baking!

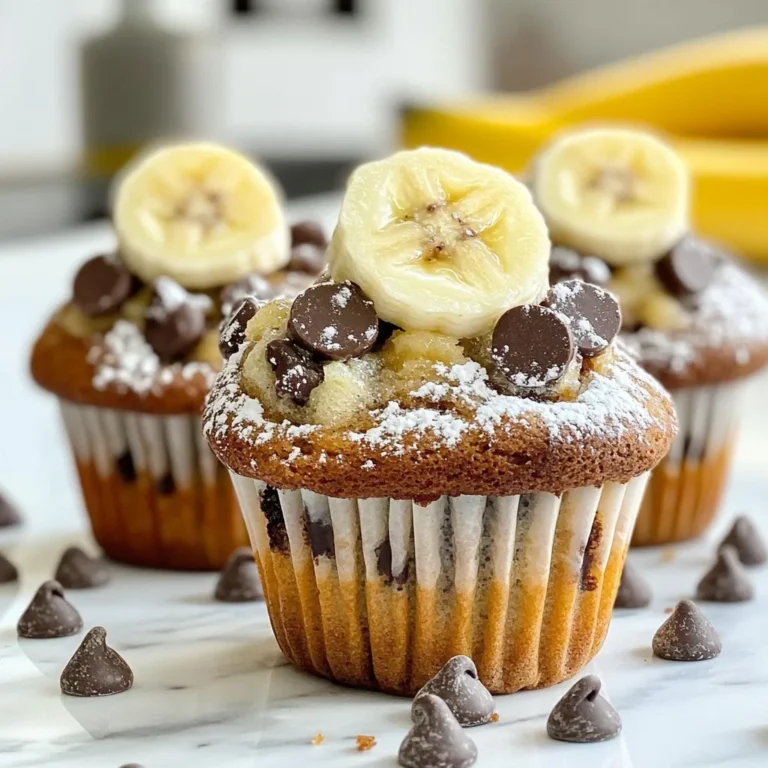
Chocolate Chip Banana Bread Muffins Easy and Tasty

- 4 chicken thighs, skin-on and bone-in - 1/4 cup unsalted butter, divided - 2 tablespoons olive oil - 4 cloves garlic, minced - Zest of 2 lemons - 1/4 cup fresh lemon juice - 1 teaspoon dried thyme - 1 teaspoon dried oregano - Salt and pepper, to taste - Fresh parsley, chopped - Lemon wedges {{ingredient_image_2}} Start with fresh chicken thighs. First, pat them dry using paper towels. This step is key. It helps make the skin crispy. Next, season both sides with salt and pepper. You want to enhance the flavor. Use enough seasoning for a nice taste. Set the seasoned thighs aside while you prepare to cook. Grab a large skillet. Heat 2 tablespoons of butter and 2 tablespoons of olive oil over medium-high heat. Once the mixture is hot and shimmering, add the chicken thighs skin-side down. Sear for 5-7 minutes. Look for a golden brown color. This crispiness is what you want! Carefully flip the chicken and cook for another 5 minutes. Once done, take the chicken out and set it on a plate. In the same skillet, lower the heat to medium. Add the remaining 2 tablespoons of butter. Wait until it melts. Then, add 4 cloves of minced garlic. Sauté the garlic for about 1 minute until it smells great. Be careful, as garlic can burn fast. It should be lightly golden. Next, stir in the zest of 2 lemons, 1/4 cup of fresh lemon juice, 1 teaspoon of dried thyme, and 1 teaspoon of dried oregano. Let this simmer for 2-3 minutes. Stir it occasionally to mix the flavors well. After that, return the chicken to the skillet skin side up. Spoon some sauce over the chicken. Cover the skillet and let it simmer on low heat for about 15 minutes. Make sure the chicken reaches an internal temperature of 165°F (75°C). Now you have a delicious base ready for your meal! To get that perfect golden skin, start with dry chicken. Pat the chicken thighs with paper towels before seasoning. This step helps the skin crisp up nicely. Use a hot skillet and a mix of butter and olive oil. This combo adds flavor and helps the skin brown evenly. Sear the chicken skin-side down for 5-7 minutes. Wait until it turns golden brown before flipping. Resist the urge to move it around too much. Resting your chicken is key. Once cooked, let it sit for about 5 minutes. This helps keep the juices inside. Cut into it too soon, and you'll lose those tasty juices. Resting makes your chicken tender and flavorful. Cover it lightly with foil. This keeps it warm while resting. Herbs can make your dish shine. I recommend using dried thyme and oregano in the recipe. But you can mix it up! Fresh herbs like rosemary or basil can add nice flavors. Try adding a pinch of crushed red pepper for some heat. Don’t forget to taste as you go. Adjust the herbs to your liking for a unique touch. Pro Tips Dry the Chicken: Patting the chicken thighs dry helps achieve a crispy skin when searing. Don’t Rush the Searing: Allow the chicken to sear undisturbed for the best golden brown color and crispy texture. Monitor the Garlic: Sauté garlic until fragrant but not browned to avoid a bitter taste in the sauce. Let it Rest: Allow the chicken to rest before serving to ensure maximum juiciness and flavor. {{image_4}} You can use different chicken cuts for this recipe. Chicken breasts work great if you prefer leaner meat. Just remember to adjust cooking times. Breasts cook faster than thighs, so check them often. Drumsticks and wings also add fun and flavor. Each cut brings a unique taste and texture to the dish. Adding vegetables makes this dish even better. You can toss in some green beans, broccoli, or bell peppers. Sauté them in the same skillet after the garlic. This will soak up the lemon-butter flavor. You can also add sliced zucchini or cherry tomatoes during the last few minutes of cooking. This not only adds color but also keeps the meal balanced. Lemon is classic, but you can mix things up. Try lime juice for a zesty twist. Orange juice adds sweetness and a hint of brightness. You can even combine citrus juices for a more complex flavor. Just be sure to adjust the zest amount to match the juice. Each citrus option offers a different taste adventure. After enjoying your meal, let the chicken cool for about 30 minutes. Place it in an airtight container. This keeps it fresh. Store it in the fridge for up to three days. If you have extra sauce, save it too. It adds flavor when reheating. To reheat, use a skillet for best taste. Heat the skillet over medium heat. Add a small amount of water or broth. This helps keep the chicken moist. Place the chicken in the skillet, skin-side up. Cover it with a lid. Heat for about 5-7 minutes or until hot. You can also use the microwave. Just cover the chicken with a damp paper towel. Heat it in short bursts, checking often. For long-term storage, freeze the chicken. Wrap each piece tightly in plastic wrap. Then, place it in a freezer bag. Remove as much air as possible. This prevents freezer burn. You can freeze it for up to three months. When ready to eat, thaw it in the fridge overnight. Then, reheat using the skillet method for the best taste. You can serve this dish with many sides. Here are some great options: - Steamed rice - Mashed potatoes - Garlic bread - Roasted vegetables - A fresh green salad These sides balance the rich flavors of the chicken. They also help soak up the tasty lemon-butter sauce. Yes, chicken breasts work well too. They cook faster than thighs. Just remember to adjust the cooking time. - Use skin-on breasts for more flavor. - Cook until the internal temperature reaches 165°F (75°C). - Keep an eye on the cooking time, about 20 minutes. To check if the chicken is done, use a meat thermometer. Insert it into the thickest part of the chicken. It should read 165°F (75°C). - The juices should run clear, not pink. - If you don’t have a thermometer, cut into the chicken. The meat should be white inside. We explored classic butter lemon chicken from start to finish. We discussed key ingredients, how to sear for crispiness, and make a tasty sauce. I shared tips for golden skin and resting times to get great flavor. You can customize with herbs, different chicken cuts, or veggies. Remember to store leftovers safely and reheat well for the best taste. Enjoy making this dish your own, and delight your family with each bite!

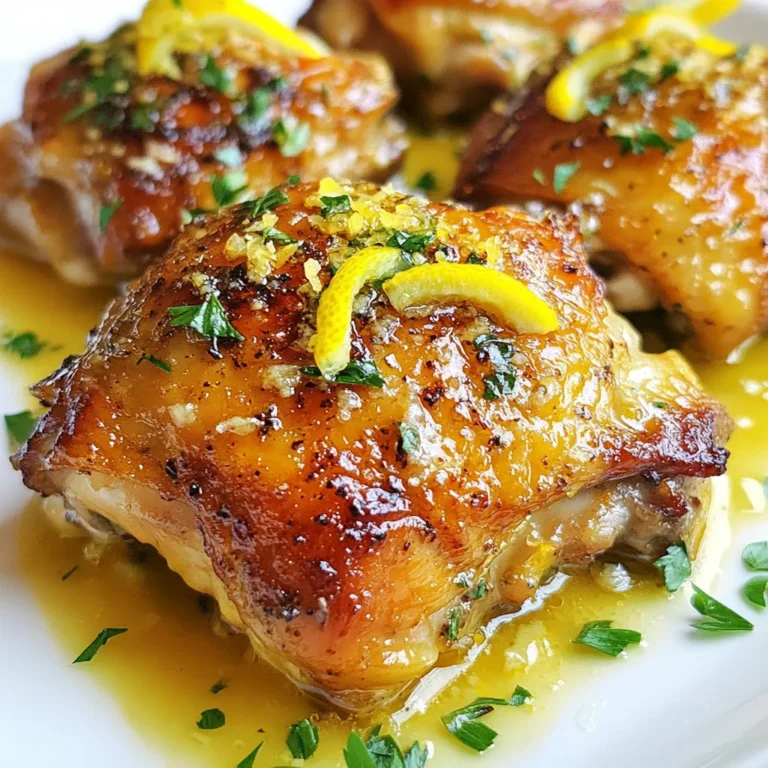
Classic Butter Lemon Chicken Savory and Scrumptious Dish

Here is the list of ingredients you will need for the BBQ Chicken Cottage Cheese Bowl: - 2 cups cooked chicken breast, shredded - 1 cup BBQ sauce - 2 cups cottage cheese - 1 cup cherry tomatoes, halved - 1 ripe avocado, diced - 1 cup corn kernels - 1/2 red onion, thinly sliced - 1 cup shredded lettuce - 1/4 cup fresh cilantro, chopped (optional) - Salt and pepper to taste - Lime wedges for garnish Each ingredient plays a key role in creating a tasty and filling meal. The shredded chicken adds protein. The BBQ sauce brings a sweet and smoky flavor. Cottage cheese gives a creamy base, while fresh veggies add crunch and color. You can adjust the toppings to fit your taste. This dish is great for lunch or dinner. {{ingredient_image_2}} To start, I heat the shredded chicken in a medium saucepan. I pour in 1 cup of BBQ sauce. I stir well to coat the chicken evenly. Over medium heat, I warm the mixture for about 5 minutes. The chicken should be hot but not overcooked. This step adds that rich BBQ flavor, making it perfect for our bowl. Next, I prepare the base of our bowl. I take 2 cups of cottage cheese and spoon it into a large serving bowl. I spread it out evenly across the bottom. This smooth layer is key. It gives a nice contrast to the warm chicken on top and adds creaminess to each bite. Now, it’s time to layer the toppings. I carefully add the heated BBQ chicken over the cottage cheese. I make sure to spread it evenly so every spoonful has chicken. Then, I add the fresh toppings: halved cherry tomatoes, corn kernels, diced avocado, thinly sliced red onion, and shredded lettuce. I try to arrange these toppings in a colorful way. This makes the dish look tasty and inviting. Finally, I season the bowl with salt and pepper to taste. If I want to add a fresh touch, I sprinkle chopped cilantro on top. This adds color and flavor. I serve the bowl right away, with lime wedges on the side. I encourage everyone to squeeze the lime over their meal. It adds a zesty kick that makes this dish truly shine. To really get that BBQ taste, pick a sauce you love. I suggest using a sweet and smoky sauce. Brands like Sweet Baby Ray's or Stubb's have great options. For a homemade twist, mix ketchup, brown sugar, and apple cider vinegar. This combo gives a nice blend of sweet and tangy flavors. When serving, be sure to use colorful bowls. This makes the dish pop! Place lime wedges in a small dish at the center of the table. It gives easy access for a zesty squeeze. Arrange the toppings in layers for a beautiful look. This way, each bite is a mix of all flavors. Want to take it up a notch? Add crunchy toppings like tortilla strips or crushed nuts. They add a fun texture. You can also try adding jalapeños for a spicy kick. If you love cheese, sprinkle some shredded cheddar on top. These extras make the dish even more exciting! Pro Tips Use Homemade BBQ Sauce: Making your own BBQ sauce allows you to customize the flavors to your liking, ensuring a personal touch to your dish. Perfect Avocado Ripeness: Choose avocados that are slightly soft to the touch but not mushy; this will ensure they are creamy and flavorful for your bowl. Fresh Ingredients Matter: Using fresh vegetables like cherry tomatoes and lettuce not only enhances the flavor but also adds a vibrant color to your dish. Customize Your Bowl: Feel free to add additional toppings like black beans, jalapeños, or shredded cheese to suit your taste preferences. {{image_4}} You can switch the chicken for many other proteins. Try shredded pork or tofu for a fun twist. Each option brings a new flavor and texture. If you want a lighter dish, grilled shrimp works great too. For a vegetarian version, mix in black beans or chickpeas. They add protein and keep it filling. You can also change the toppings. Use diced bell peppers or olives for different tastes. The key is to match your favorites with the BBQ sauce. If you need to make this dish gluten-free, check the BBQ sauce. Some brands add gluten, so look for gluten-free labels. You can also use homemade sauce to control the ingredients. To make it dairy-free, swap cottage cheese for a dairy-free alternative. Look for brands that use nuts or soy. You can also use avocado for a creamy base. These small changes make the dish fit your needs while keeping it tasty. This dish is perfect for meal prep. You can make it ahead for easy lunches or dinners. Cook the chicken and mix it with the BBQ sauce. Then store it in a container. Keep the cottage cheese and toppings separate. This keeps everything fresh and prevents sogginess. When you're ready to eat, just layer the cottage cheese first. Add the chicken and top it with your chosen toppings. It takes just a few minutes to prepare. This meal prep makes your week easier and more delicious. To keep your BBQ chicken cottage cheese bowl fresh, refrigerate leftovers right away. Place the bowl in an airtight container. Make sure the lid seals tightly. This helps keep moisture in and air out. Leftovers should stay good for up to three days. When ready to enjoy your leftovers, use a microwave for quick reheating. Place the bowl in the microwave and cover it with a damp paper towel. Heat for one to two minutes until warm. Stir halfway through to ensure even heating. You can also reheat on the stove. Just add a splash of water to a pan, then heat over low heat. Stir it until hot, about five minutes. If you want to freeze this dish, it's best to do it right after making it. Store the bowl in a freezer-safe container. Leave a little space at the top for expansion. This dish can freeze for up to three months. To thaw, move it to the fridge overnight. Once thawed, reheat as mentioned above. This will help keep the flavors rich and tasty. Yes, you can use canned chicken. It saves time and works well in this dish. Just drain it before using. The taste is still good with BBQ sauce. Mix it in with the sauce just like fresh chicken. Canned chicken adds convenience to your meal prep. If you do not like cottage cheese, try Greek yogurt. It has a similar texture and is creamy. You can also use ricotta cheese for a sweeter taste. Both options pair well with the BBQ chicken. They add protein and make the bowl satisfying. This dish lasts about three to four days in the fridge. Store it in a sealed container to keep it fresh. The ingredients stay tasty, but the avocado may brown. To prevent this, add avocado just before serving. This keeps your meal looking and tasting great. Yes, this recipe is perfect for meal prep. You can prepare the chicken and toppings in advance. Store the components separately to keep everything fresh. Assemble your bowl when you are ready to eat. This makes for quick and easy meals throughout the week. This blog post outlined a tasty BBQ chicken cottage cheese bowl. We covered the key ingredients and steps to make it delicious. I shared tips for perfecting the flavor and suggested variations to suit your needs. You can store leftovers well and even meal prep this dish. In conclusion, this recipe is simple and fun. It offers great taste and flexibility. Enjoy trying new flavors and toppings to make it your own!

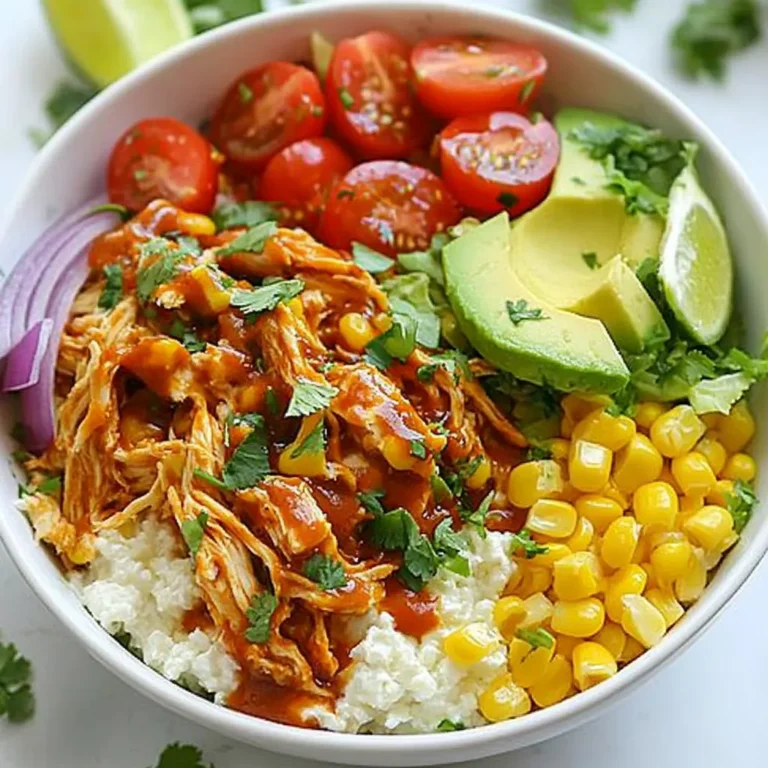
BBQ Chicken Cottage Cheese Bowl Tasty and Filling Meal

- Potatoes (Yukon Gold or red) - Olive oil and seasonings - Optional ingredient: Grated cheese To make potato roses, start with the right ingredients. I recommend using Yukon Gold or red potatoes. These types give a great flavor and texture. You will need four medium-sized potatoes for this recipe. Always wash and peel them well before slicing. Next, you need olive oil. This oil adds flavor and helps the potatoes crisp up nicely. You will also need seasonings to bring out the best taste. Use 1 teaspoon of garlic powder, dried thyme, and paprika each. Add salt and black pepper to your liking. If you love cheese, consider adding grated cheese. About 1 cup works well for a cheesy twist. It melts beautifully and enhances each bite. Gather these ingredients, and you are ready to create an impressive dish! {{ingredient_image_2}} 1. First, preheat your oven to 425°F (220°C). This ensures your potato roses cook evenly. 2. Next, prepare your muffin tin. Line it with greased aluminum foil or silicone liners. This will help hold the shape of the roses. 3. Now, wash and peel the potatoes. Make sure they are clean and free of any dirt. 1. Using a mandoline slicer or a sharp knife, slice the potatoes into thin rounds. Aim for about 1/8 inch thick. This thickness helps them cook well and look great. 2. In a large bowl, mix the potato slices with olive oil. Add garlic powder, dried thyme, paprika, and a pinch of salt and pepper. Toss gently until all slices are coated. 1. Start rolling the first potato slice into a tight spiral. Place this rolled slice in the center of a muffin tin cup. 2. Add more potato slices around the first roll. Layer them carefully to create the rose shape. Fill the cup but leave space for the potatoes to expand. 3. If you love cheese, sprinkle grated cheese on top of each rose. This adds a tasty twist. 4. Now, place the muffin tin in the oven and bake for 30-35 minutes. The potatoes should be tender and crispy at the edges. 5. After baking, take the muffin tin out of the oven. Let the potato roses cool for a few minutes. Then, gently lift them out of the cups. 6. For a fresh touch, garnish the potato roses with chopped parsley before serving. Enjoy this beautiful dish! For the best potato roses, I recommend using Yukon Gold or red potatoes. These types have a creamy texture and rich flavor. They hold their shape well when sliced and baked. Avoid starchy potatoes like Russets, as they may break apart. Choose potatoes that are firm and smooth for the best results. Uniform slicing is key for great potato roses. When you cut the potatoes into even rounds, they cook evenly and look beautiful. Use a mandoline slicer if you have one; it makes cutting thin slices easy. Aim for about 1/8 inch thick. This consistency helps your roses stay nice and neat in the muffin tin. While the basic seasoning is tasty, feel free to get creative! Here are some ideas to boost flavor: - Swap out garlic powder for onion powder. - Try adding fresh herbs like rosemary or basil. - For a spicy kick, add a bit of cayenne pepper. - Mix in some grated cheese with the potatoes for extra richness. - Experiment with different spices like cumin or dill. These small changes can make your potato roses truly unique and delightful! Pro Tips Choose the Right Potatoes: Opt for waxy varieties like Yukon Gold or red potatoes for a creamy texture and better shape retention when baking. Uniform Slices: Use a mandoline slicer for perfectly thin and even potato slices; this ensures they cook evenly and create a beautiful rose shape. Layering Techniques: When assembling the potato roses, stagger the slices to create a full and visually appealing flower shape, ensuring each layer is secured with the previous one. Cool Before Serving: Allow the potato roses to cool slightly before removing them from the muffin tin; this helps them hold their shape better and improves texture. {{image_4}} You can add many types of cheese to your potato roses. Each cheese brings a unique twist. Here are some options: - Cheddar: A rich and sharp flavor that melts well. - Gruyère: This cheese adds a nutty taste and creamy texture. - Mozzarella: For a stretchy, mild cheese that adds a lovely pull. - Feta: Crumbled on top, it gives a salty kick. - Parmesan: A sprinkle adds a nice, sharp finish. Feel free to mix and match cheeses for a fun flavor blend. You can change the taste of potato roses by adding herbs and spices. Here are some ideas: - Rosemary: This herb adds a fragrant, woodsy note. - Basil: Fresh basil gives a bright and sweet flavor. - Onion powder: A great way to add depth without fresh onions. - Chili flakes: For a spicy kick, add a pinch. - Lemon zest: Brightens the dish with a fresh citrus taste. Experiment with these to create your own flavor profile. Potato roses are perfect for many occasions. Here are some great ideas: - Dinner parties: They impress guests with their beauty. - Family meals: A fun side dish that everyone will love. - Holiday gatherings: Their shape adds a festive touch. - Potlucks: They are easy to transport and share. - Picnics: They hold up well and taste great at room temperature. These occasions make potato roses a delightful choice for any meal. To keep your potato roses fresh, store them in an airtight container. Place them in the fridge if you have leftovers. They can last for 3 to 4 days. Make sure they cool down before putting them away. This helps keep the texture right. If you want to keep them longer, consider freezing. When you reheat potato roses, you want to keep them crispy. Preheat your oven to 350°F (175°C). Place the potato roses on a baking sheet. Heat them for about 10 to 15 minutes. This method helps restore their crispiness. You can also use an air fryer at 350°F for about 5 minutes. This gives a nice crunch too. Yes, you can freeze potato roses! After they cool, place them on a baking sheet. Freeze them for 1 to 2 hours until solid. Then transfer them to a freezer bag. They can last up to 2 months in the freezer. To enjoy later, just reheat directly from the freezer. This keeps them tasty and fun! Yes, you can make Potato Roses ahead of time. Here are some tips for pre-preparation: - Slice the Potatoes Early: You can slice your potatoes and store them in water. This keeps them fresh and prevents browning. - Pre-Seasoning: Toss the potato slices in olive oil and seasonings ahead of time. This adds flavor and saves time. - Assemble and Chill: You can assemble the roses in the muffin tin. Cover and chill them in the fridge until you are ready to bake. To get those crispy edges, follow these techniques for optimal baking: - High Oven Temperature: Bake at 425°F (220°C) to ensure crispness. - Thin Slices: Make sure your potato slices are very thin, about 1/8 inch. Thin slices cook evenly and crisp up nicely. - Single Layer in Muffin Cups: Avoid overcrowding in the muffin cups. This allows heat to circulate and creates that perfect crunch. Potato Roses pair well with many dishes. Here are some suggested side dishes and pairings: - Salad: A fresh green salad brightens the meal. - Grilled Meat: Serve with grilled chicken or fish for a hearty dinner. - Dipping Sauces: Try sour cream or garlic aioli for a tasty dip. In this post, we explored making delicious potato roses step by step. You learned about the right potatoes, how to prepare them, and tips for flavor and texture. Remember to slice evenly and use fresh herbs for the best taste. Consider cheese for an added twist. These tasty treats can impress at any gathering. With the right storage and reheating methods, you can enjoy leftovers too. I hope you feel inspired to create your own potato roses. Happy cooking!

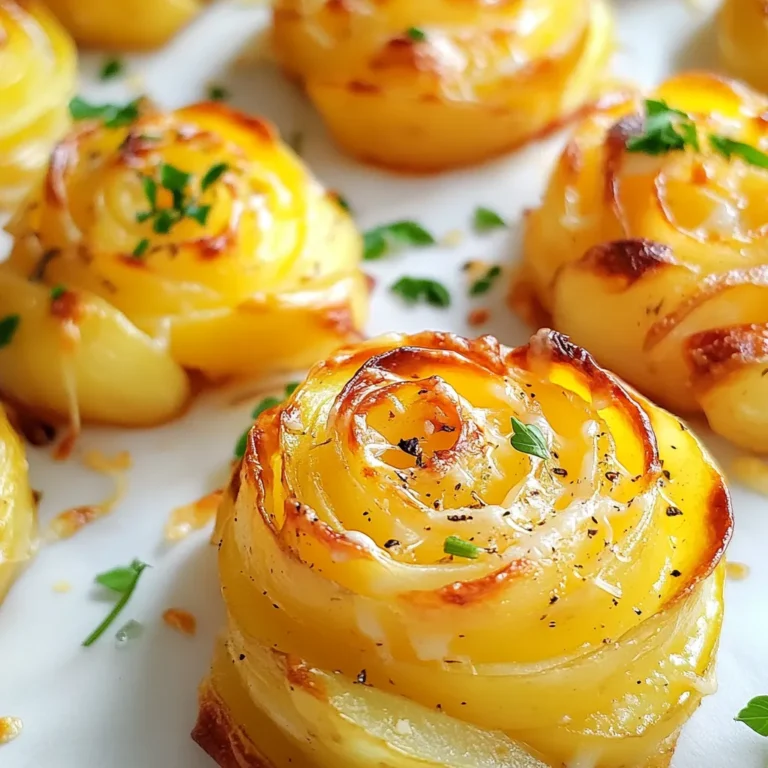
Potato Roses Irresistible and Easy Recipe Guide

PREV 1 … 16 17 18 … 20 NEXT
homedishhaven

explore

DessertsDinnerAppetizersDrinks

Our Policies

  • Cookie Policy
  • Copyright Policy
  • Disclaimer
  • GDPR Policy
  • Terms Of Use
Back to Top
  • About
  • Contact Us
  • Privacy Policy
© 2025 homedishhaven