FREE DINNER EBOOK! Get your copy!
  • Cookie Policy
  • GDPR Policy
  • Disclaimer
  • Terms Of Use
  • Visit my other site: Fun Cookie Recipes
homedishhaven
  • Home
  • Dinner
  • Desserts
  • Drinks
  • Appetizers
  • Contact
  • About
  • Privacy Policy
  • Home
  • Dinner
  • Desserts
  • Drinks
  • Appetizers
  • Contact
  • About
  • Privacy Policy
  • Cookie Policy
  • GDPR Policy
  • Disclaimer
  • Terms Of Use
Visit my other site: Fun Cookie Recipes

HOME / CATEGORIES /

Latest

- 1 medium butternut squash, peeled and diced into 1-inch cubes - 1 medium onion, finely chopped - 3 cloves garlic, minced - 2 tablespoons extra-virgin olive oil - 4 cups vegetable broth (preferably low-sodium) - 1 can (13.5 oz) full-fat coconut milk The main ingredients create a rich and hearty soup. The butternut squash gives a nice sweetness and creaminess. The onion and garlic add depth and flavor. Olive oil helps in cooking the onions and garlic, releasing their flavors. Vegetable broth is the base that ties everything together. Coconut milk brings in a creamy texture that makes the soup luxurious. - 1 teaspoon ground cumin - ½ teaspoon ground nutmeg - Salt and black pepper, to taste - Optional: Fresh basil or cilantro leaves for garnish Seasoning is key to making this soup flavorful. Ground cumin adds warmth, while nutmeg adds a hint of sweetness. Salt and black pepper balance the flavors. Fresh herbs like basil or cilantro add a burst of color and freshness when served. They also lift the flavors, making each bite more enjoyable. This simple mix of ingredients ensures that your vegan butternut squash soup is both nourishing and delicious. Each ingredient plays its part in creating a comforting bowl of goodness. Heat 2 tablespoons of olive oil in a large pot over medium heat. Once hot, add 1 finely chopped onion. Sauté the onion for about 5-7 minutes. Stir it occasionally until it turns soft and translucent. Next, add 3 minced garlic cloves. Cook the garlic for another minute until it becomes fragrant. Be careful not to let it burn, as this can change the flavor. Now, add 1 medium butternut squash, peeled and diced into 1-inch cubes. Pour in 4 cups of vegetable broth, along with 1 teaspoon of ground cumin and ½ teaspoon of ground nutmeg. Turn the heat up to bring the mix to a boil. Once boiling, reduce the heat to low and cover the pot. Let it simmer for about 20-25 minutes. The squash should be tender enough to pierce with a fork. After cooking, carefully remove the pot from the heat. Use an immersion blender to blend the soup until it's silky smooth. If you don't have an immersion blender, ladle the soup into a high-speed blender. Blend it until smooth, then return the soup to the pot. Stir in 1 can of full-fat coconut milk until fully mixed. Season the soup with salt and black pepper to taste. Place the pot back on low heat and warm it for 5 more minutes. To make a smooth soup, cut the butternut squash into even pieces. This helps it cook evenly. Aim for 1-inch cubes. When you cook the garlic, watch it closely. If garlic burns, it makes the soup taste bitter. Cook it until just fragrant, about a minute. To make the soup creamier, try using cashew cream or almond milk. Both add richness without dairy. If the soup is too thick, add more vegetable broth or water. Adjust it to your liking. If it's too thin, let it simmer longer to thicken. {{image_4}} You can mix in other veggies to add flavor and nutrition. Try adding diced carrots or sweet potatoes for sweetness. Chopped celery brings a nice crunch. Each swap makes the soup unique and tasty. Think about what is fresh and in season. Use whatever you have on hand for a fun twist. Spices can make your soup pop. Ground cumin gives warmth, while nutmeg adds a hint of sweetness. If you like spice, try adding cayenne pepper or chopped fresh chili peppers. These add heat and depth to the dish. Adjust the amount based on your taste. Feel free to experiment and find your perfect blend! To store leftovers, let the soup cool first. Then, pour it into an airtight container. Seal it tightly and place it in the fridge. The soup stays fresh for about 4-5 days. When you want to reheat, pour the soup into a pot. Heat it over low to medium heat. Stir often to prevent sticking. If it’s too thick, add a splash of vegetable broth or water. Heat until warm and enjoy again! For long-term storage, you can freeze the soup. First, let it cool completely. Then, scoop it into freezer-safe bags or containers. Leave some space at the top for expansion. The soup can last up to 3 months in the freezer. To thaw, move the soup to the fridge overnight. For quicker thawing, place the bag in a bowl of cold water. Once thawed, heat it on the stove as mentioned above. For meal prep, you can use this soup as a base. Pair it with quinoa or rice for a filling meal. Add roasted veggies or greens for extra nutrition. This soup makes a great starting point for healthy meals! Yes, this soup is gluten-free. It uses fresh vegetables, vegetable broth, and coconut milk. None of these ingredients contain gluten. You can enjoy this soup without worry, even if you have a gluten sensitivity. Absolutely! You can make this soup up to three days in advance. Just store it in an airtight container in the fridge. When you're ready to eat, simply reheat it on the stove. Stir well to get that creamy texture back. To add some heat, try these options: - Add a pinch of cayenne pepper. - Stir in some red pepper flakes. - Mix in diced jalapeños for a fresh kick. Start with a small amount and taste as you go. Enjoy the heat! This blog post covered how to make a delicious butternut squash soup. We discussed key ingredients like butternut squash, onion, and spices while detailing each step. You learned tips for perfecting your soup, storage options, and tasty variations. By following these simple steps, you can create a dish that warms the soul. Whether you enjoy it plain or spice it up, this soup is sure to please. Get cooking and enjoy your time in the kitchen!

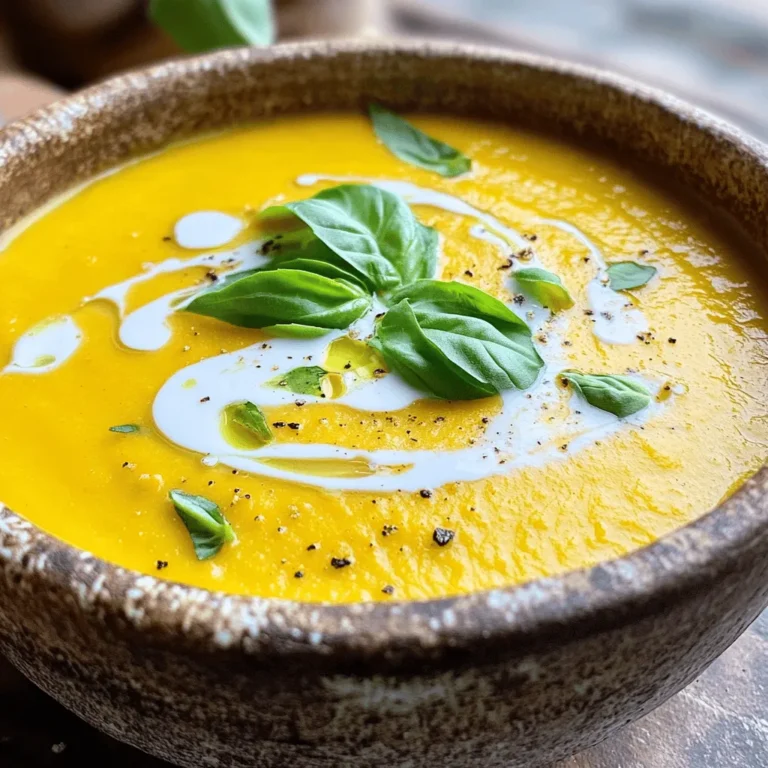
Vegan Butternut Squash Soup Simple and Nourishing Bowl

- soba noodles - sesame oil - soy sauce (or tamari for gluten-free) - fresh ginger - honey or maple syrup - rice vinegar - julienned carrot - julienned cucumber - sliced green onions - toasted sesame seeds - fresh cilantro leaves - chili flakes (optional) To make sesame ginger soba noodles, gather these ingredients. Soba noodles are the base of your dish. You can find them in most grocery stores. Sesame oil gives a nice nutty flavor. Choose soy sauce for saltiness; tamari works for gluten-free. Fresh ginger adds zest and warmth. Honey or maple syrup balances the flavors with sweetness. Rice vinegar brings a bit of tang. Add julienned carrot and cucumber for crunch. Sliced green onions add a fresh bite. Toasted sesame seeds give a delightful crunch. Fresh cilantro leaves add brightness. If you like heat, sprinkle chili flakes for a kick. Each ingredient plays a role in creating a well-rounded dish. Enjoy the mix of flavors and textures! To start, fill a large pot with salted water. Bring the water to a boil. Once boiling, add 200g of soba noodles. Cook them for 4-5 minutes. They should be tender but still a bit firm. After cooking, drain the noodles. Rinse them under cold water right away. This stops the cooking and keeps them from sticking together. Set the cooled noodles aside. Next, grab a big mixing bowl. In it, combine 2 tablespoons of sesame oil, 3 tablespoons of soy sauce (or tamari if you need it gluten-free), and 1 tablespoon of freshly grated ginger. Add 2 tablespoons of honey or maple syrup if you want a vegan option. Don’t forget to include 1 tablespoon of rice vinegar. Whisk all these ingredients together until you have a smooth sauce. Now, take the cooled soba noodles and add them to the bowl with your sauce. Use tongs or two forks to gently toss the noodles. Make sure every noodle gets coated in that delicious sauce. This step is key for flavor! After the noodles are coated, it’s time to add some fresh veggies. Fold in 1 julienned carrot, 1 julienned cucumber, and 4 sliced green onions. Toss everything gently until the vegetables are mixed well with the noodles. This adds crunch and freshness to your dish. You can serve the sesame ginger soba noodles in a lovely bowl or on a platter. Top them with 1 tablespoon of lightly toasted sesame seeds. Don’t forget to add some fresh cilantro leaves for a pop of color. If you like spice, sprinkle some chili flakes on top for an extra kick! To cook soba noodles just right, start with a big pot of salted water. Bring it to a fast boil. Add the soba noodles and cook for 4 to 5 minutes. You want them tender but still slightly firm. This is called al dente. After cooking, drain the noodles quickly. Rinse them under cold water. This stops the cooking and keeps them from sticking together. Fresh ingredients make a big difference in taste. Grate fresh ginger for a bright, spicy kick. Use fresh veggies like cucumber and carrot. They add crunch and color. Green onions bring a mild onion taste. Always choose the freshest produce you can find. This will enhance the flavors and make your dish pop. Garnishes elevate your dish visually and taste-wise. Lightly toasted sesame seeds add a nutty flavor. Fresh cilantro adds a burst of freshness. If you like heat, sprinkle chili flakes on top for an extra kick. These simple touches make your sesame ginger soba noodles look and taste amazing. {{image_4}} You can easily make this dish vegetarian or vegan. Simply use maple syrup instead of honey. Also, you can skip the soy sauce if you want a lighter flavor. Add more veggies like bell peppers or snap peas for a fresh touch. For a gluten-free option, choose tamari instead of soy sauce. Tamari tastes similar but has no wheat. Always check the noodle package. Some brands offer gluten-free soba noodles made from buckwheat. If you want more protein, add tofu or chicken. For tofu, press it to remove water, then cube and sauté it until golden. For chicken, grill or pan-fry it and slice it thin. Adding protein makes this dish more filling and satisfying. To keep your sesame ginger soba noodles fresh, place them in an airtight container. Store the noodles in the fridge. They can stay good for up to three days. If you added veggies, try to eat them sooner. When you want to enjoy your leftovers, remove them from the fridge. You can reheat them in a microwave or on the stove. If using a microwave, heat for one to two minutes. Stir halfway through to ensure even heating. On the stove, add a splash of water or oil in a pan over medium heat. Stir until warm, about three to five minutes. If you want to save your noodles for later, you can freeze them. Place the cooled noodles in a freezer-safe bag or container. Make sure to remove as much air as possible. They can last for up to two months in the freezer. To thaw, move the container to the fridge overnight. You can also run the frozen noodles under warm water to speed up thawing. After thawing, follow the reheating instructions to enjoy! Soba noodles are thin noodles made from buckwheat flour. They have a nutty flavor. You can find them in most grocery stores. Soba noodles are often used in Japanese cuisine. They can be served hot or cold. Yes, you can make sesame ginger soba noodles ahead of time. Cook the noodles and let them cool. Mix the sauce and store it separately. Combine them when you're ready to eat. This dish tastes great chilled or at room temperature. If you don’t have sesame oil, try using olive oil. Peanut oil works too but has a different taste. For a nut-free option, use canola oil. Each substitute will change the flavor slightly. Sesame ginger soba noodles are not very spicy. The ginger adds warmth, but it's mild. If you want more heat, add chili flakes. You control how spicy you like your dish. Yes, soba noodles are healthy. They are high in protein and fiber. They also contain essential nutrients like manganese and thiamine. Plus, they are lower in calories than many other noodles. Enjoy them as part of a balanced diet! This blog post explored delicious sesame ginger soba noodles. We covered key ingredients, easy steps, and useful tips. You learned how to enhance the flavor with fresh veggies and possible variations. Remember, storing leftovers properly helps keep your meal fresh. This dish is not only tasty but also offers quick meal options. Enjoying it can make any meal special and satisfying. Try making these noodles to discover a new favorite in your kitchen!

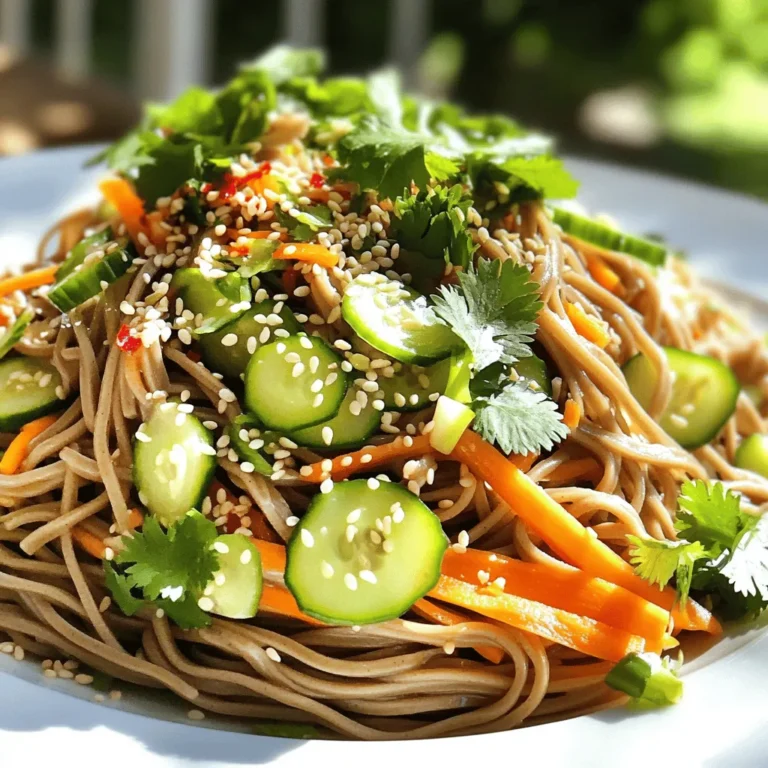
Sesame Ginger Soba Noodles Quick and Tasty Recipe

To create these tasty trifles, gather these key ingredients: - 1 batch of brownies (homemade or store-bought), cooled and cut into cubes - 1 cup caramel sauce (either store-bought or homemade) - 1 cup whipped cream (or a plant-based whipped topping) - 1 teaspoon sea salt (plus extra for garnishing) - ½ cup chocolate ganache (made with equal parts chocolate and cream) - ½ cup crushed nuts (such as pecans or almonds) for added texture - Fresh sea salt flakes for an elegant finish You can add extra flavors to make your trifles even better: - A splash of vanilla extract in the whipped cream - A pinch of espresso powder in the ganache - Caramel-flavored liqueur for an adult twist - Fresh fruit like berries for a bright touch For the best taste, I recommend these brands: - Look for Ghirardelli or Hershey's chocolate for ganache. - For caramel, try Smucker's or homemade to ensure quality. These brands give a rich flavor that makes your trifles stand out. Making brownies is easy. If you have a favorite recipe, use it. After baking, let them cool completely on a wire rack. This step is key to avoid mushy layers. Once cool, cut the brownies into small 1-inch cubes. These cubes will make layering simple and neat. To make caramel, start with a medium saucepan. Combine 1 cup of granulated sugar with ¼ cup of water. Place this over medium heat. Stir gently until the sugar dissolves. Once dissolved, stop stirring. Let it cook until it turns a golden-brown color. This can take a few minutes, so watch closely. When it reaches the right color, remove it from heat. Carefully whisk in ½ cup of heavy cream. This will bubble up, so be cautious. Let the mixture cool slightly. If you prefer, you can use store-bought caramel. Just warm it in the microwave for easy drizzling. For the whipped cream, use an electric mixer. Beat the cream on medium speed until soft peaks form. This step gives your trifles a light texture. After whipping, gently fold in 1 teaspoon of sea salt. This helps balance the sweetness. Be careful not to deflate the whipped cream. Use a spatula to fold it in lightly. This keeps the whipped cream fluffy. Remember, the salt adds a nice touch to the sweet layers. To make your trifles shine, use clear cups or jars. Start with a layer of brownie cubes. Make it neat and even for a pretty look. Drizzle on some caramel sauce next. This adds both flavor and a beautiful golden color. Then, add a layer of whipped cream. You can use a piping bag for a fancy touch. Follow this with a drizzle of chocolate ganache. Repeat these layers until you reach the top. Finish with whipped cream and a sprinkle of nuts for crunch. This creates a stunning visual effect that will impress everyone. After assembling your trifles, cover them with plastic wrap. Chill them in the fridge for at least 30 minutes. This helps the flavors blend well and the textures set. When ready to serve, remove the wrap gently. Look for a smooth surface on the whipped cream layer. You can garnish with extra sea salt or a sprig of mint. Serve them cold for the best taste. This way, you keep the cream light and fluffy. One big mistake is not letting the brownies cool fully. Warm brownies can melt the whipped cream. This makes the layers all run together, and we want distinct layers. Another mistake is overloading the layers. Keep portions balanced for better flavor and texture. Also, avoid using too much caramel sauce. It can make the trifles too sweet. Lastly, don’t skip the chilling step. This is crucial for the trifles to hold their shape. Following these tips will help you create a perfect dessert. {{image_4}} You can switch up flavors to make your trifles unique. For a lighter touch, use vanilla in the whipped cream. This will give a nice contrast to the rich brownie. If you want a coffee kick, try mocha-flavored cream. Just mix in some cocoa powder or coffee extract. These changes can make your trifles fun and fresh. You can easily adapt this recipe for dietary needs. To make it gluten-free, use gluten-free brownies. Many brands offer great options that taste just as good. For a vegan version, swap the whipped cream for a plant-based alternative. You can also find vegan caramel sauces in stores. These simple swaps let everyone enjoy the dessert. Adding flavors to your caramel can boost its taste. A splash of vanilla or almond extract makes it richer. You could also try a hint of whiskey for a fun twist. For the ganache, mix in peppermint extract for a festive touch. These flavor boosts can take your trifles to the next level. Experimenting with these ideas makes cooking exciting and creative. To store leftover trifles, cover them with plastic wrap or a lid. This keeps them fresh and protects them from odors in the fridge. Keep the trifles in their glass cups for easy access. If you use a large bowl, place a layer of plastic wrap over the top. In the fridge, your trifles can last up to three days. The flavors will blend and taste even better. If you want to freeze them, do so without the whipped cream. Store them in an airtight container for up to a month. When you’re ready to enjoy, thaw in the fridge overnight before adding fresh whipped cream. If your brownies need a little warmth, microwave them for ten seconds at a time. Be careful not to overheat, or they may dry out. You can also warm them in the oven at 350°F for about five minutes. Let them cool before adding to your trifles. This way, you keep the layers fresh and tasty. Salted Caramel Brownie Trifles can last up to four days in the fridge. Keep them covered to stay fresh. The brownies may soften a bit, but they still taste great. Yes, you can make these trifles a day ahead. Just layer them and refrigerate. This helps the flavors blend well and makes for an easy dessert. If you want a dairy-free option, use coconut cream or any plant-based whipped topping. Both options work well and still give a nice texture. To keep your caramel sauce smooth, store it in a sealed container in the fridge. Warm it up slightly before using, either in the microwave or on the stove. Use a sturdy container with a tight lid. Clear jars work best for showing off the layers. If you need to stack them, use parchment paper in between to prevent sticking. This blog covered the key steps to make Salted Caramel Brownie Trifles. We explored essential and optional ingredients, plus recommended brands. I shared easy instructions for brownies and caramel. You learned how to layer for beauty and avoid common mistakes. We reviewed delicious variations and storage tips. Enjoy making these trifles for any occasion. They are tasty, fun, and a crowd-pleaser. Your friends and family will love them!

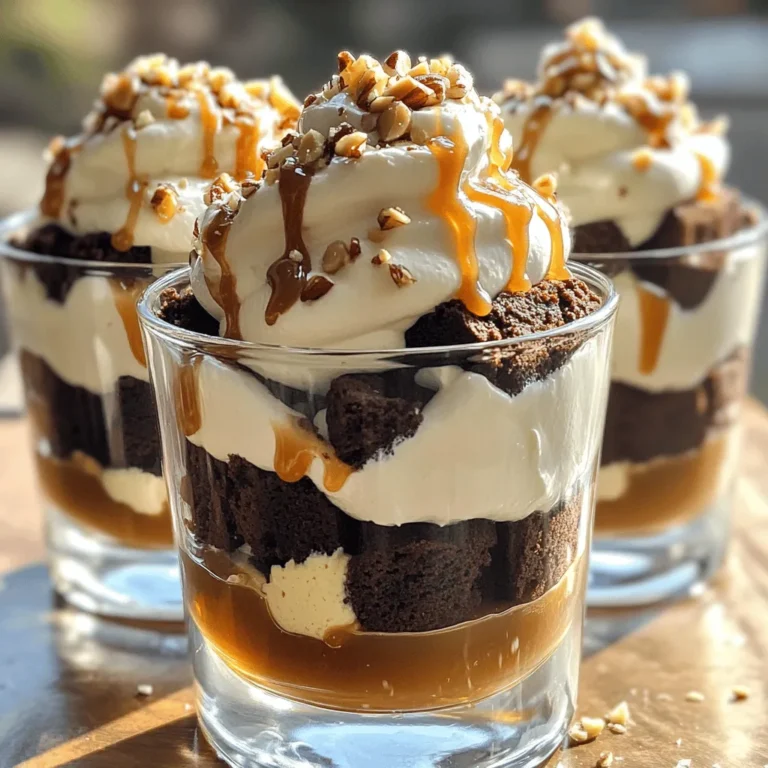
Salted Caramel Brownie Trifles Irresistible Delight

To make a tasty cheesy taco casserole, gather these key ingredients: - 1 lb ground beef or turkey - 1 can (15 oz) black beans, drained and rinsed - 1 cup corn kernels (can be fresh, frozen, or canned) - 1 packet taco seasoning - 1 cup salsa (your choice of spiciness) - 2 cups shredded cheddar cheese - 2 cups tortilla chips, roughly crushed These ingredients work together to create a flavorful and satisfying dish. The ground meat adds protein, while the black beans and corn give it a hearty texture. The taco seasoning brings a burst of flavor, and the cheese makes everything creamy and rich. For added flavor and color, consider these garnishes: - 1/2 cup sour cream (for serving) - 1/4 cup green onions, thinly sliced (for garnish) - Fresh cilantro, chopped (for garnish) These garnishes not only enhance the look of your casserole but also bring fresh flavors to each bite. Sour cream adds creaminess, while green onions and cilantro give a bright finish. Pair your cheesy taco casserole with these sides for a complete meal: - Simple green salad - Guacamole - Mexican rice These sides complement the casserole well. A fresh salad balances the richness of the dish, while guacamole adds creaminess and flavor. Mexican rice provides a nice base for scooping up the casserole. {{ingredient_image_2}} Start by heating your oven to 350°F (175°C). This helps the casserole cook evenly. Next, take a large skillet. Add the ground beef or turkey, and cook it over medium heat. Stir often for about 6-8 minutes. You want the meat to turn brown. If you see extra fat, drain it. This keeps your dish light and tasty. Now, add the black beans, corn, taco seasoning, and salsa to the skillet. Mix everything well. Heat this for about 3-4 minutes. This step blends the flavors nicely. Get a 9x13 inch baking dish and lightly grease it. Spread half of the crushed tortilla chips at the bottom. This forms a solid base. Next, spoon the meat and bean mix over the chips. Make sure to spread it out evenly. Then, take 1 cup of shredded cheddar cheese and sprinkle it on top. We want a nice cheesy layer here! After that, add the rest of the crushed tortilla chips. Follow this with the remaining meat mix. Top it all off with the last bit of cheese. This creates a melty topping. Now it’s time to bake! Place your dish in the oven. Bake for 20-25 minutes. You want the cheese to melt and bubble up. It should have a nice golden layer. Once ready, take the casserole out and let it sit for about 5 minutes. This helps the layers firm up. When serving, add a dollop of sour cream to each plate. Finish with green onions and cilantro for a fresh touch. Enjoy this cheesy taco delight! You can make this dish your own! Here are some fun ideas: - Add Veggies: Toss in diced bell peppers or zucchini for extra color and nutrition. - Change the Protein: Use ground chicken or a meat substitute for a different flavor. - Spice it Up: Add jalapeños or hot sauce if you like heat. - Cheese Variety: Experiment with different cheeses like pepper jack or Monterey jack. Want to make it a bit lighter? Here are some tips: - Lean Meat: Choose lean ground turkey or chicken to reduce fat. - Low-Fat Cheese: Use reduced-fat cheese to cut down on calories. - Swap Sour Cream: Try Greek yogurt instead of sour cream for a healthier option. - Whole Grain Chips: Use baked tortilla chips or whole-grain options for more fiber. Get the best out of your casserole with these handy tips: - Preheat the Oven: Always preheat your oven to ensure even cooking. - Perfect Layering: Layer your ingredients evenly to avoid soggy spots. - Rest Before Serving: Let it sit for 5 minutes after baking. This helps the layers set. - Keep an Eye on It: Watch closely while baking. You want that cheese to bubble but not burn! Pro Tips Use Lean Meat: Opt for lean ground beef or turkey to reduce the overall fat content in your casserole, making it healthier without sacrificing flavor. Add Extra Veggies: Consider adding bell peppers, zucchini, or diced tomatoes to the meat mixture for an extra boost of nutrition and flavor. Experiment with Cheese: While cheddar is classic, try mixing in Monterey Jack or pepper jack for a different flavor profile and a bit of heat. Make Ahead: Prepare the casserole a day in advance and refrigerate it. Just pop it in the oven when you're ready to serve for a quick and easy meal. {{image_4}} You can easily make this dish meat-free. Replace the ground meat with 1 cup of chopped mushrooms or 1 cup of textured vegetable protein. Add more black beans or chickpeas for protein. Use vegetable broth instead of meat broth if needed. You still use the same taco seasoning and salsa. Layer it just like the meat version. The cheese melts beautifully, and you will love it! Do you like heat? Add diced jalapeños or a can of green chiles to the meat mixture. You can also use spicy salsa for extra kick. Consider swapping cheddar cheese for pepper jack cheese. This adds a nice spicy flavor. Adjust the spice level as you like. Serve with cooling sour cream to balance the heat. Want a low-carb option? Skip the tortilla chips. Instead, use cauliflower rice as your base. Cook the cauliflower rice until soft, then layer it in the dish. Follow the same steps for the meat mixture and cheese. This version is still creamy and satisfying. You won't miss the chips at all! To store leftovers, let the casserole cool completely. Place it in an airtight container. You can keep it in the fridge for up to three days. Make sure to cover it well. This keeps the flavors fresh and prevents drying out. When you want to reheat, preheat your oven to 350°F (175°C). Cover the casserole with foil to keep it moist. Heat it for about 20 minutes. You can also microwave it. Put a slice on a microwave-safe plate. Heat for 1-2 minutes, checking to ensure it's hot all the way through. You can freeze Cheesy Taco Casserole too! First, let it cool completely. Wrap it tightly in plastic wrap, then foil. This helps prevent freezer burn. You can freeze it for up to three months. When ready to eat, thaw it in the fridge overnight before reheating. Yes, you can make Cheesy Taco Casserole ahead of time. Prepare the casserole, but do not bake it. Cover the dish with foil or plastic wrap and store it in the fridge for up to 24 hours. When ready, bake it straight from the fridge. Just add a few extra minutes to the baking time. This makes meal prep easy and quick for busy days. You have many options to substitute ground beef. Ground turkey is a great choice. It offers a leaner option with similar taste. You can also use ground chicken or even plant-based meat alternatives if you want a vegetarian dish. Each substitute brings its own flavor, making it fun to experiment. Making a gluten-free Cheesy Taco Casserole is simple. Use gluten-free tortilla chips and check the taco seasoning for gluten-free labels. Most salsa is gluten-free, but always verify the ingredients. With these swaps, you can enjoy a tasty casserole without gluten. This article covered everything you need to know about making a cheesy taco casserole. You learned the main ingredients, optional garnishes, and great sides. I walked you through step-by-step cooking instructions and shared tips for perfect results. You also saw variations for different tastes and how to store leftovers. In conclusion, this casserole is fun to make and easy to adjust. Enjoy creating delicious meals that your whole family will love!

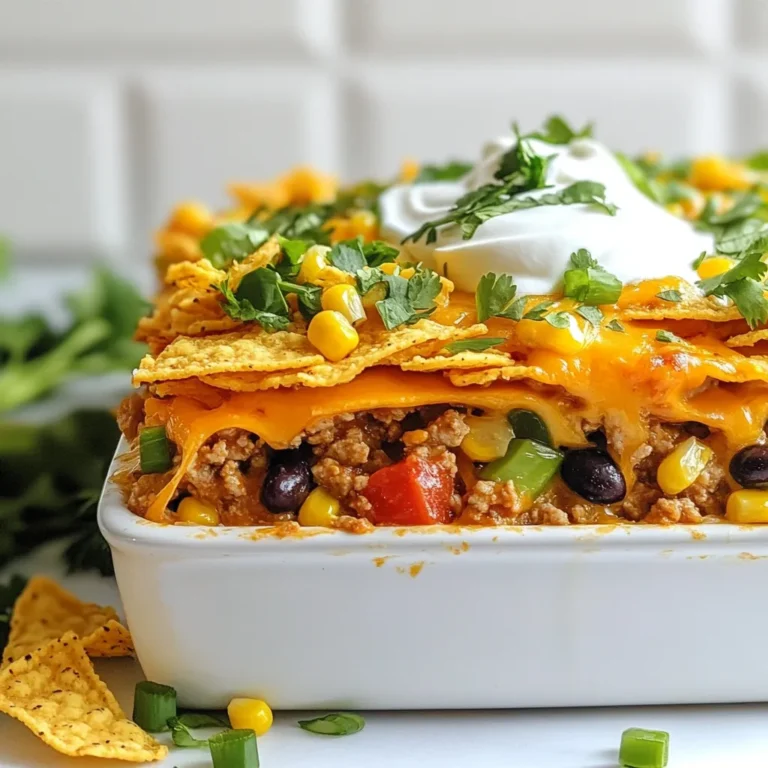
Cheesy Taco Casserole Tasty and Easy Dinner Recipe

- 1 cup raw cashews - 1/2 cup nutritional yeast - 1/2 cup water - 1 tablespoon fresh lemon juice - 1 teaspoon garlic powder - 1 teaspoon onion powder - 1 teaspoon smoked paprika - 1/2 teaspoon ground cumin - 1/2 teaspoon cayenne pepper (optional) - Salt, to taste - 1 diced jalapeño - 1 medium tomato, diced - 1/4 cup fresh cilantro, chopped To make Vegan Cashew Queso Dip, you need simple and healthy ingredients. Raw cashews form the base of this creamy dip. Soaking them softens the nuts, which makes blending easy. Nutritional yeast gives a cheesy flavor, while water helps adjust the dip's thickness. Fresh lemon juice adds brightness, and garlic powder and onion powder bring depth. Smoked paprika infuses a warm, smoky note, while cumin adds earthiness. For heat, add cayenne pepper based on your taste. Jalapeños and tomatoes add fresh crunch. Finally, cilantro gives a burst of color and flavor. Each ingredient plays a role in making this dip both tasty and healthy. If you need alternatives for cashews, try soaked sunflower seeds or tahini. They can mimic the creamy texture. Instead of nutritional yeast, some use vegan cheese. For spices, swap smoked paprika with regular paprika or chili powder. Adjust flavors based on what you like or have on hand. Your dip will still be tasty! Start by soaking 1 cup of raw cashews for at least 4 hours. This softens the nuts and makes them blend easier. After soaking, drain the cashews and rinse them under cold water. This removes any extra starch and gives your dip a clean taste. Next, place the drained cashews in a high-speed blender. Add in the following ingredients in this order: - 1/2 cup nutritional yeast - 1/2 cup water (adjust to your liking) - 1 tablespoon fresh lemon juice - 1 teaspoon garlic powder - 1 teaspoon onion powder - 1 teaspoon smoked paprika - 1/2 teaspoon ground cumin - 1/2 teaspoon cayenne pepper (if you want it spicy) - A pinch of salt Blend on high speed until the mixture becomes very smooth and creamy. Stop the blender to scrape down the sides as needed. If your dip is too thick, add more water a little at a time until you reach your desired consistency. After blending, transfer the creamy queso to a medium mixing bowl. Gently fold in the diced jalapeño and tomato for added flavor and texture. Taste your dip and adjust the salt or lemon juice to make it just right for you. For the best flavor, cover the dip and chill it in the fridge for at least 30 minutes. This allows all the flavors to mix well. After chilling, serve your queso dip with crispy tortilla chips or fresh veggie sticks. Enjoy! - Choosing the right blender: I prefer a high-speed blender. It makes the dip smooth and creamy. A regular blender may not blend cashews well. If you have a food processor, it can work too, but may take longer. - Scraping down sides for a smooth texture: During blending, stop and scrape down the sides. This ensures everything mixes well. A smooth dip is the goal, so take your time. - Pairing with tortilla chips: This dip shines with crispy tortilla chips. The crunch enhances the creamy texture. You can serve it in a bowl for easy dipping. - Using as a taco topping: Drizzle the dip over tacos for extra flavor. It adds a rich, creamy layer that pairs well with fresh ingredients. - Suggestions for serving with vegetables: Cut veggies like carrots, cucumbers, and bell peppers. They make a great dip option. It's a healthy choice that adds color and crunch. - Suggested spices and herbs: Feel free to add spices like chili powder or oregano. They can elevate the flavor. Fresh herbs like cilantro can also brighten the dip. - Tips for adjusting heat level: To make it spicier, add more cayenne or jalapeños. For a milder dip, leave out the seeds. Start small, and taste as you go. Adjust to your preference for the perfect heat. {{image_4}} To make your queso extra spicy, add more jalapeños. You can use diced jalapeños for heat or keep them whole for a milder touch. Want to mix things up? Try adding spices like cayenne or chili powder. These spices boost the flavor and kick up the heat. Adjust the amounts to suit your taste. For a smoky twist, add a few drops of liquid smoke to your dip. This gives it a rich, campfire-like flavor. You can also toss in roasted vegetables, like bell peppers or corn. Roasting adds depth to the dip and enhances its taste. Blend them in for a unique, hearty version. To amp up the cheesy flavor, try using miso paste. It brings a savory, umami taste that makes your dip even better. Experiment with different flavors of nutritional yeast. Some have a nutty or cheesy taste that can change the dip's profile. Use these tips to make your vegan queso truly your own! Store your vegan cashew queso dip in an airtight container. This keeps it fresh and tasty. Make sure the lid is tight. It helps block air and moisture. Place the container in the fridge for best results. You can keep the dip in the fridge for about 4 to 5 days. After this, the flavor can change. Look for signs of spoilage. If you see any mold or off smells, throw it away. When you reheat the queso, use a gentle method. A microwave works well, but stir every 30 seconds. This keeps it creamy. You can also heat it on the stove. Stir it often to avoid separation. If it gets too thick, add a little water to smooth it out. Yes, you can make this dip ahead of time. To prepare it in advance, follow these steps: - Soak the cashews: Soak them for at least four hours before blending. - Blend and chill: Prepare the dip as directed. Cover it and chill for at least 30 minutes. - Flavor boost: Making it a day ahead can enhance the flavors. Yes, Vegan Cashew Queso is healthy. Here are some nutritional benefits of its main ingredients: - Cashews: Rich in healthy fats, protein, and minerals like magnesium. - Nutritional yeast: Packed with B vitamins and adds a cheesy flavor. - Tomatoes: High in vitamins C and K, plus antioxidants. - Jalapeños: Provide vitamin C and may boost metabolism. Yes, you can freeze this dip. Here are best practices for freezing and thawing: - Freeze in an airtight container: This helps prevent freezer burn. - Thaw in the fridge: Let it sit in the fridge overnight. - Reblend if needed: After thawing, reblend to restore creaminess. This dip is fun to make and enjoy at any time! Making Vegan Cashew Queso at home is easy and fun. We covered the key ingredients and how to blend them. I shared tips on flavor enhancements and serving ideas. Experiment with variations to find your perfect dip. Remember to store it right for freshness. Enjoy this dip with your favorite snacks, or use it as a taco topping. With practice, you’ll impress everyone with your culinary skills. Dive into this delicious recipe and make it your own!

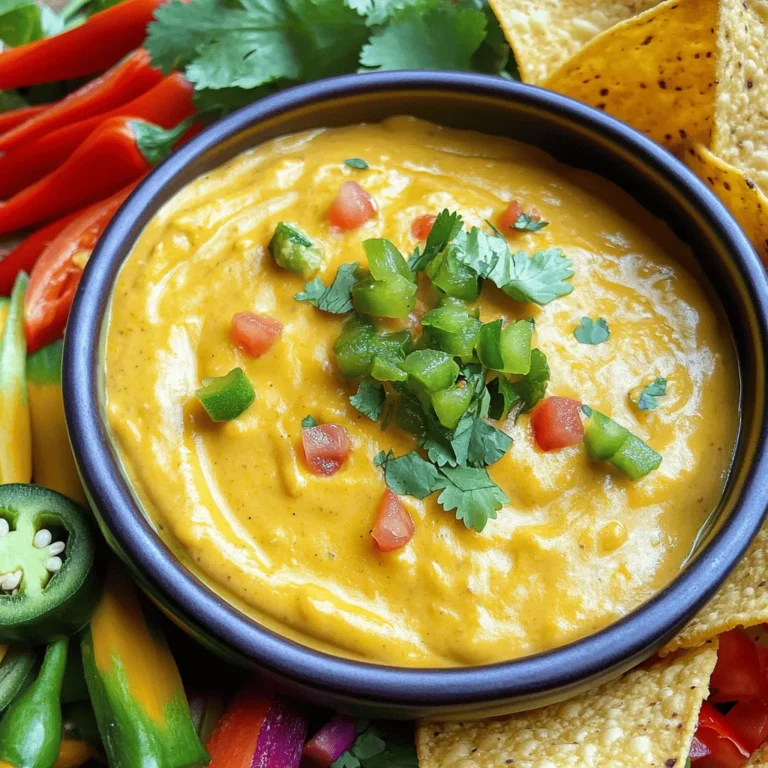
Vegan Cashew Queso Dip Delicious and Easy Recipe

- 1 ½ cups all-purpose flour - 1 teaspoon baking powder - 1 teaspoon baking soda - ½ teaspoon salt - 1 teaspoon ground cinnamon - ½ teaspoon ground nutmeg - ½ teaspoon ground ginger - ½ cup granulated sugar - ½ cup brown sugar, packed - 1 cup canned pumpkin puree - ½ cup vegetable oil - 2 large eggs - 1 teaspoon vanilla extract - 8 oz cream cheese, softened at room temperature - ¼ cup powdered sugar - 1 teaspoon vanilla extract - 1 large egg In this recipe, I use simple ingredients that create a warm, cozy flavor. The dry mix combines flour, baking powder, soda, and spices. The spices, like cinnamon and nutmeg, give the muffins that classic fall taste. The wet mix features both granulated and brown sugar for a nice balance. I love adding pumpkin puree; it keeps the muffins moist and adds a lovely orange hue. Vegetable oil makes the batter light and fluffy, while eggs and vanilla extract add richness and depth. For the cream cheese swirl, I use softened cream cheese, which blends well with powdered sugar and a touch of vanilla. A little egg helps bind it all together, creating a smooth mixture. This creamy layer brings a delightful contrast to the spiced pumpkin. Gather these ingredients, and you’re set for a delicious baking adventure! You'll be amazed at how well they blend to create the perfect muffin. First, you need to preheat your oven to 350°F (175°C). This temperature helps the muffins rise nicely. While the oven heats, prepare your muffin tin. You can line it with paper liners or grease each cup lightly. This step prevents the muffins from sticking. In a medium bowl, whisk together the dry ingredients. Use 1 ½ cups of all-purpose flour, 1 teaspoon of baking powder, 1 teaspoon of baking soda, and ½ teaspoon of salt. Add 1 teaspoon of ground cinnamon, ½ teaspoon of ground nutmeg, and ½ teaspoon of ground ginger. Mix these well so the spices are evenly spread. Next, grab a large bowl for the wet mix. Combine ½ cup of granulated sugar and ½ cup of packed brown sugar. Add 1 cup of canned pumpkin puree, ½ cup of vegetable oil, 2 large eggs, and 1 teaspoon of vanilla extract. Use a whisk or an electric mixer to blend these until smooth and uniform. Now, it’s time to combine the dry and wet mixes. Gradually add the dry ingredients from the first bowl into the wet mixture. Stir gently, just until everything is combined. It's okay if the batter has a few lumps; overmixing can make the muffins tough. In a small bowl, make the cream cheese mixture. Beat 8 oz of softened cream cheese with ¼ cup of powdered sugar and 1 teaspoon of vanilla extract. Add 1 large egg to this mix. Beat until you have a smooth and creamy texture. With a spoon or scoop, fill each muffin cup with the pumpkin batter until they are about two-thirds full. Next, place about one tablespoon of the cream cheese mixture on top of each filled muffin cup. Take a toothpick or the back of a small spoon and gently swirl the cream cheese into the pumpkin batter. Aim for a pretty marbled look. Place your muffin tin in the preheated oven. Bake for 20-25 minutes. To check for doneness, insert a toothpick into the center. It should come out clean or with a few moist crumbs attached. Once done, let the muffins cool in the pan for about 5 minutes. Then transfer them to a wire rack to cool completely. To get fluffy muffins, you must avoid overmixing. When you mix the dry and wet ingredients, stir gently. It’s okay to have some lumps; they help keep your muffins light. Overmixing can make them tough. Aim for a just-combined batter for the best results. You can boost the flavor with a few simple spices. Adding a pinch of allspice or cloves can give a warm kick. You might also try a splash of maple syrup for sweetness. Another option is to mix in chopped nuts or chocolate chips for a fun twist. To make your muffins look special, dust them with powdered sugar. This adds a nice touch and sweetness. Serve them warm for the best experience. A pat of butter on top while they are still warm melts beautifully. Enjoy them with a hot cup of coffee or tea for a cozy treat! {{image_4}} You can swap cream cheese with Greek yogurt or ricotta. Greek yogurt adds a tangy twist and keeps muffins moist. Ricotta gives a lighter texture and a subtle flavor. Both options work well in the swirl. Just keep the same amount, about eight ounces. For a gluten-free option, use almond flour or a gluten-free blend. Almond flour gives a nutty taste and moist texture. A gluten-free blend often works best for muffins, keeping the texture fluffy. Always check the package for the right amount to use. Mix in some chopped nuts, chocolate chips, or dried fruit for extra flavor. Walnuts or pecans add crunch. Chocolate chips bring sweetness and fun. Dried cranberries or raisins offer a chewy texture. Aim for about half a cup of your favorite mix-ins to keep muffins balanced. To keep your pumpkin cream cheese swirl muffins fresh, store them at room temperature. Use an airtight container to prevent drying out. If you live in a humid area, keep them in the fridge. They will stay good for about 3 to 5 days. You can also place parchment paper between layers to avoid sticking. Freezing muffins is easy and keeps them tasty. First, let the muffins cool completely. Wrap each muffin in plastic wrap. Then, place them in a freezer bag or airtight container. They will last up to 3 months. To thaw, simply leave them at room temperature for a few hours or microwave for 15-20 seconds. This way, they stay moist and delicious. Reheating muffins brings back their warm, cozy feel. The best way is to use the oven. Preheat it to 350°F (175°C). Place the muffins on a baking sheet for about 10 minutes. If you're in a hurry, you can use the microwave. Heat for 10-15 seconds. Enjoy your muffins warm, with some butter if you like! Yes, you can use fresh pumpkin. However, it needs some prep. First, peel and chop the pumpkin. Then, steam or roast it until soft. After that, mash it until smooth. Fresh pumpkin has a different moisture level than canned. You may need to adjust the flour. Start with a little less flour, then add more if needed. Fresh pumpkin can add a bright taste and a bit of texture to your muffins. These muffins stay fresh for about three to five days. Keep them in an airtight container at room temperature. This keeps them soft and moist. If you want to extend their life, you can store them in the fridge. They can last up to a week there. Remember, the cream cheese swirl can make them spoil faster. Always check for signs of mold or an off smell before eating. Yes, you can prepare the batter ahead of time. Mix up the wet and dry ingredients separately. Then, keep them in the fridge for up to 24 hours. When you're ready to bake, just combine them. If the batter thickens, add a splash of milk to loosen it. This helps keep the muffins fluffy and light. Just remember to swirl in the cream cheese mix right before baking for the best taste! This blog post covered everything you need to make delicious pumpkin muffins. We discussed the right ingredients, clear steps, and helpful tips for success. You learned how to create the perfect texture and flavor, plus how to customize your muffins. Store your treats properly for long-lasting freshness. Now, you're ready to bake and share your tasty creations. Enjoy the process and the yummy results!

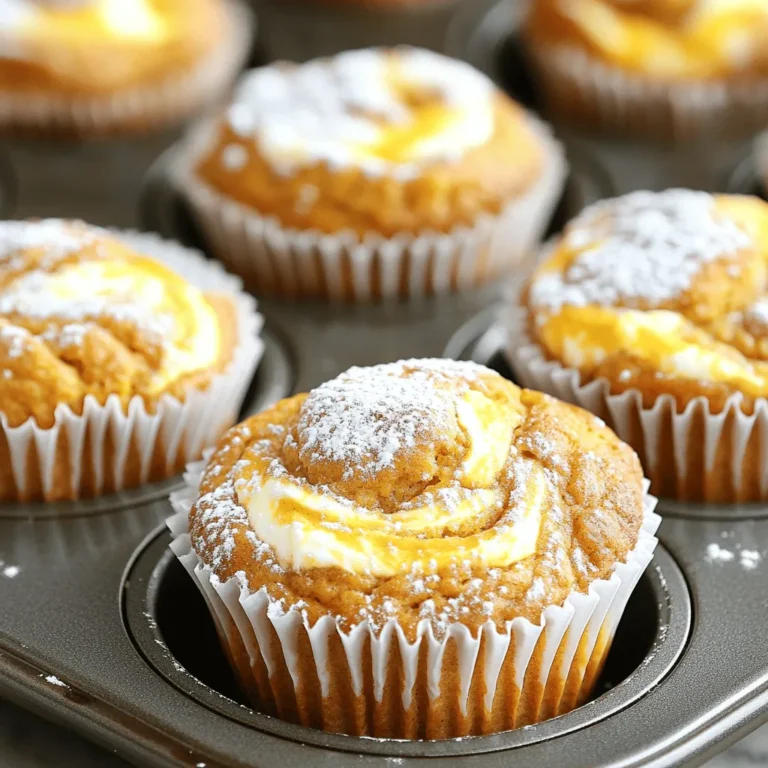
Pumpkin Cream Cheese Swirl Muffins Tasty and Cozy Treat

- 8 oz cream cheese, softened to room temperature - 1/2 cup powdered sugar - 1 tsp vanilla extract - 1/2 cup sour cream - 1 cup caramel sauce (store-bought or homemade) - 1 large apple (Granny Smith or Honeycrisp), diced into small pieces - 1/2 cup crushed graham crackers - 1/4 cup chopped pecans (optional) - Additional caramel sauce for drizzling on top The cream cheese forms the base of the dip. It gives a rich and creamy texture. The powdered sugar adds sweetness, while the vanilla extract gives a warm flavor. Sour cream adds tanginess, balancing the sweetness. The caramel sauce brings that classic caramel flavor, making every bite special. Diced apples add freshness and crunch, while graham crackers give a nice texture. Chopped pecans add extra crunch if you want it. - Cinnamon (for warmth) - Nutmeg (for spice) - Chocolate chips (for sweetness) - Toasted coconut (for a tropical twist) You can add cinnamon or nutmeg for a warm flavor. Chocolate chips make the dip sweeter. Toasted coconut adds a fun tropical taste. These options let you customize the dip to your liking. - Use Greek yogurt instead of sour cream for a healthier option. - Swap the cream cheese for mascarpone for a different texture. - Choose different apples like Fuji or Gala based on your taste. If you want to make it lighter, Greek yogurt is a good swap. Mascarpone can give a creamier texture. Different apples can change the flavor, so feel free to experiment. Start by grabbing a big mixing bowl. You need to beat 8 oz of softened cream cheese. Use an electric mixer to make it smooth. Add 1/2 cup of powdered sugar and 1 tsp of vanilla extract. Mix until it is creamy and there are no lumps. Next, stir in 1/2 cup of sour cream. Beat it again until everything blends well. The mixture should look nice and smooth. Now, it’s time for the fun part! Take 1 large diced apple and fold it into the cream cheese mix. I love using Granny Smith for a tart taste or Honeycrisp for sweetness. Make sure the apples mix evenly so every bite has flavor. Then, pour in 1 cup of caramel sauce. Gently stir to combine. This adds that sweet, sticky goodness you want. Transfer the creamy dip into a nice serving dish. Spread it out so it looks even. Drizzle more caramel sauce over the top. It should look inviting! Next, sprinkle 1/2 cup of crushed graham crackers on top. If you like, add 1/4 cup of chopped pecans for crunch. For a final touch, drizzle a little more caramel on top. Serve with fresh apple slices, pretzels, or vanilla wafers around the dip. This makes it look pretty and invites everyone to dig in! To get the best creamy texture, start with softened cream cheese. This is key. Use an electric mixer for smooth results. Mix until it looks fluffy. Gradually add powdered sugar and vanilla. Keep mixing until the sugar blends in well. Then add sour cream slowly. Beat again until it’s lump-free. This makes your dip rich and velvety. Serve the dip in a shallow bowl. This makes it easy to scoop. Drizzle caramel sauce on top for a beautiful finish. You can add crushed graham crackers and pecans for texture. Pair it with fresh apple slices. Pretzels and vanilla wafers also work great. This mix of flavors will wow your guests. You can make this dip in advance. Prepare it up to two days ahead. Just store it in the fridge. Keep it covered to stay fresh. Add the toppings right before serving. This keeps everything crunchy. You’ll have more time to enjoy your guests when they arrive! {{image_4}} You can make this dip even better with extra flavors. Try adding cinnamon for warmth. A pinch of nutmeg gives a nice spice too. You can also use different extracts. Almond extract adds a unique twist. Just remember, a little goes a long way! While apples are the star, you can switch things up. Pears work well if you want a softer fruit. For a tropical vibe, try adding diced mango or pineapple. You can also top the dip with chocolate chips for extra sweetness. Fresh berries add color and a tart taste. Want a lighter version? Use Greek yogurt instead of sour cream. It gives a creamy texture with less fat. You can swap cream cheese for a low-fat version too. For sweetening, try honey or maple syrup instead of powdered sugar. These options keep the dip delicious while making it a bit healthier. Store any leftover caramel apple cheesecake dip in an airtight container. Keep it in the fridge for up to three days. Make sure to cover it well to keep it fresh. If the dip seems thick after chilling, just give it a quick stir before serving again. You can freeze this dip, but it may change texture. To freeze, place it in a freezer-safe container. Seal it tightly to avoid freezer burn. It can last for about one month. When ready to eat, thaw it in the fridge overnight. Stir again to help restore its creamy texture. Use glass or plastic containers with tight lids for the best storage. Glass jars keep flavors fresh and are easy to clean. If you use plastic, make sure it is BPA-free. Label your containers with the date, so you remember when you made it. Yes, you can make this dip ahead of time. I suggest preparing it a few hours before your guests arrive. Just store it in the fridge. This allows the flavors to blend well. If you want to make it even earlier, you can prep it a day ahead. Just add the toppings right before serving for the best look. I love using Granny Smith apples for their tartness. They add a nice contrast to the sweet dip. Honeycrisp apples are another great choice. They bring a sweet crunch that pairs well with the creaminess of the dip. Feel free to mix both types for a fun flavor combo! Definitely! To make this dip gluten-free, simply swap out regular graham crackers for gluten-free ones. Many brands offer tasty gluten-free options now. You can also skip the graham crackers if you want. This dip is still delicious and creamy without them! Caramel apple cheesecake dip is easy and fun to make. We explored its key ingredients, like cream cheese and caramel, and discussed how you can customize flavors. I shared step-by-step instructions and tips for perfect texture and presentation. Don't forget to consider variations and storage tips to enjoy your dip longer. As you dive into making this treat, remember it’s all about having fun and sharing with others. Get creative, and enjoy each bite!

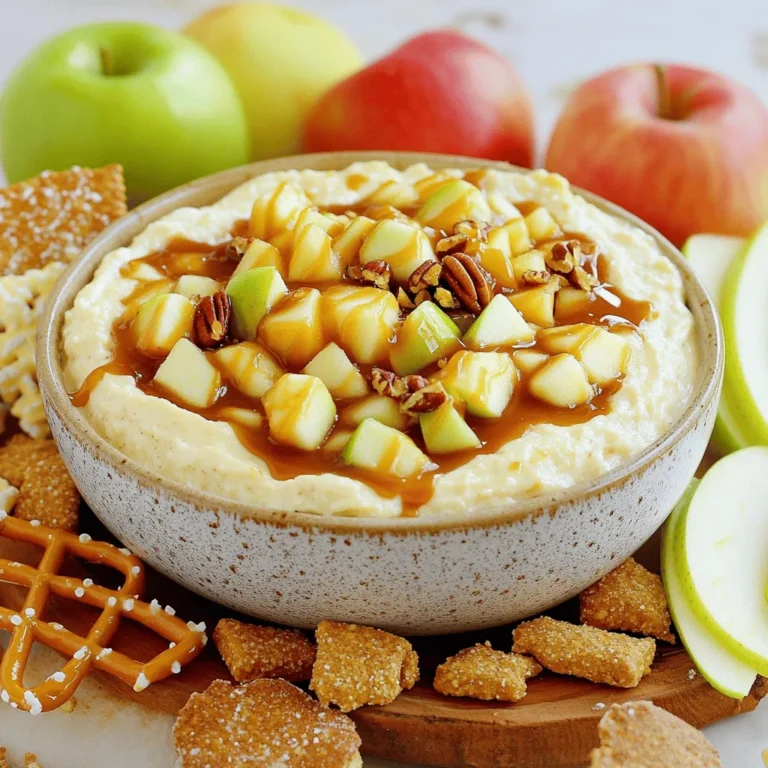
Caramel Apple Cheesecake Dip Delectable and Easy Recipe

- 1 pound chicken breast, diced - 2 tablespoons chipotle sauce - 1 teaspoon ground cumin - 1 teaspoon garlic powder - 1 cup brown rice - 2 cups chicken broth (or water) The heart of the Chipotle Chicken Burrito Bowl is the chicken. I use diced chicken breast, as it cooks quickly and stays juicy. Marinating it in chipotle sauce, ground cumin, and garlic powder gives it a smoky kick. The brown rice adds a hearty base, and using chicken broth instead of water enhances the flavor. - 1 can black beans, drained and rinsed - 1 cup corn (fresh or frozen) - 1 red bell pepper, diced - 1 avocado, diced - 1 cup cherry tomatoes, halved - ½ cup fresh cilantro, chopped I love to load my burrito bowls with fresh toppings. Black beans and corn add protein and sweetness. Red bell pepper gives a nice crunch, while cherry tomatoes bring juiciness. Diced avocado adds creaminess, and fresh cilantro brightens the dish. - Shredded cheese, sour cream, sliced jalapeños - Olive oil for cooking - Salt and pepper to taste - Juice of 1 lime For those who want extra flavor, I recommend adding shredded cheese and sour cream. Sliced jalapeños can bring heat. A splash of lime juice ties everything together, while a drizzle of olive oil enhances the cooking process. Don't forget to season with salt and pepper! To start, take 1 pound of diced chicken breast. In a medium bowl, mix the chicken with 2 tablespoons of chipotle sauce, 1 teaspoon of ground cumin, and 1 teaspoon of garlic powder. Add salt and pepper to taste. Stir well so each piece is coated. Cover the bowl and place it in the fridge. Chill for at least 30 minutes. This marination makes the chicken flavorful and tender. Next, let's cook the rice. Boil 2 cups of chicken broth or water in a medium saucepan. Once it reaches a rapid boil, stir in 1 cup of brown rice. Lower the heat and cover the pot. Let it simmer for 30-35 minutes. When the rice is done, remove it from heat. Use a fork to fluff the rice gently. This will give it a nice texture. Now, heat 1 tablespoon of olive oil in a large skillet over medium-high heat. Add the marinated chicken to the pan, making sure it spreads out. Cook for 7-10 minutes. Stir occasionally until the chicken is golden and cooked through. In the same skillet, add more olive oil if needed. Sauté 1 diced red bell pepper for 3-4 minutes. If you have corn, toss it in now to warm it up. It's time to build your burrito bowls! In individual serving bowls, start with a base of fluffy brown rice. Layer on the sautéed chicken, black beans, bell pepper, and corn. Add halved cherry tomatoes and diced avocado on top. This creates a colorful and tasty dish. To finish, squeeze fresh lime juice over each bowl. This adds a zesty kick. You can also sprinkle chopped cilantro on top for freshness. For extra flavor, offer optional toppings like shredded cheese, sour cream, or spicy sliced jalapeños. These small additions can make a big difference! For the best flavor, marinate your chicken for at least 30 minutes. If you have time, try to let it sit longer. This helps the spices soak in well. When cooking, use medium-high heat to get a nice sear. This gives the chicken a golden color. Stir it a few times to cook evenly. Aim for 7 to 10 minutes until it is fully cooked and juicy. To avoid mushy rice, start with boiling chicken broth or water. Once it boils, add the brown rice and lower the heat. Cover the pot tightly and let it simmer. Cooking for 30 to 35 minutes gets the rice tender. After cooking, fluff it with a fork to separate the grains. If you want alternatives, consider quinoa or cauliflower rice. Both options add unique flavors and textures. Quinoa is high in protein, while cauliflower rice is low in carbs. For extra taste, try adding spices like smoked paprika or chili powder. You can also mix in some fresh herbs like oregano or thyme. Adjust the spice levels to your liking. If you enjoy heat, add more chipotle sauce or diced jalapeños. Customizing ingredient ratios can make your burrito bowl unique. If you love avocado, add more. If you prefer less rice, reduce the amount. This way, every bowl will suit your taste perfectly. {{image_4}} For a vegetarian version, you can swap out the chicken for hearty substitutes. Try using grilled tofu, tempeh, or even jackfruit. These plant-based proteins soak up flavors well. You can marinate them just like the chicken. This keeps the dish packed with flavor. Want to lower carbs? Use cauliflower rice instead of brown rice. Just pulse cauliflower in a food processor until it resembles rice. Sauté it with olive oil for a tasty base. You can also use vegan cheese or skip cheese for a dairy-free option. These swaps help keep it light. Add different sauces to change the taste. Try salsa verde for a zesty kick or a creamy chipotle sauce for more heat. You can also add fruits for sweetness. Diced mango or pineapple brighten up your bowl. Mix and match to find your favorite combination. To keep your Chipotle chicken burrito bowls fresh, choose good storage containers. Glass or BPA-free plastic containers work best. Make sure they have tight lids to keep air out. Let the food cool down before sealing it. This step helps avoid condensation, which can make your food soggy. I usually let the bowls sit out for about 30 minutes before storing them. When it's time to eat again, use the microwave for quick reheating. Place the bowl in the microwave and cover it with a damp paper towel. This method keeps the food moist. Heat in 30-second intervals until hot. You can also reheat on the stove. Just add a bit of olive oil to a pan and cook over medium heat. Stir gently to warm all parts evenly. To keep ingredients fresh, separate the toppings. Store items like avocado and tomatoes in separate containers. This way, they won’t get mushy or lose their crunch. Yes, you can freeze burrito bowl components! Cooked chicken, rice, and beans freeze well. Just make sure they cool completely before freezing. Use airtight containers or freezer bags to prevent freezer burn. When you're ready to use them, let them thaw in the fridge overnight. You can also use the microwave for quick thawing. Just be sure not to overheat, as this can dry them out. Once thawed, reheat as mentioned before and add fresh toppings for a delicious meal! It takes about 40 minutes to prep and cook these bowls. You will spend 30 minutes marinating the chicken. The rice cooks for about 30-35 minutes. Overall, from start to finish, you can enjoy these flavorful bowls in about an hour. Yes! You can add any toppings you like. Try using shredded cheese or sour cream. You can also include spicy jalapeños or fresh herbs. Personalize your burrito bowl to match your taste. Mix and match your favorite flavors for a unique meal. Absolutely! You can prep the chicken and rice a day before. Store them in the fridge in airtight containers. When ready to eat, simply reheat and assemble your bowls. This makes for an easy meal prep option that saves time. Pair these bowls with tortilla chips and salsa for a fun crunch. You might also enjoy a fresh side salad for extra veggies. A zesty corn salad can complement the flavors too. These sides enhance the meal and make it more filling. You can find similar burrito bowls at many fast-casual restaurants. Look for places that specialize in Mexican or Tex-Mex food. Some popular chains offer burrito bowls with customizable options. Check local eateries for fresh and tasty versions too. In this post, we explored how to make delicious Chipotle Chicken Burrito Bowls. We covered key ingredients, step-by-step cooking instructions, and helpful tips. You can customize your bowl with fresh toppings or even make a vegetarian version. Remember, storing and reheating leftovers properly will keep them tasting great. Enjoy crafting these tasty meals that fit your taste and lifestyle. Start your cooking journey today and impress your family and friends!

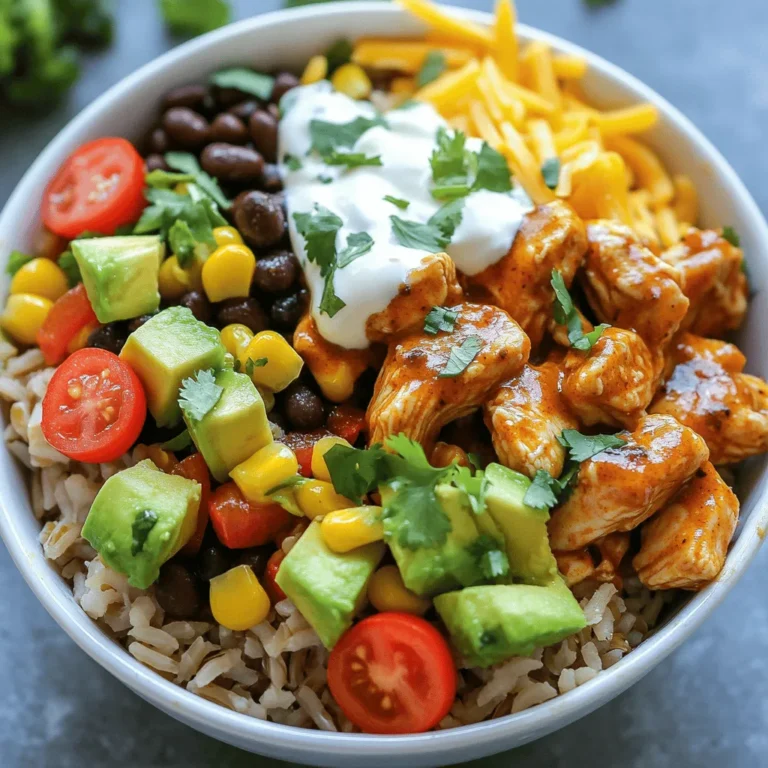
Chipotle Chicken Burrito Bowls Packed with Flavor

- 8 slices of thick bread (challah or brioche) - 3 medium-sized apples (peeled, cored, and diced) - 4 large eggs - 2 cups whole milk (or dairy alternative) - 1/4 cup packed brown sugar - 1 teaspoon pure vanilla extract - 1 teaspoon ground cinnamon (plus extra for garnish) - 1/4 teaspoon ground nutmeg - 1/4 cup chopped walnuts (optional) - Maple syrup (for serving) To make Apple Cinnamon French Toast Bake, you'll need the right ingredients. I love using thick bread like challah or brioche. They soak up the egg mixture well and add a rich flavor. You'll also need fresh apples, which give a nice crunch and sweetness. Eggs and milk create a creamy base. I recommend whole milk, but any dairy alternative works too. Brown sugar adds depth, while vanilla and spices like cinnamon and nutmeg bring warmth to the dish. If you want some crunch, add walnuts. Maple syrup is a must for serving. It complements the flavors and adds sweetness. Gather these ingredients before you start. Having everything ready makes cooking easier and more fun! - Preheat oven to 350°F (175°C). - Grease a 9x13-inch baking dish with butter or cooking spray. - Cube the thick bread slices into 1-inch pieces. - In a bowl, mix the diced apples with brown sugar and cinnamon. - Layer half of the bread cubes in the greased dish. - Spread the apple mixture evenly over the bread. - Add the rest of the bread cubes on top of the apple layer. - In a bowl, whisk eggs, milk, brown sugar, vanilla, cinnamon, and nutmeg. - Pour this egg mixture over the layered bread and apples. - Cover the dish with aluminum foil and let it sit for 15 minutes. - This helps the bread soak up the flavors. - After 15 minutes, remove the foil and bake for 35-40 minutes. - Look for a golden brown top and a firm center with a slight jiggle. For the best flavor and texture, I love using challah or brioche. These breads soak up the egg mixture well. Their rich taste makes the dish feel special. Cut the bread into 1-inch cubes for even cooking. Use a sharp knife to get clean cuts. This helps each piece soak up the mix evenly. You can boost the flavor by adding extra spices. Try a pinch of allspice or ginger for warmth. A splash of almond extract also works well. If you want to sweeten it differently, consider using maple sugar or honey. These options add unique notes to your bake. Get creative with your toppings! Fresh fruits like berries or sliced bananas add color and flavor. You can also sprinkle powdered sugar on top for a sweet touch. For a fancy look, place the bake on a large platter. Garnish with thin apple slices and cinnamon sticks. This makes your dish ready for any special occasion! {{image_4}} You can easily switch out the apples in this recipe. Try using berries, peaches, or pears instead. Each fruit brings a unique taste. For a twist, mix dried fruits like raisins or cranberries. Just soak them in warm water first to plump them up. This adds flavor and texture to your bake. If you need gluten-free bread, use a suitable loaf made from rice or almond flour. Look for brands that are soft to match the bread texture. For a vegan version, swap the eggs for flax eggs. Mix one tablespoon of flaxseed with three tablespoons of water. Let it sit until it thickens. Use almond or oat milk in place of whole milk. These options keep the dish tasty and friendly for everyone. To make this bake even more exciting, add chocolate chips or raisins. They melt and create sweet pockets in every bite. You can also add spices like ginger or allspice for extra warmth. Just a pinch will do! These fun additions will surprise your taste buds and keep you coming back for more. Store any leftovers in an airtight container. This keeps them fresh and tasty. Your Apple Cinnamon French Toast Bake will last about 3 to 4 days in the fridge. Make sure to cool it to room temperature before sealing it up. You can freeze the bake either before or after cooking. If freezing before baking, cover it tightly with foil. This way, it stays fresh for about 2 months. To freeze after baking, let it cool completely first. Then, wrap it in foil and place it in a freezer-safe bag. When you want to enjoy your bake, thaw it in the fridge overnight. If you froze it before baking, you can bake it straight from the freezer. Just add about 10-15 minutes to the baking time. To reheat, the oven is your best friend. Preheat it to 350°F (175°C). Place the bake in a baking dish and cover it with foil. Heat for about 15-20 minutes until warm. This keeps the texture nice and soft. If you use a microwave, slice the bake into pieces. Heat for about 30-45 seconds. Check if it’s warm enough. Microwaving may make it a bit soggy, so I prefer the oven. Enjoy your delicious treat again! Yes, you can prepare this dish the night before. Here’s how: - Mix the Ingredients: Follow the recipe until you pour the egg mixture over the bread and apples. - Cover and Chill: Cover the baking dish with foil and place it in the fridge overnight. This helps the bread soak up the flavors. - Baking: The next morning, simply preheat your oven and bake. You might need to add a few extra minutes to the baking time. This dish pairs well with many sides. Here are a few ideas: - Fresh Fruit: Sliced bananas, strawberries, or a berry medley add freshness. - Yogurt: A dollop of plain or flavored yogurt adds creaminess. - Bacon or Sausage: Crispy bacon or sausage links provide a savory contrast. - Whipped Cream: A light topping of whipped cream makes it extra special. Look for these signs to check if your bake is ready: - Color: The top should be golden brown and slightly crisp. - Firmness: The center should feel firm but still have a slight jiggle. - Toothpick Test: Insert a toothpick in the center. If it comes out clean, your bake is done. Enjoy making this delightful dish! This apple cinnamon French toast bake combines simple ingredients with easy steps. You can enjoy it with family or friends for any meal. Remember, you can tweak flavors and add your favorite fruits. Storing leftovers is simple too—just follow the tips provided. Try this dish to impress your guests or treat yourself on a cozy day. Happy cooking!

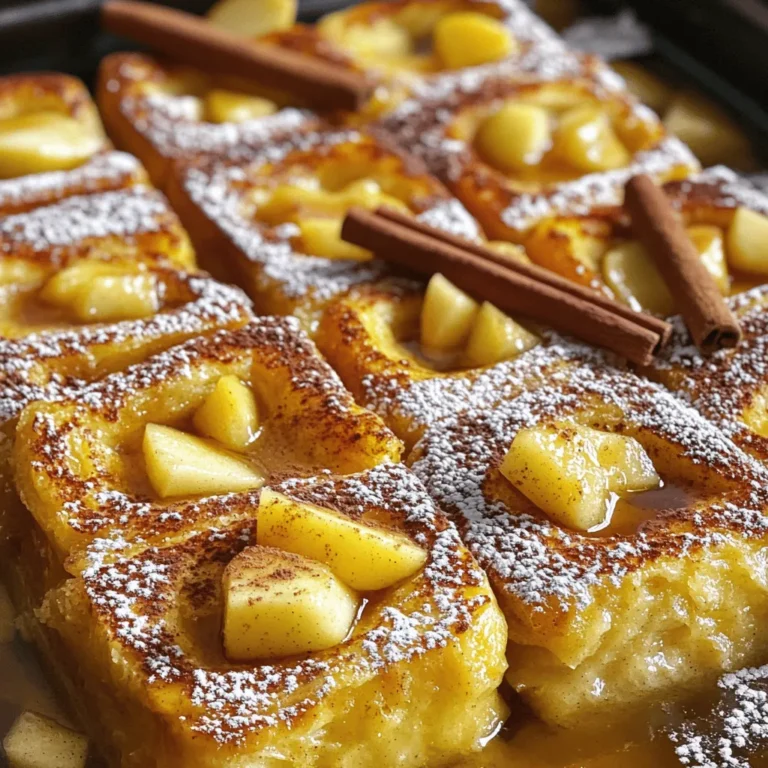
Apple Cinnamon French Toast Bake Quick and Tasty Recipe

- 1 pound ground chicken - 1 tablespoon vegetable oil - 2 cloves garlic, minced - 1 inch fresh ginger, grated The main ingredients create a solid base for flavor. Ground chicken adds protein and richness. Vegetable oil helps cook the chicken and adds a subtle flavor. Garlic and ginger give a fragrant kick that makes this dish pop. - 1 red bell pepper, finely diced - 1 medium carrot, grated - 1 tablespoon fresh cilantro, chopped - 1/4 cup roasted peanuts, chopped (for garnish) Adding vegetables boosts nutrition and color. The red bell pepper brings a sweet taste and crunch. Grated carrot adds texture and sweetness. Fresh cilantro gives a bright flavor, while roasted peanuts add a satisfying crunch on top. - 1 tablespoon soy sauce - 2 tablespoons creamy peanut butter - 1 tablespoon fresh lime juice - 1 tablespoon honey Sauces and seasonings tie everything together. Soy sauce adds saltiness and depth. Creamy peanut butter gives that iconic nutty flavor. Fresh lime juice brightens the dish, while honey balances with a touch of sweetness. This combo creates a rich and flavorful sauce that coats the chicken and veggies perfectly. Start by warming 1 tablespoon of vegetable oil in a large skillet over medium heat. Add 2 cloves of minced garlic and 1 inch of grated ginger. Sauté these for about 1 minute. You want to stir often until they smell great. Next, add 1 pound of ground chicken to the skillet. Use a spatula to break it apart. Cook for about 5 to 7 minutes. Stir occasionally until the chicken turns brown and is fully cooked. Now, it’s time to add some color and crunch. Fold in 1 red bell pepper, finely diced, and 1 medium carrot, grated. Continue to sauté for another 3 to 4 minutes. The goal is to soften the veggies just a bit while keeping some of their bite. In a small bowl, whisk together 1 tablespoon of soy sauce, 2 tablespoons of creamy peanut butter, 1 tablespoon of fresh lime juice, and 1 tablespoon of honey. Mix until it is smooth and creamy. Pour this sauce over the chicken and vegetables in your skillet. Stir everything well to coat it evenly. Cook for another 2 to 3 minutes. This lets the flavors combine beautifully. Finally, gently stir in some chopped cilantro for a fresh kick. To serve, take the chicken mixture and spoon it into individual lettuce leaves. I like to use butter or iceberg lettuce for a nice crunch. For a finishing touch, sprinkle some chopped roasted peanuts on top. This adds an extra crunch that is just delightful. You can also garnish with extra cilantro and lime wedges for a vibrant presentation. Enjoy your flavorful Thai Peanut Chicken Lettuce Cups! To ensure your chicken is cooked properly, use a meat thermometer. The chicken should reach 165°F. This keeps it safe to eat and juicy. When sautéing vegetables, cut them into small pieces. This helps them cook evenly and fast. Add the red bell pepper and carrot after the chicken is browned. Cook them just until they are soft but still crisp. If your peanut sauce is too thick, add a little water or more lime juice. Whisk it well until it reaches your desired consistency. You can also vary the flavor by adding spices. Try a pinch of chili flakes for heat or a dash of sesame oil for depth. Plating is key for a great meal. Arrange the filled lettuce cups on a large platter. Garnish with extra cilantro leaves and roasted peanuts. This adds color and texture. Serve with lime wedges on the side. The lime juice will brighten the flavors and look fresh on the plate. {{image_4}} You can switch the ground chicken for ground turkey. Ground turkey has a lighter flavor. It still works well with the peanut sauce. If you want a plant-based option, try crumbled tofu or tempeh. These options soak up the flavors nicely and fit well in the cups. Feel free to get creative with your sauces. You can use almond butter or cashew butter instead of peanut butter. Each nut butter brings a new twist to the dish. For a kick, add some sriracha or chili paste to your sauce. This will give your cups a spicy edge. Add more veggies to your mix for extra crunch and color. Try diced cucumbers, shredded cabbage, or snap peas. These add freshness to each bite. You can also use seasonal veggies like zucchini or bell peppers in summer. They will keep your dish vibrant and tasty. After making Thai Peanut Chicken Lettuce Cups, store the chicken mixture in an airtight container. It keeps well in the fridge for up to three days. Make sure to let it cool before sealing. For the lettuce, store the leaves in a damp paper towel inside a plastic bag. This keeps them crisp. Use them within two days for the best taste. To reheat the chicken mixture, warm it in a skillet over medium heat. Stir it often to keep the texture nice. You can also microwave it in short bursts. For leftover sauce, heat it gently on the stove or in the microwave. This helps keep the rich flavors intact. Yes, you can freeze the chicken mixture. Place it in a freezer-safe container. It lasts up to three months frozen. When you are ready to eat, thaw it in the fridge overnight. Reheat it in a skillet or microwave before serving. Yes, you can prepare the chicken mix ahead. Cook the chicken and veggies. Store the mix in a container. Keep it in the fridge for up to two days. When ready to serve, reheat the mix. Spoon it into the lettuce cups, and enjoy! Lettuce cups pair well with many side dishes. Here are some options: - Steamed jasmine rice - Thai cucumber salad - Crispy spring rolls - Grilled vegetables These sides add variety and balance to your meal. Yes, this recipe can be made gluten-free. Use gluten-free soy sauce instead of regular soy sauce. Most other ingredients are gluten-free too. Always check the labels to be sure. Enjoy this tasty dish without the gluten worries! This post covered a tasty Thai Peanut Chicken Lettuce Cups recipe. You learned about key ingredients like ground chicken, garlic, and peanut butter, plus how to cook them right. I shared tips for storing leftovers and ideas for variations. Making these cups is a fun way to enjoy a meal. Try different proteins and vegetables to find your favorite. With these tips, you can impress your family and friends. Enjoy your cooking adventure!

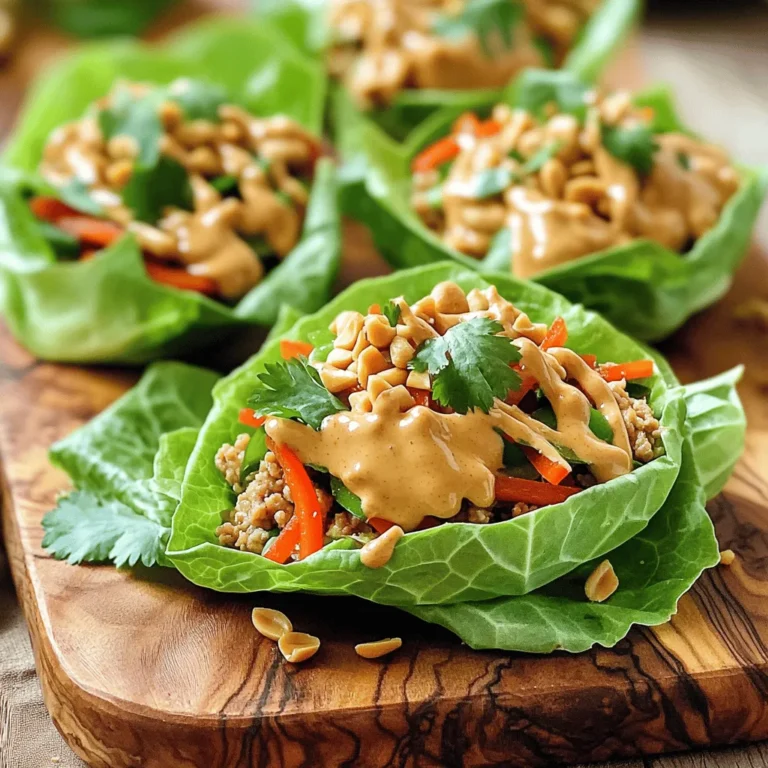
Thai Peanut Chicken Lettuce Cups Flavorful and Fresh Dish

PREV 1 … 9 10 11 … 20 NEXT
homedishhaven

explore

DessertsDinnerAppetizersDrinks

Our Policies

  • Cookie Policy
  • Copyright Policy
  • Disclaimer
  • GDPR Policy
  • Terms Of Use
Back to Top
  • About
  • Contact Us
  • Privacy Policy
© 2025 homedishhaven